
基本 Windows 操作
 |
|
根據您使用的電腦,操作方式可能會有所不同。
|
顯示印表機資料夾
Windows 7/Server 2008 R2
[開始 (Start)] 選擇 [檢視裝置和印表機 (View devices and printers)]。
[開始 (Start)]
 選擇 [檢視裝置和印表機 (View devices and printers)]。
Windows Server 2012
在畫面左下角按一下滑鼠右鍵 選擇 [控制台 (Control Panel)]
  [檢視裝置和印表機 (View devices and printers)]。
在畫面左下角按一下滑鼠右鍵
 選擇 [控制台 (Control Panel)]
  [檢視裝置和印表機 (View devices and printers)]。
Windows 8.1/Server 2012 R2
在 [開始 (Start)] 上按一下滑鼠右鍵 選擇 [控制台 (Control Panel)]
  [檢視裝置和印表機 (View devices and printers)]。
在 [開始 (Start)] 上按一下滑鼠右鍵
 選擇 [控制台 (Control Panel)]
  [檢視裝置和印表機 (View devices and printers)]。
Windows 10
[ ]
]  選擇 [Windows 系統 (Windows System)]
  [控制台 (Control Panel)]
  [硬體和音效 (Hardware and Sound)]
  [裝置和印表機 (Devices and Printers)]。
[
 ]
]  選擇 [Windows 系統 (Windows System)]
  [控制台 (Control Panel)]
  [硬體和音效 (Hardware and Sound)]
  [裝置和印表機 (Devices and Printers)]。
Windows Server 2008
[開始 (Start)] 選擇 [控制台 (Control Panel)]
  按兩下 [印表機 (Printers)]。
[開始 (Start)]
 選擇 [控制台 (Control Panel)]
  按兩下 [印表機 (Printers)]。
Windows Server 2016
在 [ ] 上按一下滑鼠右鍵
  選擇 [控制台 (Control Panel)]
  [硬體 (Hardware)]
  [裝置和印表機 (Devices and Printers)]。
在 [
 ] 上按一下滑鼠右鍵
  選擇 [控制台 (Control Panel)]
  [硬體 (Hardware)]
  [裝置和印表機 (Devices and Printers)]。
啟用 [網路探索 (Network discovery)]
啟用 [網路探索 (Network discovery)] 以檢視您網路上的電腦。
Windows 7/Server 2008 R2
[開始 (Start)] 選擇 [控制台 (Control Panel)]
  [檢視網路狀態及工作 (View network status and tasks)]
  [變更進階共用設定 (Change advanced sharing settings)]
  選擇 [網路探索 (Network discovery)] 下的 [開啟網路探索 (Turn on network discovery)]。
[開始 (Start)]
 選擇 [控制台 (Control Panel)]
  [檢視網路狀態及工作 (View network status and tasks)]
  [變更進階共用設定 (Change advanced sharing settings)]
  選擇 [網路探索 (Network discovery)] 下的 [開啟網路探索 (Turn on network discovery)]。
Windows Server 2012
在畫面左下角按一下滑鼠右鍵 選擇 [控制台 (Control Panel)]
  [檢視網路狀態及工作 (View network status and tasks)]
  [變更進階共用設定 (Change advanced sharing settings)]
  選擇 [網路探索 (Network discovery)] 下的 [開啟網路探索 (Turn on network discovery)]。
在畫面左下角按一下滑鼠右鍵
 選擇 [控制台 (Control Panel)]
  [檢視網路狀態及工作 (View network status and tasks)]
  [變更進階共用設定 (Change advanced sharing settings)]
  選擇 [網路探索 (Network discovery)] 下的 [開啟網路探索 (Turn on network discovery)]。
Windows 8.1/Server 2012 R2
在 [開始 (Start)] 上按一下滑鼠右鍵 選擇 [控制台 (Control Panel)]
  [檢視網路狀態及工作 (View network status and tasks)]
  [變更進階共用設定 (Change advanced sharing settings)]
  選擇 [網路探索 (Network discovery)] 下的 [開啟網路探索 (Turn on network discovery)]。
在 [開始 (Start)] 上按一下滑鼠右鍵
 選擇 [控制台 (Control Panel)]
  [檢視網路狀態及工作 (View network status and tasks)]
  [變更進階共用設定 (Change advanced sharing settings)]
  選擇 [網路探索 (Network discovery)] 下的 [開啟網路探索 (Turn on network discovery)]。
Windows 10
[ ]
]  選擇 [Windows 系統 (Windows System)]
  [控制台 (Control Panel)]
  [檢視網路狀態及工作 (View network status and tasks)]
  [變更進階共用設定 (Change advanced sharing settings)]
  選擇 [網路探索 (Network discovery)] 下的 [開啟網路探索 (Turn on network discovery)]。
[
 ]
]  選擇 [Windows 系統 (Windows System)]
  [控制台 (Control Panel)]
  [檢視網路狀態及工作 (View network status and tasks)]
  [變更進階共用設定 (Change advanced sharing settings)]
  選擇 [網路探索 (Network discovery)] 下的 [開啟網路探索 (Turn on network discovery)]。
Windows Server 2008
[開始 (Start)] 選擇 [控制台 (Control Panel)]
  按兩下 [網路和共用中心 (Network and Sharing Center)]
  選擇 [網路探索 (Network discovery)] 下的 [開啟網路探索 (Turn on network discovery)]。
[開始 (Start)]
 選擇 [控制台 (Control Panel)]
  按兩下 [網路和共用中心 (Network and Sharing Center)]
  選擇 [網路探索 (Network discovery)] 下的 [開啟網路探索 (Turn on network discovery)]。
Windows Server 2016
在 [ ] 上按一下滑鼠右鍵
  選擇 [控制台 (Control Panel)]
  [檢視網路狀態及工作 (View network status and tasks)]
  [變更進階共用設定 (Change advanced sharing settings)]
  選擇 [網路探索 (Network discovery)] 下的 [開啟網路探索 (Turn on network discovery)]。
在 [
 ] 上按一下滑鼠右鍵
  選擇 [控制台 (Control Panel)]
  [檢視網路狀態及工作 (View network status and tasks)]
  [變更進階共用設定 (Change advanced sharing settings)]
  選擇 [網路探索 (Network discovery)] 下的 [開啟網路探索 (Turn on network discovery)]。
在列印伺服器中顯示共用印表機
1
開啟 Windows 檔案總管。
Windows 7/Server 2008
[開始 (Start)] 選擇 [所有程式 (All Programs)] 或 [程式 (Programs)]
  [附屬應用程式 (Accessories)]
  [Windows 檔案總管 (Windows Explorer)]。
[開始 (Start)]
 選擇 [所有程式 (All Programs)] 或 [程式 (Programs)]
  [附屬應用程式 (Accessories)]
  [Windows 檔案總管 (Windows Explorer)]。
Windows Server 2012
在畫面左下角按一下滑鼠右鍵 選擇 [檔案總管 (File Explorer)]。
在畫面左下角按一下滑鼠右鍵
 選擇 [檔案總管 (File Explorer)]。
Windows 8.1/Server 2012 R2
在 [開始 (Start)] 上按一下滑鼠右鍵  選擇 [檔案總管 (File Explorer)]。
 選擇 [檔案總管 (File Explorer)]。
Windows 10/Server 2016
在 [ ] 上按一下滑鼠右鍵
  選擇 [檔案總管 (File Explorer)]。
在 [
 ] 上按一下滑鼠右鍵
  選擇 [檔案總管 (File Explorer)]。
2
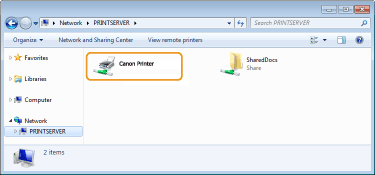
在 [網路 (Network)] 或 [網路上的芳鄰 (My Network Places)] 中選擇印表機伺服器。
若要檢視網路上的電腦,可能必須開啟網路探索,或是在網路上搜尋電腦。
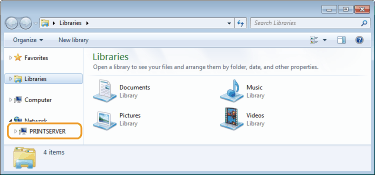
將顯示共用印表機。
顯示 [安裝軟體程式/手冊 (Software Programs/Manuals Setup)] 畫面
插入隨附的 DVD-ROM 後,如果電腦沒有顯示 [安裝軟體程式/手冊 (Software Programs/Manuals Setup)] 畫面,請遵循以下步驟。本手冊中以「D:」表示 DVD-ROM 光碟機名稱。DVD-ROM 光碟機名稱會因使用的電腦而異。
Windows 7/Server 2008
[開始 (Start)]  在 [搜尋程式及檔案 (Search programs and files)] 或 [開始搜尋 (Start Search)] 中輸入「D:\MInst.exe」
 按下 [ENTER] 鍵。
 在 [搜尋程式及檔案 (Search programs and files)] 或 [開始搜尋 (Start Search)] 中輸入「D:\MInst.exe」
 按下 [ENTER] 鍵。
Windows Server 2012
在畫面左下角按一下滑鼠右鍵  [執行 (Run)]
  輸入「D:\MInst.exe」
 按一下 [確定 (OK)]
 [執行 (Run)]
  輸入「D:\MInst.exe」
 按一下 [確定 (OK)]
Windows 8.1/Server 2012 R2
在 [開始 (Start)] 上按一下滑鼠右鍵 [執行 (Run)]
  輸入「D:\MInst.exe」
 按一下 [確定 (OK)]
 [執行 (Run)]
  輸入「D:\MInst.exe」
 按一下 [確定 (OK)]
Windows 10
在搜尋方塊中輸入「D:\MInst.exe」 按一下搜尋結果中顯示的 [D:\MInst.exe]。
 按一下搜尋結果中顯示的 [D:\MInst.exe]。
Windows Server 2016
按一下 [ ]
]  輸入「D:\MInst.exe」
  按一下搜尋結果中顯示的 [D:\MInst.exe]。
 ]
]  輸入「D:\MInst.exe」
  按一下搜尋結果中顯示的 [D:\MInst.exe]。
在 Windows 中列印測試頁
透過在 Windows 中列印測試頁,您可檢查印表機驅動程式是否可操作。
1
在多用途紙盤中裝入 A4/信件 尺寸紙張。在多用途紙盤中裝入紙張
2
開啟印表機資料夾。 顯示印表機資料夾
3
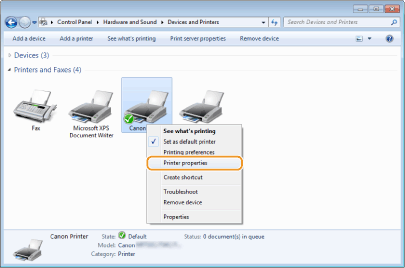
在本機的印表機驅動程式圖示上按一下滑鼠右鍵,然後按一下 [印表機內容 (Printer properties)] 或 [內容 (Properties)]。
4
按一下 [一般 (General)] 標籤中的 [列印測試頁 (Print Test Page)]。
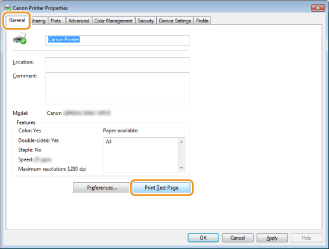
將會列印測試頁。
確認位元架構
如果不確定電腦執行的是 32 位元還是 64 位元 Windows,請遵照以下程序。
1
顯示 [控制台 (Control Panel)]。
Windows 7/Server 2008
[開始 (Start)] 選擇 [控制台 (Control Panel)]。
[開始 (Start)]
 選擇 [控制台 (Control Panel)]。
Windows Server 2012
在畫面左下角按一下滑鼠右鍵 選擇 [控制台 (Control Panel)]。
在畫面左下角按一下滑鼠右鍵
 選擇 [控制台 (Control Panel)]。
Windows 8.1/Server 2012 R2
在 [開始 (Start)] 上按一下滑鼠右鍵 選擇 [控制台 (Control Panel)]。
在 [開始 (Start)] 上按一下滑鼠右鍵
 選擇 [控制台 (Control Panel)]。
Windows 10/Server 2016
繼續進行步驟 2。
繼續進行步驟 2。
2
顯示 [系統 (System)]。
Windows 7/Server 2008 R2/Server 2012
按一下 [系統及維護 (System and Maintenance)] 或 [系統及安全性 (System and Security)] [系統 (System)]。
按一下 [系統及維護 (System and Maintenance)] 或 [系統及安全性 (System and Security)]
 [系統 (System)]。
Windows 10/Server 2016
按一下 [ ]
]  [設定 (Settings)]
  [系統 (System)]
  選擇 [關於 (About)]。
按一下 [
 ]
]  [設定 (Settings)]
  [系統 (System)]
  選擇 [關於 (About)]。
Windows Server 2008
按兩下 [系統 (System)]。
按兩下 [系統 (System)]。
3
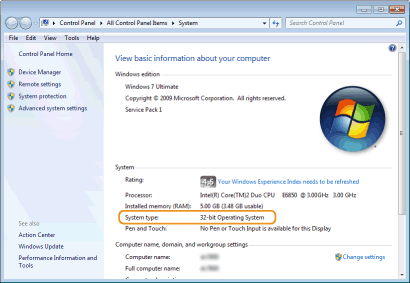
確認位元架構。
32 位版本
顯示 [32 位元作業系統 (32-bit Operating System)]。
顯示 [32 位元作業系統 (32-bit Operating System)]。
64 位版本
顯示 [64 位元作業系統 (64-bit Operating System)]。
顯示 [64 位元作業系統 (64-bit Operating System)]。
查看電腦名稱
1
顯示 [控制台 (Control Panel)]。
Windows 7/Server 2008
[開始 (Start)] 選擇 [控制台 (Control Panel)]。
[開始 (Start)]
 選擇 [控制台 (Control Panel)]。
Windows Server 2012
在畫面左下角按一下滑鼠右鍵 選擇 [控制台 (Control Panel)]。
在畫面左下角按一下滑鼠右鍵
 選擇 [控制台 (Control Panel)]。
Windows 8.1/Server 2012 R2
在 [開始 (Start)] 上按一下滑鼠右鍵 選擇 [控制台 (Control Panel)]。
在 [開始 (Start)] 上按一下滑鼠右鍵
 選擇 [控制台 (Control Panel)]。
Windows 10
按一下 [ ]
]  選擇 [Windows 系統 (Windows System)]
  [控制台 (Control Panel)]。
按一下 [
 ]
]  選擇 [Windows 系統 (Windows System)]
  [控制台 (Control Panel)]。
Windows Server 2016
在 [ ] 上按一下滑鼠右鍵
 選擇 [控制台 (Control Panel)]。
在 [
 ] 上按一下滑鼠右鍵
 選擇 [控制台 (Control Panel)]。
2
顯示 [系統 (System)]。
Windows 7/10/Server 2008 R2/Server 2012/Server 2016
按一下 [系統及維護 (System and Maintenance)] 或 [系統及安全性 (System and Security)] [系統 (System)]。
按一下 [系統及維護 (System and Maintenance)] 或 [系統及安全性 (System and Security)]
 [系統 (System)]。
Windows Server 2008
按兩下 [系統 (System)]。
按兩下 [系統 (System)]。
3
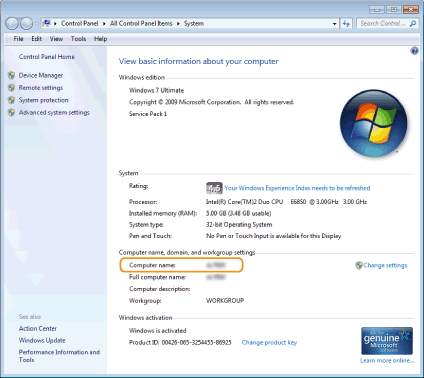
查看電腦名稱。
查看印表機連接埠
1
開啟印表機資料夾。 顯示印表機資料夾
2
在本機的印表機驅動程式圖示上按一下滑鼠右鍵,然後按一下 [印表機內容 (Printer properties)] 或 [內容 (Properties)]。

3
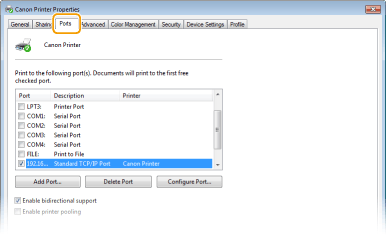
在 [連接埠 (Ports)] 標籤中,查看是否已選擇正確的連接埠。
 |
如果使用網路連線且變更了本機的 IP 位址如果所選連接埠的 [描述 (Description)] 是 [Canon MFNP Port (Canon MFNP Port)],且本機和電腦是在相同的子網路,則會保持連線。您不需要新增連接埠。如果是 [Standard TCP/IP Port (Standard TCP/IP Port)],則需要新增連接埠。設定印表機連接埠
|
查看雙向通訊
1
開啟印表機資料夾。 顯示印表機資料夾
2
在本機的印表機驅動程式圖示上按一下滑鼠右鍵,然後按一下 [印表機內容 (Printer properties)] 或 [內容 (Properties)]。

3
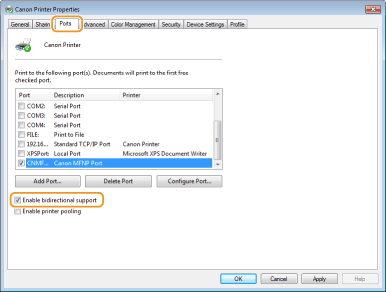
在 [連接埠 (Ports)] 標籤中,確認已勾選 [啟用雙向支援功能 (Enable bidirectional support)] 核取方塊。
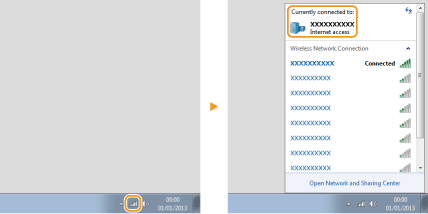
查看電腦連線的 SSID
如果電腦是連線到無線區域網路,按一下系統匣中的  、
、 、
、 或
或  可顯示無線區域網路路由器的 SSID。
 、
、 、
、 或
或  可顯示無線區域網路路由器的 SSID。
從 Windows Store App 列印或傳送時
Windows 8/Server 2012
顯示畫面右側的快速鍵 點選或按一下 [裝置 (Devices)]
  您使用的驅動程式
  [列印 (Print)]。
顯示畫面右側的快速鍵
 點選或按一下 [裝置 (Devices)]
  您使用的驅動程式
  [列印 (Print)]。
Windows 8.1/Server 2012 R2
顯示畫面右側的快速鍵 點選或按一下 [裝置 (Devices)]
  [列印 (Print)]
  您使用的驅動程式
  [列印 (Print)]。
顯示畫面右側的快速鍵
 點選或按一下 [裝置 (Devices)]
  [列印 (Print)]
  您使用的驅動程式
  [列印 (Print)]。
Windows 10
點選或按一下應用程式上的 [列印 (Print)] 您使用的驅動程式
  [列印 (Print)]。
點選或按一下應用程式上的 [列印 (Print)]
 您使用的驅動程式
  [列印 (Print)]。
 |
|
如果使用此方法列印文件或傳送傳真,僅可使用有限的功能。
如果顯示 [印表機需要您注意。請移至桌面以處理其問題。 (The printer requires your attention. Go to the desktop to take care of it.)] 訊息,請移至桌面,並執行所需的操作。此訊息會在本機設定為在列印文件、傳送傳真或類似例項期間顯示使用者名稱時出現。
|