
Creating and Printing Images for Gallery Wrap
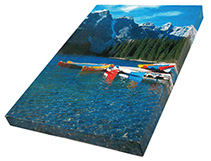
Gallery Wrap is a method used when you intend to stretch a photo over a frame by printing it in a larger size than the frame so that even the sides of the frame can be wrapped with the image.
You can adjust the image size according to the frame depth, or set an effect to the sides of the frame.
-
Start Professional Print & Layout, and then drag and drop the images you want to print to the Preview area.
 Note
Note- For how to start Professional Print & Layout, see Starting Professional Print & Layout.
-
In the Stored Settings area, select Gallery Wrap for Layout Mode.
-
In Frame Settings on the General Settings tab, set Panel Layout, Frame Size, Frame Depth, and other settings.
-
In Print Settings on the General Settings tab, set Media Type, Paper Size, Paper Source, and other settings.
Note- For Paper Size, set paper of a size larger than the image's print size. To check if the image fits the paper size, open Print Preview.
-
Click Print.
The Print dialog box appears.
-
Click OK.
![]() Note
Note
- For Frame Settings on the General Settings tab, see General Settings Tab (Frame Settings).
