
Other Settings Dialog
Set the number of copies to print and the amount of extension for borderless printing.
You can also specify the settings related to preview, set the monitor's color matching, and more.
To display the Other Settings dialog, select Other Settings... from the File menu in the main screen.
Preferences Tab
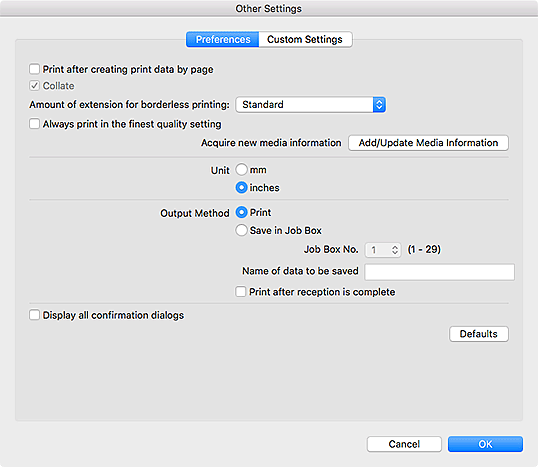
- Print after creating print data by page
- Set whether to send the data to the printer page by page or all at once. Select this checkbox to send the data page by page.
- Collate
- Select this checkbox to print on a copy-by-copy basis.
- Amount of extension for borderless printing
-
Set the amount of extension for borderless layouts.
Select from None, Small, Medium, Large, and Standard.
Example:
The solid lines represent the paper size, and the translucent areas represent the amount of extension.


Large Medium Small  Note
Note- The image may be cropped depending on the set amount of extension.
- Always print in the finest quality setting
- Select this checkbox to always print in the finest quality.
- Add/Update Media Information
- Updates media information.
- Unit
- Select mm or inches.
- Output Method
-
Select the output method.
- Performs printing.
- Save in Job Box
-
Saves the print job to the printer's box function.
- Job Box No.
- Select the destination box number (1 to 29).
- Name of data to be saved
- Set the name of the data to be saved.
- Print after reception is complete
-
Select this checkbox to prevent degradation of the print quality that occurs when printing is interrupted due to choppy reception of the print job.
 Important
- This function is unavailable depending on your printer.
- Display all confirmation dialogs
- Select this checkbox to unhide any dialog you have hidden by selecting the Do not show this again checkbox.
- Defaults
- Restores the default state.
Custom Settings Tab
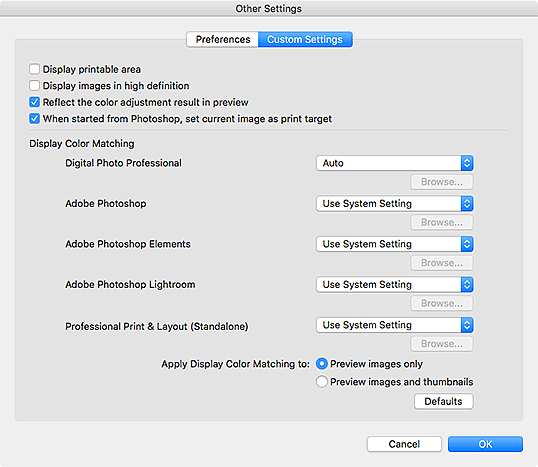
- Display printable area
- Select this checkbox to display the printable area in the Preview area.
- Display images in high definition
-
Select this checkbox to display images in high quality at higher resolutions when started from Digital Photo Professional.
Note- When this checkbox is selected, it may take time for the preview to appear depending on your environment.
- Reflect the color adjustment result in preview
-
Select this checkbox to reflect the result of the color tone adjustment in the Preview area.
Deselect the checkbox if you want the color tone before adjustment to be displayed in preview instead of reflecting the adjustment result.
- When started from Photoshop, set current image as print target
-
Select this checkbox to set only the image being edited as the print target when you start Professional Print & Layout after opening multiple images in Photoshop.
To set all the images opened in Photoshop as the print target, deselect the checkbox.
- Display Color Matching
-
You can set the monitor profile for each application.
Select one of the following profiles according to your monitor.
- Auto
- sRGB
- AdobeRGB
- Use System Setting
- Monitor Profile
Note- Auto can be selected for Digital Photo Professional only. Select Auto to set the profile automatically according to the settings of Digital Photo Professional.
- Select Monitor Profile to display a window for selecting the profile to be used. To change the profile to be used, click Browse....
- Apply Display Color Matching to
-
Select where to apply the monitor profile.
- Preview images only
- Applies the monitor profile to the images displayed in preview only.
- Preview images and thumbnails
- Applies the monitor profile to the images displayed in preview and the Thumbnails area.
- Defaults
- Restores the settings to the default state.
