
Adjusting Margins
You can adjust margins when printing in a bordered layout or when printing an index.
Adjustable margin properties vary by layout.
 |
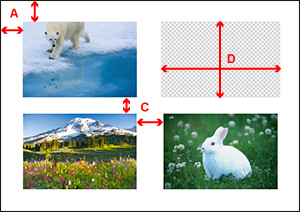 |
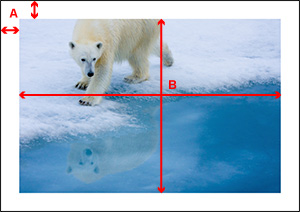
| Single | Multiple |
- A: Margin (top/bottom/left/right)
- B: Image size (height/width)
- C: Image spacing (vertical/horizontal)
- D: Image slot size (height/width)
- Setting Margin Values
- Setting Image Position
- Changing Image Size
- Setting Image Slot Position
- Changing Image Size Within Image Slot
- Making Margins and Image Spacing Black
![]() Important
Important
- Set Layout (Number of Images) and paper before adjusting margins. If you change Layout (Number of Images) or paper after setting margins, the settings return to the default.
![]() Note
Note
- The displayed items vary depending on your printer.
Setting Margin Values
Set margin values. The image size changes according to the margin values.
-
In the Stored Settings area, select Single Image for Layout (Number of Images).
-
In Layout on the General Settings tab, select Image Slot Position/Margin for Image Slot Position/Margin.
-
Set the top, bottom, left, and right margins in Margins.
Set the margin values by moving the sliders for top, bottom, left, and right or by entering the values directly.
The image size is enlarged or reduced according to the margin values.
 Important
- When a cropping frame is set for the image, the image will be cropped according to the margin values instead of being enlarged or reduced.
 Note
Note- The available range of margin values varies depending on the selected media type and paper size.
- To apply the specified settings to all pages, select the Apply to All Pages checkbox.
Setting Image Position
You can set the image position while maintaining the image size.
-
In the Stored Settings area, select Single Image for Layout (Number of Images).
-
In Layout on the General Settings tab, select Image Slot Position/Size for Image Slot Position/Margin.
-
Set image position in Position.
Set the image position by moving the sliders for top and left or by entering the values directly.
Note- You can also change the image position by dragging the red frame in preview.
- To apply the specified settings to all pages, select the Apply to All Pages checkbox.
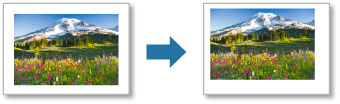
Changing Image Size
Change the image size. The margin values change according to the image size.
-
In the Stored Settings area, select Single Image for Layout (Number of Images).
-
In Layout on the General Settings tab, select Image Slot Position/Size for Image Slot Position/Margin.
-
Set height and width in Size.
Set the image size by moving the sliders for height and width or by entering the values directly.
The image is enlarged or reduced to the specified image size.
Important- When a cropping frame is set for the image, the image will be cropped to the specified image size instead of being enlarged or reduced.
Note- You can also change the image size by dragging the red frame in preview.
- The available range of image sizes varies depending on the selected media type and paper size.
- To apply the specified settings to all pages, select the Apply to All Pages checkbox.
Setting Image Slot Position
Change the image slot position.
-
In the Stored Settings area, select Multiple Images for Layout (Number of Images).
-
In Layout on the General Settings tab, set image slot position in Set Slot Position.
Set the image slot position by moving the sliders for top and left or by entering the values directly.
Note- You can also change the image slot position by dragging the red frame in preview.
- To apply the specified settings to all image slots within the page, select the Apply To All Image Slots checkbox.
Changing Image Size Within Image Slot
Change the image size within the image slot.
-
In the Stored Settings area, select Multiple Images for Layout (Number of Images).
-
In Layout on the General Settings tab, set height and width in Set Image Size Within Slot.
Set the image size within the image slot by moving the sliders for height and width or by entering the values directly.
Important- When a cropping frame is set for the image, the image will be cropped to the specified image size instead of being enlarged or reduced.
Note- You can also change the image size within the image slot by dragging the red frame in preview.
Making Margins and Image Spacing Black
You can make margins and image spacing black.
-
Select the Print the margins in black checkbox.
The margins and image spacing turn black.
Important- Margins may not be printed black up to the edges of the paper depending on the selected media type.
![]() Note
Note
- To save the changed margin settings, click Layout Management from Registered Layouts on the General Settings tab (Layout).
