Cutting Roll Paper after Printing
The procedure for cutting roll paper automatically and printing cut guidelines is as follows:
Open the printer driver setup window
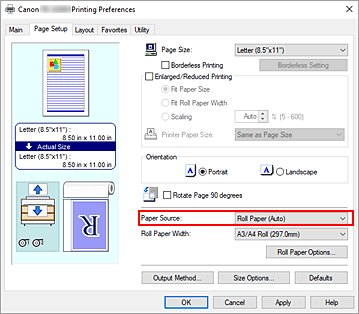
Select the paper source
For Paper Source on the Page Setup tab, select the setting that matches your purpose from Roll Paper (Auto), Roll 1, and Roll 2.

Display Roll Paper Options dialog box
Click Roll Paper Options... to display the Roll Paper Options dialog box.

Set auto cut
From Automatic Cutting, select the item that matches your purpose.
The current settings are displayed in the settings preview on the left side of the Page Setup tab.Yes
The roll paper is cut automatically after printing.No
The roll paper is not cut after printing.Print Cut Guideline
Cut guidelines are printed for cutting the roll paper manually after printing.
 Note
Note- The default setting for automatic cutting is Yes.
 Important
- If No or Print Cut Guideline is selected, paper will be output from the front. We recommend that you set a basket before printing.
After completing the setting, click OK to return to the Page Setup tab.
Complete the setup
Click OK on the Page Setup tab.
When you print, the status after printing is set to whatever was set in Automatic Cutting.
