
Printing from iOS Device (AirPrint)
Use AirPrint to print photographs, E-mails, web pages, and other documents without having to download special applications.
![]() Important
Important
- There are restrictions for printing using AirPrint. Please be aware in advance.
Checking Your Environment
First, check your environment.
AirPrint Operation Environment
iPhone, iPad, and iPod touch running the latest version of iOSRequirement
The iOS device and the printer must be connected by one of the following methods:- Connected to the same network over a LAN
- Connected directly without wireless router (Direct Connection)
Printing with AirPrint from iOS Device
Load paper in printer
Set roll paper or cut paper.
Tap operation icon using your iOS device's application
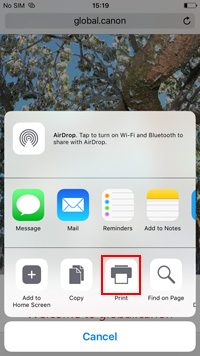
The following screen appears when printing from iOS 10's Safari. The screen differs depending on the devices or applications.

Menu options appear.
Tap Print
Select your model name from Printer on Printer Options
 Important
- Because some applications do not support AirPrint, Printer Options may not be displayed. If an application does not let you use printer options, you cannot print from that application.
Check Print Settings
Set the number of copies to be printed and print options, as needed.
Tap Print
The printer prints according to the specified settings.
![]() Note
Note
- It can take the Wi-Fi a few minutes to get connected after the printer turns on. Print after checking that the printer is connected to the network.
- You cannot use AirPrint if Bonjour settings of printer are disabled. Check LAN settings of printer and enable Bonjour settings.
- Refer to "Cannot Print Using AirPrint" for printing problems when using AirPrint.
Paper Size
With AirPrint, the paper size is selected automatically according to the application being used on the iOS device and the region in which AirPrint is used.
![]() Important
Important
- Depending on the device or OS, the initial settings of paper size may differ.
Test printing is recommended. - Depending on the application you are using, the available paper size may differ.
Checking Print Status
You can check the print status of AirPrint from Print Center.
Click the Home button in the iOS device twice to switch to multitask mode, swipe towards the right to display Print Center, then tap on it.
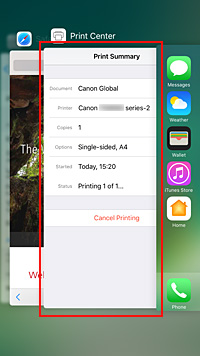
Deleting Print Job
Click the Home button in the iOS device twice to switch to multitask mode, swipe towards the right to display Print Center, then tap on it. In the screen that appears, tap on the print job to be deleted, and then tap Cancel Printing.
Restrictions on the AirPrint
- If A2+, A3+, or 13 x 22 is selected for Paper Size in the print dialog, part of the image may not fit on the paper.
- If printing cut paper, the bottom edge of the image may be cut out.
- If printing cut paper, feed the paper vertically. If the paper is fed horizontally, it will still print vertical images.
- The roll sheets with the below width cannot be printed without borders.
- 39.37 in. (1000.0 mm)
- 31.50 in. (800.0 mm)
- 30.00 in. (762.0 mm)
- 23.62 in. (600.0 mm)
- 22.00 in. (558.8 mm)
- 20.00 in. (508.0 mm)
- 19.69 in. (500.0 mm)
- 18.00 in. (457.2 mm)
- 16.54 in. (420.0 mm)
- 16.00 in. (406.4 mm)
- 12.95 in. (329.0 mm)
- 12.00 in. (304.8 mm)
- 11.81 in. (300.0 mm)
- 11.69 in. (297.0 mm)
- 10.12 in. (257.0 mm)
- 8.00 in. (203.2 mm)
- 6.00 in. (152.4 mm)
- When printing images with large data sizes, the color may turn out uneven. In this case, select Device settings -> Hard disk settings -> Save first and print -> ON on the operational panel of the printer.
