
Print Dialog
In the Print dialog, you can set paper type, paper source and print quality to start printing.
To open the Print dialog, you typically select Print... from the File menu of your application software.
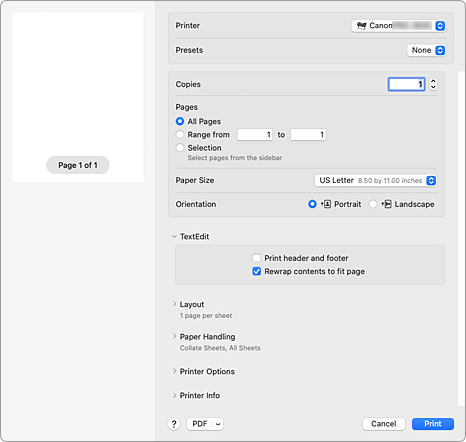
- Printer
-
Select the model to be used for printing.
When you click Add Printer..., a dialog for specifying the printer opens. - Presets
- You can save or delete the settings of the Print dialog.
- Copies
-
You can set the number of copies to be printed.
 Note
Note- You can set collated printing by choosing Paper Handling.
- Pages
- You can set the range of pages to be printed.
- Paper Size
-
Select the size of the paper to be used for printing.
To set a non-standard size, select Manage Custom Sizes.... - Orientation
- Select the print orientation.
- Printer Options
-
You can switch between pages in the Print dialog by Printer Options. The first menu to appear differs depending on the application software that opened the Print dialog.
You can choose one of the following items from Printer Options.- Color Matching
- You can select the color correction method.
- Quality & Media
- You can set basic print settings that match the printer.
- Color Options
- You can adjust the print colors as you desire.
- Advanced Paper Settings
- Specifies detailed print settings that match the media type loaded in the printer.
- Page Processing
- You can configure the detailed settings when printing to roll paper, and adjust the amount of the source document that sticks out from the page when printing all borderless.
- Additional Settings
- The output method can be set.
- Printer Info
-
- Supply Levels
- A rough indication of the remaining ink level is displayed.
-
You can save a document in PDF (Portable Document Format) format.
By starting up Canon imagePROGRAF Free Layout, it is possible to allocate multiple source documents, and display the print results in imagePROGRAF Preview.
