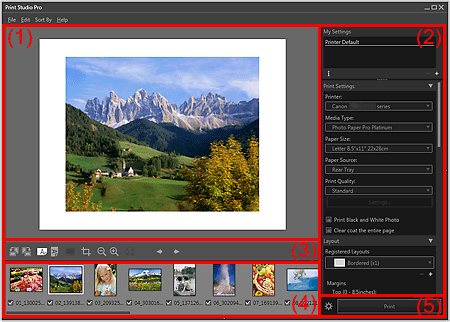


This is the screen in which you handle various functions of Print Studio Pro. You can correct color tones of images, perform printing, etc. by operating in the corresponding area.

(1) Preview
(2) Settings Area
(3) Tools Area
(4) Thumbnails Area
 Note
NoteYou can show or hide the Thumbnails area with  (Triangle) at the bottom of the screen. You can show or hide the Settings area with
  (Triangle) at the rightmost of the screen.
Displays the previews of the selected images. You can make edits or adjust margins while viewing the result since the settings are reflected as you make them.
When multiple images are laid out on one page, you can rearrange the images, change the image size, etc. by dragging them in preview.
You can register settings or make settings for printing.
The Settings area consists of the following categories. See the corresponding page for details.
My Settings
Print Settings
 Settings Area (Print Settings)
Layout
Color Management
 Settings Area (Color Management)
Correction
 Note
NoteClick  (Triangle) to display the corresponding category in the Settings area.
Change the orientation of the page or image displayed in preview, or change the display size.
 (Rotate Left)
Rotates the image 90 degrees counterclockwise.
 (Rotate Right)
Rotates the image 90 degrees clockwise.

 (Display the Page Horizontally/Display the Page Vertically)
Displays the page in horizontal or vertical orientation.
 (Photo Information)
Switches the position to display the photo information between the bottom and left sides of the image.

 (Crop)
Displays the Crop window in which you can crop the image.

 (Reduce/Enlarge)
Reduces or enlarges the display size of preview.
Display ranges are 25%, 50%, 75%, 100%, 200%, 300% and 400%.
 (Whole Image View)
Displays the preview at the size at which the whole page can be displayed.

 (Display the Previous Page/Next Page)
Switches the displayed page when there are multiple pages.
 Note
NoteImages whose checkboxes are not selected in the Thumbnails area do not appear.
Displays the thumbnails of images.
Images with the checkboxes selected will be printed.
You can change the order of images by selecting and dragging them.
 Note
NoteYou can select multiple images by clicking them while pressing the Ctrl key.
Select Select All Images from the Edit menu to select all the images displayed in the Thumbnails area. Select Clear All Selected Images to cancel all image selections.
Place the cursor over a checkbox to display the file name.
Displays the Print dialog box from which you can print images.
 Note
NotePrinting will be performed in the order displayed in the Thumbnails area.
 (Advanced Print Settings)
Displays the Advanced Print Settings dialog box in which you can make settings for printing.
Page top |