Using Auto Design
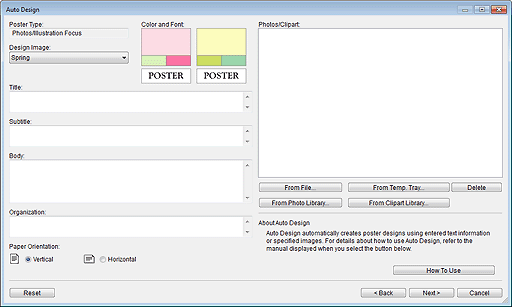
Auto Design is a function to automatically design posters by simply entering titles and text, and then selecting your favorite images.
From created designs, select the one you like.
-
In the task area, click Select Template.
-
Click Auto Design....
The Auto Design screen appears.
-
Select the type of poster you want to create, and then click Next.
-
In Design Image, select a design theme.

-
Enter the Title, Subtitle, Body, and Organization.
 Important
- If Long/Horizontal Banners is selected in poster type, the Body cannot be entered.
- Advanced Settings... may not be displayed depending on your language.
 Note
Note- Enter up to 60 characters for Title, Subtitle, and Organization.
- Enter up to 200 characters for Body.
- Click Advanced Settings... to display the Advanced Settings dialog box for setting a monospaced font for the title, body, and other text.
-
Select the Paper Orientation.
-
Select the images you want to use in the poster as follows.
-
To use images saved on computer:
Click From File... to display the Insert Image dialog box, and then select image(s).
 Note
Note- To select multiple files, hold down the Ctrl or Shift key as you click the thumbnails.
- Image files can also be added by dragging and dropping them from Windows Explorer.
- For supported file formats, see Supported File Formats.
-
To use photos or clipart in temporary tray:
Click From Temp. Tray... to display the Show Images in the Temporary Tray dialog box, and then select image(s).
 Note
Note- To select multiple files, hold down the Ctrl or Shift key as you click the thumbnails.
-
To use photos in library:
Click From Photo Library... to display the View All Photos dialog box, and then select image(s).
 Note
Note- To select multiple files, hold down the Ctrl or Shift key as you click the thumbnails.
-
To use clipart in library:
Click From Clipart Library... to display the View All Clipart dialog box, and then select image(s).
 Note
Note- To select multiple files, hold down the Ctrl or Shift key as you click the thumbnails.
 Note
Note- When Photos/Illustration Focus is selected in poster type, specify up to eight photos or up to two clipart items.
When a poster type other than Photos/Illustration Focus is selected, specify up to two photos or two clipart items. - To delete images from the image list, select one and click Delete.
- To use a selected image multiple times, select it again.
-
-
Click Next.
Designs are created automatically and their thumbnails appear.
 Note
Note- The number of designs to be created varies depending on the number of selected images, paper orientation, and design theme.
- Changing the order of thumbnails in Photos/Clipart by dragging and dropping them recreates the design. To select multiple files and change the order, hold down the Ctrl or Shift key as you click the thumbnails.
-
In Color Patterns, select color.
 Note
Note- Choices in Color Patterns are determined by the selected design theme.
In Text Color, select color.
-
Select your favorite design from the thumbnails, and then click OK.
The design is inserted in the poster area.
 Note
Note- Add designs to the temporary tray when you are not sure which design to use. Click Add to Temporary Tray to use them as replacements even after ending Auto Design.
 Note
Note
- For details on the Auto Design screen, see Auto Design Screen.
