
Edit Image Dialog Box (Gradation)
Apply a gradation to photos.
Click Edit in the task area, click Photos, and then select the image you want to edit on the poster.
To display the Edit Image dialog box and preview panel, click  (Gradation) in Edit Image.
- Opacity
-
 (Set Opacity to Background)
-
Apply transparency to the entire photo by specifying the opacity.
Increase the value to increase opacity and decrease the value to increase transparency.
- Gradation Orientation
-
Specify the direction of the gradation.
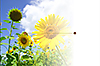
 (Left to Right)
-
Colors fade from left to right.
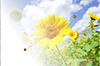
 (Upper Left to Lower Right)
-
Colors fade from the upper left to the lower right.

 (Upper Right to Lower Left)
-
Colors fade from the upper right to the lower left.
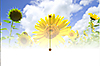
 (Top to Bottom)
-
Colors fade from the top to the bottom.
 Note
Note- To remove the gradation, click the selected Gradation Orientation again.
- Number of Points in Gradation
-
Select whether to apply a gradation with midpoints.
To use midpoints, select Three Points. Midpoints (C1 and C2) appear in the preview; use them to make the gradation more variable.
- Point A Opacity
-
Specify the opacity of starting point.
Increase the value to increase opacity and decrease the value to increase transparency.
- Point B Opacity
-
Specify the opacity of ending point.
Increase the value to increase opacity and decrease the value to increase transparency.
- Point C Opacity
-
Specify the opacity of midpoints.
Increase the value to increase opacity and decrease the value to increase transparency.
Note- Selectable when Three Points is selected for Number of Points in Gradation.
- Undo
- Undoes the last operation.
- Redo
- Redoes the last undone correction.
- Help
- Opens this guide.
