PosterArtist QuickCopy Screen
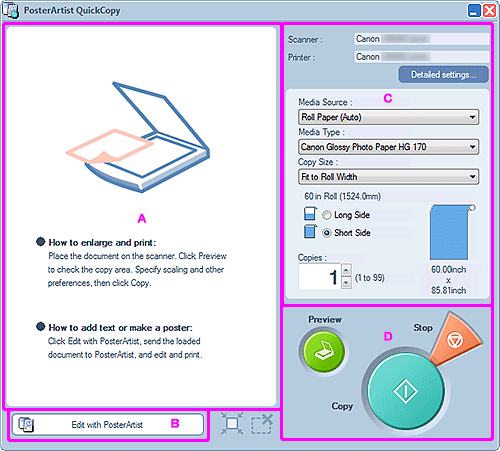
This is PosterArtist QuickCopy's main screen for selecting the scanner and printer to use, specifying the printing method, and more.

A: Preview Area
Displays a preview of the scanned image. The scan area is indicated by an outline and can be adjusted.
-
Resizing the scan area
Point to the outline of the scan area to display one of these cursors:
 ,
,  ,
,  , or
, or  . Drag the cursor to adjust the scan area.
 -
Moving the scan area
Move the pointer inside the outlined scan area to display
 (Move pointer). Drag the outlined area with
  (Move pointer) to move the scan area.
B: Edit with PosterArtist
Opens the scanned image in PosterArtist for editing.
C: Settings Area
Specify the printer and scanner to use, paper source, paper type, size, and other settings for printing.
- Scanner
- Displays the scanner to be used.
- Printer
- Displays the printer to be used.
- Detailed settings...
-
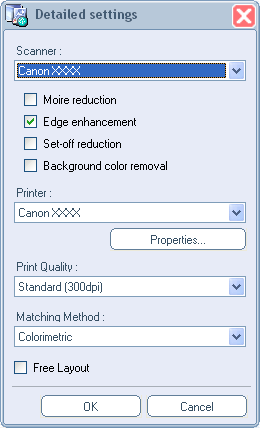
Displays the Detailed settings dialog box for changing the scanner and printer to use and for making advanced settings for scanning.

- Scanner
- Select the scanner to use. The list displays only scanners supporting PosterArtist QuickCopy among scanners installed on your computer.
- Moire reduction
-
Moire is image distortion (uneven, lighter areas or striped patterns) that may occur when scanning photos or pictures. Select this checkbox to reduce moire.
 Note
Note- Some moire effects may remain when the Edge enhancement checkbox is selected.
- Edge enhancement
- Select this checkbox to enhance the outline and increase sharpness.
- Set-off reduction
- When the original is double-sided, images or text on the reverse side may be scanned inadvertently. Select this checkbox to reduce this show-through effect.
- Background color removal
-
When paper of the original is light-colored, select this checkbox to correct the base color and make it white.
 Note
Note- Correction may not be applied if the original is dark-colored or includes many photos.
- Background color removal cannot be set when Set-off reduction is set.
- Printer
-
Select the printer to use. The list displays only printers supporting PosterArtist among printers installed on your computer.
- Properties...
- Displays the selected printer's Properties dialog box for specifying the print settings.
- Print Quality
- Select the print quality. Available options vary depending on the selected paper type.
- Matching Method
-
Select a rendering intent.
- Auto
- Print in natural color tones.
- Perceptual / Perceptual (Photo)
- Print with natural color tones and gradations. Suitable for photos.
- Colorimetric
- Reduces color differences between the original document and the print result.
- Saturation / Saturation (Poster)
- Performs color matching while emphasizing vividness.
- Free Layout
- Select this checkbox to enable the Free Layout function of the printer driver.
- Media Source
- Select the paper source.
- Media Type
- Select the type of paper you want to use.
- Copy Size
- Select the size for the enlarged copy.
- Long Side
- Select this to print by enlarging the original so that the length of the poster's long side will be the same as the paper width.
- Short Side
- Select this to print by enlarging the original so that the length of the poster's short side will be the same as the paper width.
- Copies
- Set the number of copies to print.
D: Buttons Area
- Preview
- Scans the original to display the print area.
- Copy
- Scans the original to print an enlarged copy.
- Stop
- Cancels printing.

