Setting Criteria for Printer Search/Searching Specific Printer
You can set the criteria for printer search when you start up Wi-Fi Connection Assistant or update the printer search, or you can search the specific printer.
Changing these settings may detect the printer you want to use if it is not detected.
 Note
Note
- If the printer you want to use is not detected, it may be detected by entering IP address, subnet mask, or default gateway on the operation panel and search again.
Setting Criteria for Printer Search
-
Check the displayed message and select Yes.
-
Select Printer Network Setup on the displayed screen.
Detected printers are listed.
-
Select Search Settings... on Option menu.
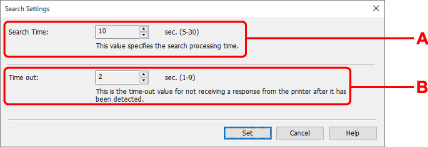
The Search Settings screen appears.
-
Enter criteria for printer search.

- A: Search Time:
- Specifies the time to search printers.
- B: Time out:
- Specifies the timeout length for not receiving a response from printer.
 Note
Note- Printers you want to find are more likely to be detected as the values are larger, however, it may take a while to search them.
-
Click Set.
Searching Specific Printer
-
Check the displayed message and select Yes.
-
Select Printer Network Setup on the displayed screen.
Detected printers are listed.
-
Select Specified Searching... on Option menu.
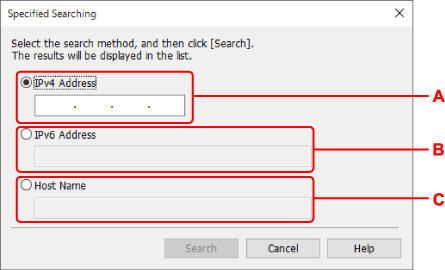
The Specified Searching screen appears.
-
Select item to specify and enter value.

- A: IPv4 Address
- Specifies the IPv4 address of the printer you want to search.
- B: IPv6 Address
- Specifies the IPv6 address of the printer you want to search.
- C: Host Name
- Specifies the host name of the printer you want to search.
-
Click Search.
Wi-Fi Connection Assistant starts searching by the specified criteria and detected printers are listed.

