Performing/Changing Wired LAN Settings
Follow the procedure below to perform/change wired LAN settings.
 Note
Note
- For some models, you can perform network setup for a USB connected printer using IJ Network Device Setup Utility. Select USB on Switch View under the View menu to display printers for which you can perform setup.
-
Check the displayed message and select Yes.
-
Select Printer Network Setup on the displayed screen.
Detected printers are listed.
-
Select printer to perform/change settings from printer list.
Select the printer with Wired LAN displayed on Connection Method and Available displayed on Status to perform settings.
You can perform settings for a printer with Available not displayed on Status via USB connection.
To perform setup for a USB connected printer, select USB from the pulldown menu on the toolbar and select the printer to perform/change settings.
-
Select Network Settings... on Printer Settings menu.
The Confirm Printer Password screen appears.
For more on the password, refer to Administrator Password.
 Note
Note- Clicking the
 icon allows you to perform/change settings.
 -
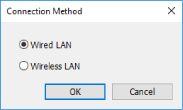
If you select a USB connected printer on step 4, the screen below appears after the Confirm Printer Password screen appears

Select Wired LAN and click OK.
- Clicking the
-
Enter password and click OK.
The Network Settings screen appears.
-
Perform/change settings.
You can switch the screen between IPv4 and IPv6. Click the tab to switch the protocol.
-
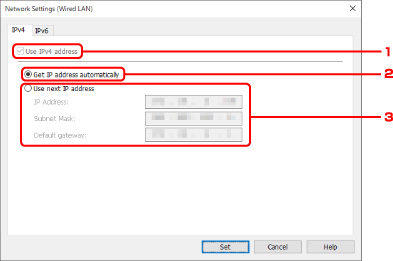
IPv4 settings

-
Use IPv4 address
Always selected. (displayed in a gray out state)
-
Get IP address automatically
Select this option to use an IP address automatically assigned by a DHCP server. DHCP server functionality must be enabled on your router.
-
Use next IP address
Select this option if no DHCP server functionality is available in your setup where you use the printer, or you want to use a fixed IP address.
Enter the IP address, subnet mask, and default gateway.
-
-
IPv6 settings
 Note
Note- If USB is selected from the pulldown menu on the toolbar, you cannot perform IPv6 settings.

-
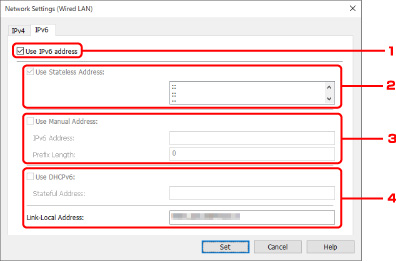
Use IPv6 address
Select when you use the printer with IPv6 environment.
-
Use Stateless Address:
Select when you use an IP address assigned automatically. Use a router compatible with IPv6.
 Note
Note- This setting item is not available depending on the printer you are using.
-
Use Manual Address:
Select this option if no DHCP server functionality is available in your setup where you use the printer, or you want to use a fixed IP address.
Enter the IP address and IP address prefix length.
 Note
Note- This setting item is not available depending on the printer you are using.
-
Use DHCPv6:
Select when you obtain an IP address using DHCPv6.
 Note
Note- This setting item is not available depending on the printer you are using.
-
-
Click Set.

