Adjusting, Correcting, or Enhancing Images
In the Item edit screen, you can change the angle, position, and size of the images inserted in your item. You can also adjust the image brightness and contrast, or enhance images by using special filters.
 Important
- This function may not be available when PREMIUM Contents are used.
 Note
Note
- Refer to "Item Edit Screen" for how to switch to the Item edit screen.
- Collage editing is used as an example in the following descriptions. Available settings may vary depending on what you create.
Changing Angle, Position, and Size of Images
-
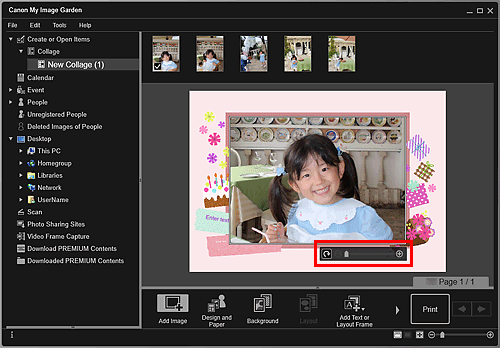
Select an image in the Edit area of the Item edit screen.
The image editing tool appears below the selected image.

-
Change the angle, position, and size using the editing toolbar.
 (Rotate 90°)
- You can rotate the image 90 degrees clockwise each time you click it.
 (Reduce/Enlarge)
- You can freely change the display size by dragging the slider. You can also reduce or enlarge the image each time you click
 (Reduce) or
  (Enlarge).
  (Move)
- Click an image to switch the cursor to
 (Move). Switch to
  (Move) and drag the image to change its position.
 Note
Note- When the item is a photo layout, Add date appears. Click to add the date to the photo. You can also set to print dates on all images in the Advanced Settings dialog box displayed by clicking Advanced... at the bottom of the screen. If Advanced... is not displayed, click
 (Right Scroll).
Correcting/Enhancing Images
-
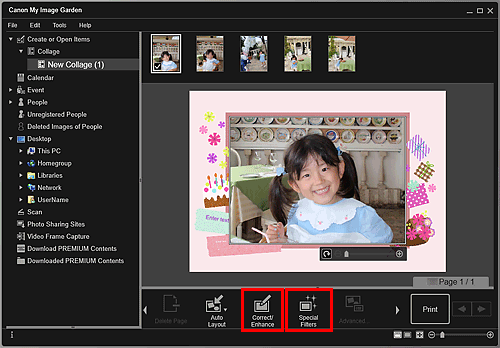
Select the image(s) in the Edit area, then click Correct/Enhance or Special Filters.

When Correct/Enhance is clicked:
The Correct/Enhance Images window appears. You can correct red eyes or adjust the brightness and contrast of images.
When Special Filters is clicked:
The Special Image Filters window appears. You can joyfully enhance photos using the filter you want to use.
 Note
Note- You can also correct or enhance an image by right-clicking it in the Edit area, then selecting Correct/Enhance or Special Filters from the displayed menu.

