Using Digital Face Smoothing
You can enhance skin beautifully by reducing blemishes and wrinkles.
There are two Digital Face Smoothing methods: automatic and manual.

-
Select the image(s) you want to enhance.
-
Click Correct/Enhance at the bottom of the screen.
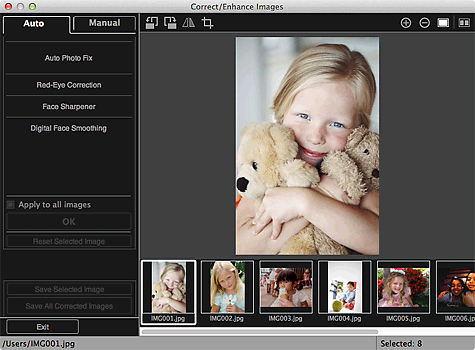
The Correct/Enhance Images window appears.

-
Select the image you want to enhance from the Selected Images area.
The selected image appears in the Preview area.
 Note
Note- If only one image is selected, only the preview appears and the Selected Images area does not appear.
Auto Enhancement:
-
Make sure that Auto is selected.
-
Click Digital Face Smoothing.
 Note
Note- The enhancement level can be changed by moving the slider displayed below Digital Face Smoothing.
-
Click OK.
Skin is enhanced beautifully and the
 (Correction/Enhancement) mark appears on the upper left of the image.
 Note
Note- Click
 (Display Comparison Screen) to display the images before and after the enhancement side by side in a separate window so that you can compare and check the result.
 - Click Reset Selected Image to undo all enhancements.
- Select the Apply to all images checkbox to enhance the selected images at one time.
- Click
Manual Enhancement:
-
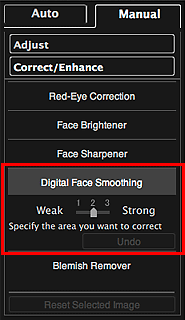
Click Manual, then click Correct/Enhance.
-
Click Digital Face Smoothing.

 Note
Note- The enhancement level can be changed by moving the slider displayed below Digital Face Smoothing.
- When the cursor is moved over the image, the shape of the cursor changes to
 (Cross).
-
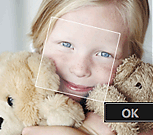
Drag to specify the area you want to correct, then click OK that appears over the image.

Skin in and around the specified area is enhanced beautifully and the
 (Correction/Enhancement) mark appears on the upper left of the image.
 Note
Note- You can also drag to rotate the selected area.
- Click
 (Display Comparison Screen) to display the images before and after the enhancement side by side in a separate window so that you can compare and check the result.
 - Click Undo to undo the last operation.
-
Click Save Selected Image or Save All Corrected Images.
Enhanced image(s) is (are) saved as a new file(s).
 Note
Note- To save only the image(s) you like, select it (them) and click Save Selected Image. Click Save All Corrected Images to save all the enhanced images at one time.
- The enhanced image(s) can be saved in JPEG/Exif format only.
-
Click Exit.
 Important
- If the enhanced image(s) is (are) not saved, the enhancement(s) will be deleted.

