Using Red-Eye Correction
You can reduce red eye caused by a camera flash.
There are two Red-Eye Correction methods: automatic and manual.

 Note
Note
- You can automatically correct red eyes when printing. Refer to "Print Settings Dialog" for the setting procedure.
-
Select the image(s) you want to correct.
-
Click Correct/Enhance at the bottom of the screen.
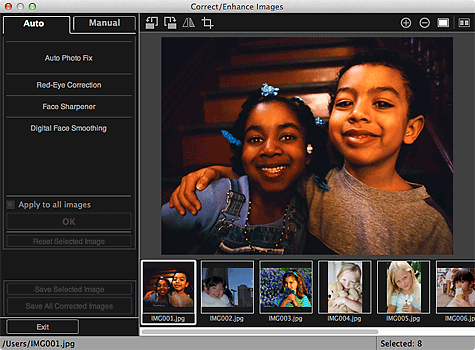
The Correct/Enhance Images window appears.

-
Select the image you want to correct from the Selected Images area.
The selected image appears in the Preview area.
 Note
Note- If only one image is selected, only the preview appears and the Selected Images area does not appear.
Auto Correction:
-
Make sure that Auto is selected.
-
Click Red-Eye Correction.
-
Click OK.
Red eyes are corrected and the
 (Correction/Enhancement) mark appears on the upper left of the image.
 Important
- Areas other than the eyes may be corrected depending on the image.
 Note
Note- Click
 (Display Comparison Screen) to display the images before and after the correction side by side in a separate window so that you can compare and check the result.
 - Click Reset Selected Image to undo all corrections.
- Select the Apply to all images checkbox to correct the images displayed in the Selected Images area at one time.
Manual Correction:
-
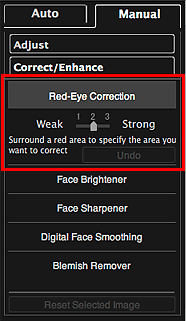
Click Manual, then click Correct/Enhance.
-
Click Red-Eye Correction.

 Note
Note- The correction level can be changed by moving the slider displayed below Red-Eye Correction.
- When the cursor is moved over the image, the shape of the cursor changes to
 (Cross).
-
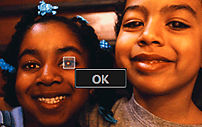
Drag to specify the red area you want to correct, then click OK over the image.

Red eyes are corrected and the
 (Correction/Enhancement) mark appears on the upper left of the image.
 Note
Note- Click
 (Display Comparison Screen) to display the images before and after the correction side by side in a separate window so that you can compare and check the result.
 - Click Undo to undo the last operation.
- Click
-
Click Save Selected Image or Save All Corrected Images.
Corrected image(s) is (are) saved as a new file(s).
 Note
Note- To save only the image(s) you like, select it (them) and click Save Selected Image. Click Save All Corrected Images to save all the corrected images at one time.
- The corrected image(s) can be saved in JPEG/Exif format only.
-
Click Exit.
 Important
- If the corrected image(s) is (are) not saved, the correction(s) will be deleted.

