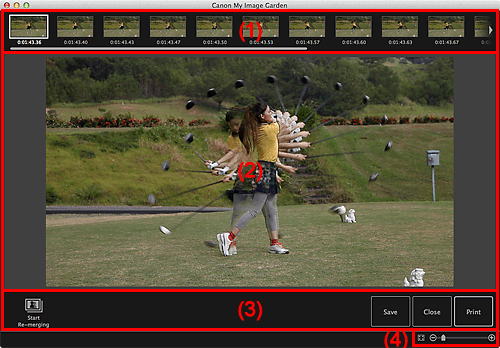


You can merge still images captured from a video in the order of the time code to create an image depicting the flow of a moving subject.
Select the images you want to merge in the Video Frame Capture view, then click Merge Frames to switch to the Merge Frames view.
 Important
You can merge between 5 and 30 still images.
Still images corrected in the Correct view cannot be used. The original uncorrected still images will be used.
 Note
NoteIt is recommended that you use still images captured from a video recorded with a steady camera (fixed to a tripod, etc.) without zooming or adjusting focus while recording.
Some portions of subjects may appear transparent if frames in which moving subjects overlap are selected.
Frames may not merge properly in the following cases.
When using a video recorded in a place where the background is moving
When frames in which moving subjects/shadows overlap are selected
When using a video recorded in a place where moving subjects and the background have similar colors and shapes
When using a video in which the brightness or lighting changed while recording
When using a video recorded using special functions such as miniature effect

Displays the thumbnails of the still image(s) selected in the Video Frame Capture view.

 (Left Scroll)/(Right Scroll)
Scrolls the Selected Images area left or right to display the hidden thumbnails.
Displays the preview of the merged image.
Start Re-merging
Re-merges using the images re-selected in the Selected Images area.
Save
Displays the Save dialog from which you can save the created image of merged frames.
Close
Switches to the Video Frame Capture view.
Displays the print settings dialog from which you can print the created image of merged frames.
 (Whole Image View)
Fits the preview to the area size.
 (Reduce/Enlarge)
Click  (Reduce) or
  (Enlarge) to reduce or enlarge the display size. You can also freely change the display size by dragging the slider.
 Note
NoteRefer to "Creating Images of Merged Video Frames" for how to merge still images.
Page top |