
Replacing an Ink Tank
When remaining ink cautions or errors occur, the message will appear on the touch screen to inform you of the error. Take appropriate action according to the message.
![]() Note
Note
- If print results become faint or white streaks appear despite sufficient ink levels, see Maintenance Procedure.
Replacing Procedure
When you need to replace an ink tank, follow the procedure below.
![]() Important
Important
- If you remove an ink tank, replace it immediately. Do not leave the machine with the ink tank removed.
- Use a new ink tank for replacement. Installing a used ink tank may cause the nozzles to clog. Furthermore, with such an ink tank, the machine will not be able to inform you when to replace the ink tank properly.
- Once an ink tank has been installed, do not remove it from the machine and leave it out in the open. This will cause the ink tank to dry out, and the machine may not operate properly when it is reinstalled. To maintain optimal printing quality, use an ink tank within six months of first use.
![]() Note
Note
-
Color ink may be consumed even when printing a black-and-white document or when black-and-white printing is specified.
Every ink is also consumed in the standard cleaning and deep cleaning of the print head, which may be necessary to maintain the performance of the machine. When an ink tank is out of ink, replace it immediately with a new one.
-
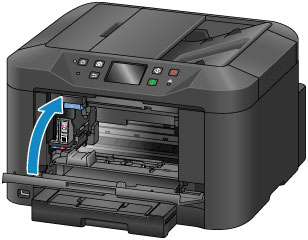
Make sure that the power is turned on, then open the front cover.
The replaceable ink tank is displayed on the touch screen and the print head holder (A) moves to the replacement position of that ink tank.
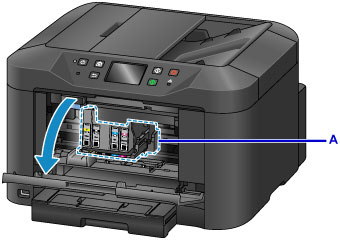
 Caution
- Do not hold the print head holder to stop or move it forcibly. Do not touch the print head holder until it stops completely.
 Important
-
Do not remove an ink tank until a new one is prepared to be installed.
- Once you remove an ink tank, the machine will not operate until a new one is installed.
- Once you remove an ink tank, the machine will not operate even if the removed ink tank is just reinstalled.
- You cannot remove the ink tank which is not placed at the replacement position. Removing it forcibly may cause the machine to malfunction or damage the machine.
- Do not touch the metallic parts or other parts inside the machine.
- If the front cover is left open for more than 60 minutes, the print head holder moves to the right. In this case, close and reopen the front cover.
 Note
Note- If the message for the ink tank replacement is displayed on the touch screen, check it and then tap OK.
-
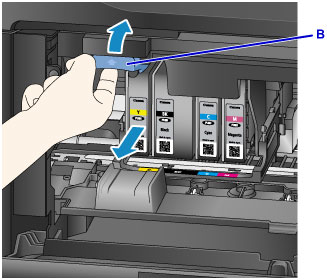
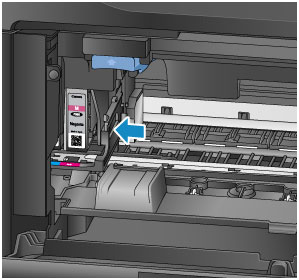
When an ink tank for replacement is displayed on the touch screen, push up the ink tank eject lever (B).
The ink tank will be ejected.
When you want to replace another ink tank, tap Next to display the screen for the ink tank to replace.
 Important
- Place the removed ink tank into a plastic bag immediately after removing from the machine. Otherwise, ink residue may stain your clothes or the surrounding area.
- Do not touch other parts besides the ink tanks.
- Discard the empty ink tank according to the local laws and regulations regarding disposal of consumables.
- Handle the ink tanks carefully. Do not drop or apply excessive pressure to them.
-
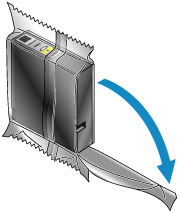
Remove the ink tank from the package.
 Important
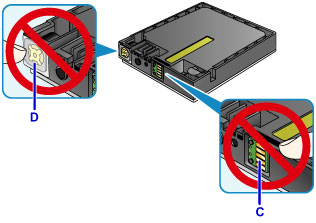
-
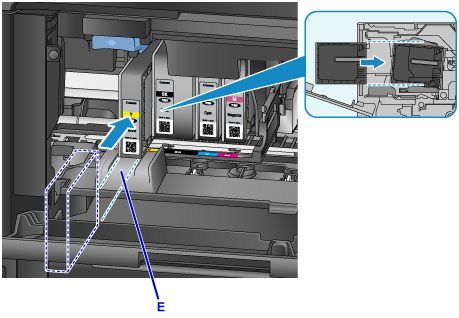
Do not touch the contact (C) and joint (D) of the ink tank.
-
-
Insert a new ink tank aligning it with the installation guide (E) of the machine.
 Important
- You cannot insert the ink tank in the wrong position. Check the label under the installation position, then install the ink tank in the correct position.
-
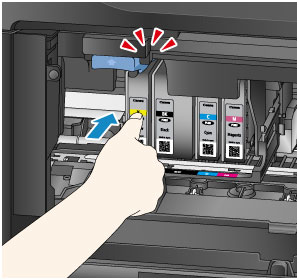
Push the ink tank until it snaps firmly into place.
-
Tap Exit on the touch screen.
If Next is displayed on the screen, it means there is another ink tank that can be replaced.
If you want to replace this ink tank, tap Next and then repeat procedures from step 2.
To exit the ink tank replacement, tap Next until Exit is displayed on the screen.
The print head holder moves to the standby position. You cannot remove the ink tank while at this position.
 Important
- You cannot print unless all the ink tanks are installed. Be sure to install all the ink tanks.
- An installed ink tank cannot be removed until the message to replace it is displayed.
-
Close the front cover.
After replacing the ink tanks, the machine starts mixing the ink automatically. Wait until the machine has stopped making operating noise. (This takes about 1 to 2 minutes.)
Note-
If the error message appears on the touch screen, take appropriate action.
- If the print head is out of alignment, as indicated by misaligned printed ruled lines or similar symptoms, align the print head.
- The machine may make noise during operation.
-
