Settings for Web Service
This section describes the machine's settings for web service.
 Registering the Account on Photo Sharing Site
 Resetting the Web Service Settings
Before using the web service, see the terms of service.
 Notice for Web Service Printing
Registering the Account on Photo Sharing Site
Register the account on the photo sharing site to the machine following the procedure below.
 Important
-
LAN connection with the machine and internet connection are required to use this function.
-
Before you register the account to the machine, you have to get the account on the photo sharing site. For getting the account, refer to the photo sharing site.
-
You can register the login name or e-mail address up to 256 characters and register the password up to 80 characters. When you get the account on the photo sharing site, set the login name or e-mail address within 256 characters and set the password within 80 characters.
Set the login name, e-mail address, and password in letters and figures can be entered on the touch screen of the machine.
-
Flick the HOME screen, then tap
 Setup.
 -
Tap
 Web service setup.
 -
Tap Online Album connection setup.
-
Tap Register account.
 Note
Note-
When you delete the account, tap Delete account. After tapping the photo sharing site to delete the account, the confirmation screen to delete the account is displayed. To delete the account, tap Yes.
-
-
Tap the photo sharing site to register the account.
The message for account information is displayed.
-
Check the message, then tap Next.
-
When the confirmation screen for account management is displayed, tap Agree.
 Note
Note-
By tapping Privacy Policy, you can display the message for account management policy.
-
-
Check the message to enter the login name or e-mail address, then tap User-ID or Email.
The screen to enter the login name or e-mail address is displayed.
 Note
Note-
If you already have registered the account, the login name or e-mail address is displayed on the screen.
-
-
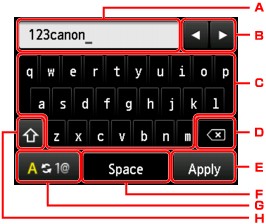
Enter the login name or e-mail address.

-
The entered characters are displayed.
-
Tap to move the cursor under the position where you want to edit.
-
Tap to enter the selected character.
-
Tap to delete the entered character.
-
Tap to finalize to enter.
-
Tap to enter a space.
-
Tap to switch the input mode from alphabetic to numeric.
-
Tap to switch the input mode.
When the input mode is alphabetic, switches lowercase to uppercase.
When the input mode is numeric, switches symbol.
-
-
Check the entered login name or entered e-mail address, then tap Apply.
-
Check the message to enter the password, then tap Password.
The screen to enter the password is displayed.
-
Enter the password.
Enter the password as well as the login name or e-mail address.
 Note
Note-
Depending on the setting on the photo sharing site, entering the password may not be necessary.
-
-
Tap Connect.
The machine accesses on the photo sharing site, then your account is confirmed.
After the confirmation of account is complete, the confirmation screen to save the login name or e-mail address and password is displayed.
-
Tap the setting to specify.
The account registration is complete.
Resetting the Web Service Settings
This function resets all web service settings.
Reset the web service settings following the procedure below.
-
Flick the HOME screen, then tap
 Setup.
 -
Tap
 Device settings.
 -
Tap Reset setting.
-
Tap Web service setup only.
The confirmation screen is displayed.
 Note
Note-
When you select Reset all, all settings you made including the web service settings are reverted to the machine back to default.
-
-
Tap Yes.
The web service setting is reset.

