Connecting Computer or Smartphone to Printer Directly via Wireless LAN (Access Point Mode)
The printer has a function to connect a computer or smartphone to the printer directly via wireless LAN, allowing you to perform printing operation. Follow the procedure below to use this function.
For more on printing operation, refer to device's or application's instruction manual.
 Important
-
If a device has already been connected to the printer via wireless LAN and you want to add a device to connect, connect it to the printer directly. You can connect up to 5 devices to the printer at the same time.
-
For restrictions when you change the connection method from direct connection to connection via a wireless router:
Changing Printer Setting
Change the printer setting following the procedure below.
-
Press and hold Wi-Fi button and release it when POWER lamp flashes 3 times.

-
Make sure POWER lamp changed from flashing to lit.

If the POWER lamp is not lit, repeat step 2.
 Note
Note
-
To check the current access point mode setting of the printer, print out the network setting information.
-
You can change the security setting using IJ Network Tool (bundled software).
Connecting Device to Printer
 Important
-
Before connecting a computer to the printer and start printing with the method below, complete setup for wireless LAN (via a wireless router) from our website (canon.com/ijsetup).
-
Turn on wireless communication on your computer or smartphone.
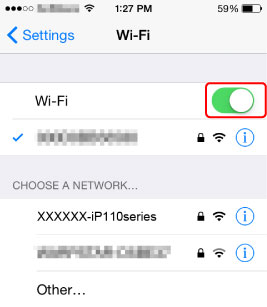
For Android or iOS, enable "Wi-Fi" on your device's "Setting" menu. For more on the procedure, refer to device's instruction manual.
For iOS:

-
Select "XXXXXX-iP110series" ("XXXXXX" represents last six digits of printer's MAC address.) from SSID list displayed on device.
-
Enter password.
The printer serial number is specified as a default password. It is printed on the sticker attached on the printer rear and consists of 9 alphanumeric characters (four alphabets followed by five numbers).
 Note
Note-
To check printer's serial number, print out the network setting information.
Connection is completed.
-
Performing Printing Operation
Start printing from the connected device.


