
Replacing the Print Head
If the touch screen indicates to replace the print head or if instructed to do so by your Canon dealer, replace the print head.
Compatible Print Head
For details on compatible print head, see Print Head.
Precautions When Handling Print Head
Take the following precautions when handling the print head.
![]() Caution
Caution
- For safety, keep print head out of the reach of children.
- If ink is accidentally ingested, contact a physician immediately.
- Do not touch the print head immediately after printing. The print head becomes extremely hot, and there is a risk of burns.
![]() Important
Important
- There may be ink around the nozzles of the print head you remove. Handle the print head carefully during replacement. The ink may stain clothing.
- Do not open the print head pouch until immediately before installation. After removing the print head from the pouch, install it right away. If the print head is left as is after the pouch is opened, the nozzles may dry out, which may affect printing quality.
How to Replace Print Head
![]() Caution
Caution
- When replacing the print head immediately after printing, wait a few minutes before replacing it. The metal parts of the print head become hot during printing, and there is a risk of burns from touching these parts.
![]() Important
Important
- Your hands may become dirty during print head replacement. Use the gloves provided in the box with the new print head for replacement.
![]() Note
Note
- Refill the ink tanks when ink levels are low.
- Prepare a new maintenance cartridge when the remaining capacity of the maintenance cartridge is low.
-
Select
 (Setup) on the HOME screen.
 -
Select
 Maintenance.
 -
Select Head Replacement.
-
Check message and select Start.
Draining ink from the print head starts. Draining ink takes about 3 minutes.
 Important
- When the cover is ready to be opened, instructions will be displayed on the touch screen. Do not open the cover before these instructions are displayed.
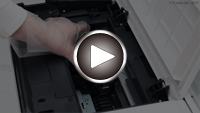
-
Open the scanning unit / cover (TC-5200M) or the access cover on the left (TC-5200).
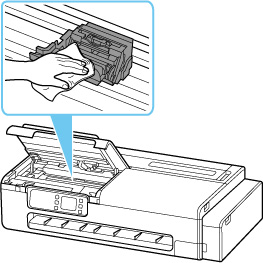
-
If the print head locking cover and print head lock lever are dirty, use a damp cloth that you have wrung out completely to wipe them clean.
 Important
-
Do not touch the linear scale (A) and carriage rail (B). Touching these may cause malfunction.
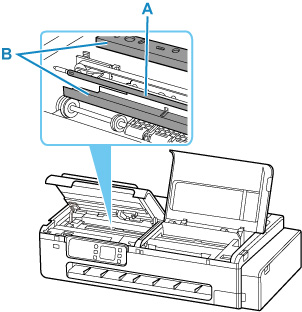
- Do not use tissue paper, paper towels, rough-textured cloth, or similar materials for cleaning so as not to scratch the surface.
-
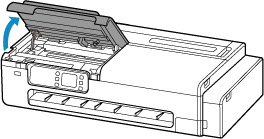
-
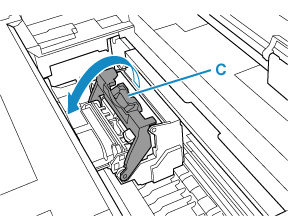
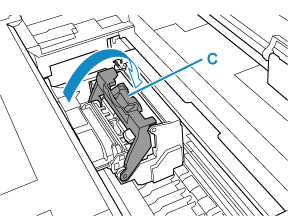
Open print head lock lever firmly toward the front while holding its center (C) with your fingertip.
-
Grab grip (D) and open print head locking cover.

-
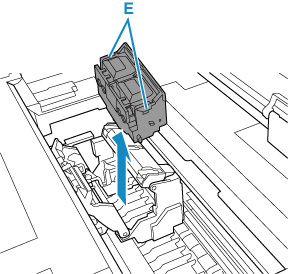
Grab grips (E), remove print head, and then select OK.
 Important
- Never touch the metal contacts of the carriage. Furthermore, do not allow any dirt or debris to become adhered to the metal contacts of the carriage. These may damage the printer.
 Note
Note- Dispose of the used print head in accordance with local regulations.
-
Remove print head that was in case from pouch.

-
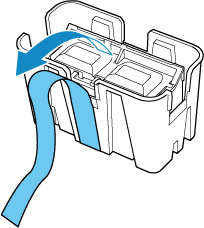
Remove tape used to secure print head.
-
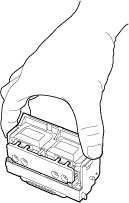
Hold the left and right grips, and remove the print head from the case.
 Important
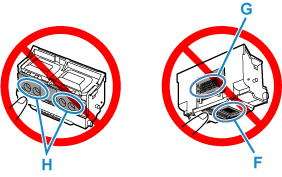
- Always carry the print head by holding its right and left grips. Never touch nozzle (F) or metal contacts (G). This may damage the print head and affect printing quality.
-
Never touch the ink holes (H). This may affect printing quality.
- The print head contains ink to protect the nozzle. If ink accidentally spills, wipe off the ink with a dry cloth.
- If you need to put a print head somewhere temporarily before installation, do not set it down with the nozzles and metal contacts facing down. If the nozzles or metal contacts are damaged, it may affect the printing quality.
-
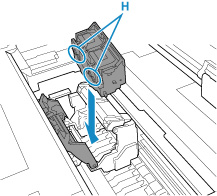
Turn ink holes (H) toward the front and insert print head into carriage.
Insert the print head all the way into the carriage, while taking care to keep the ink supply unit from touching the carriage.
When inserting the print head into the carriage, make sure that the print head lock lever is firmly opened toward the front of the printer.
 Important
- Do not force the print head. The carriage may be damaged.
-
Grasp tab (D) of print head locking cover and lower it to front to lock print head.

-
While holding center part (C) of print head lock lever, lower it toward back.
-
Close the scanning unit / cover (TC-5200M) or the access cover on the left (TC-5200).
To close the scanning unit / cover, hold it up once, then take it down gently.

Ink now fills the print head. It takes about 7 minutes.
 Caution
- When closing the scanning unit / cover, be careful not to get your fingers caught.
Important- While ink is being filled, definitely do not remove the maintenance cartridge. Ink may leak out.
