
Transporting Your Printer
Do not tilt the printer or turn it on its side or upside down. Doing so may cause ink to leak during relocation.
If you can transport the printer in its horizontal orientation:
If the printer may tilt during transport:
![]() Important
Important
-
If you tilt the printer or turn it on its side or upside down, ink may leak.
For this reason, when transporting the printer, to prevent the ink leakage, the ink in the printer and a certain amount of ink in the ink tanks need to be ejected into the maintenance cartridge.
If the maintenance cartridge does not have the remaining capacity enough for ejected ink, you need to replace it with a new one. Up to three maintenance cartridges are required.
If replacement of the maintenance cartridge is not possible, printer transport preparation cannot be executed. We recommend you to prepare maintenance cartridges before executing printer transport preparation.
However, the maintenance cartridge removed for printer transport preparation may still have the remaining capacity for printing.
In such cases, the removed maintenance cartridge can be reinstalled for use.
When you first use the printer after executing printer transport preparation, a certain amount of ink is consumed to set up the printer for printing. The maintenance cartridge is also consumed for this set up.
Prepare to transport the printer and remove ink tanks.
Preparing to Transport Your printer
-
Make sure that the power is turned on.
-
Select Maintenance on the HOME screen, then press the OK button.
The Maintenance screen will appear.
-
Select Prepare to transportation, then press the OK button.
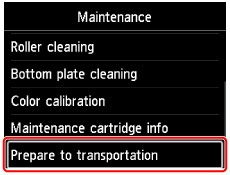
The confirmation screen will appear.
-
Check the message, select Yes, then press the OK button.
The ink in the printer is ejected into the maintenance cartridge. This takes about 5 minutes to complete (excluding the maintenance cartridge replacement).
Do not perform any other operations during this operation.
 Important
- If the space in the maintenance cartridge is almost used up, a message prompting you to replace the maintenance cartridge is displayed. Follow the directions in the message to replace the maintenance cartridge.
-
While ink is being ejected, always follow the precautions below. Otherwise, ink ejection may be interrupted and started over again, causing the printer to consume more ink.
- Do not unplug the printer to turn off the power.
- Do not open the tank cover.
- Do not open the maintenance cover.
- Do not move or lift up the printer.
-
If a message prompting you to remove ink tanks appears, remove all ink tanks.
-
Close the tank cover.
A message prompting you to replace the maintenance cartridge will be displayed. Follow the directions in the message to replace the maintenance cartridge.
The ink in the printer is ejected into the maintenance cartridge. This takes about 6 minutes to complete (excluding the maintenance cartridge replacement).
Do not perform any other operations during this operation.
When the completion message appears, turn off the printer.
Important- Keep removed ink tanks in a bag to avoid staining of clothing or the surrounding area. Also, do not drop ink tanks or apply excessive pressure to them. Handle carefully.
Packing Your printer
-
Turn off the printer.
-
Confirm that the POWER lamp is off and unplug the power cord.
Important- Do not unplug the printer while the POWER lamp is lit or flashing, as it may cause malfunction or damage to the printer, making the printer unable to print.
-
Retract the paper output support, then close the output tray extension and the paper output tray.
-
Close the top feed or the manual feed tray.
To close the top feed, retract the paper support extension, then close the paper support.
To close the manual feed tray, retract the paper support extension and the paper support.
-
Unplug the printer cable from the computer and from the printer, then unplug the power cord from the printer.
-
Use adhesive tape to secure all the covers on the printer to keep them from opening during relocation.
-
Attach the protective material to the printer when packing the printer in the box.
![]() Important
Important
- Reinstall the printer on a flat place while paying attention to the ink supply stopper.
Reinstalling Your printer
When the preparations to transport have been done and the printer was transferred, follow the procedure below.
![]() Important
Important
- During reinstallation, a great amount of ink is consumed since ink is loaded into the printer or inside of print head. Additional new ink tanks or maintenance cartridges may be also necessary since a great amount of ink is ejected. Obtain ink tanks or maintenance cartridges before performing preparations. If a message prompting you to replace ink tanks or the maintenance cartridge is displayed, you cannot use the printer until you replace them with new ones.
-
Take the printer out of the box.
-
Press the ON button to turn on the printer.
-
Check the message, select Yes, then press the OK button.
-
When the message appears, open the tank cover, then install all removed ink tanks.
After the tank cover is closed, the printer starts preparations to reinstall it. Wait for a while.
Do not perform any other operations during this operation.
The main menu will appear after preparations to reinstall the printer are complete.
Important-
If there is not enough ink in the ink tanks, a message prompting you to replace ink tanks is displayed. Follow the directions in the message to replace the ink tank and then press the Back button.
We recommend storing the removed ink tanks since they may still be usable for normal printing.
-
If the maintenance cartridge does not have enough space, a message prompting you to replace the maintenance cartridge is displayed. Follow the directions in the message to replace the maintenance cartridge and then press the Back button.
We recommend storing the removed maintenance cartridge since it may still be usable for normal printing.
- Keep removed ink tanks in a bag to avoid staining of clothing or the surrounding area. Also, do not drop ink tanks or apply excessive pressure to them. Handle carefully.
-
During reinstallation preparation, always follow the precautions below. Otherwise, reinstallation preparation may be interrupted and started over again, causing the printer to consume more ink.
- Do not unplug the printer to turn off the power.
- Do not open the tank cover.
- Do not open the maintenance cover.
- Do not move or lift up the printer.
-
