 Uneven or Streaked Colors


-
Check 1 Do page size and media type settings match size and type of loaded paper?
If these settings do not match, it is not possible to obtain the proper result.
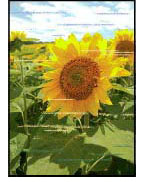
If you are printing a photograph or an illustration, an incorrect paper type setting may reduce the quality of the printout color.
Also, if you print with an incorrect paper type setting, the printed surface may be scratched.
In borderless printing, uneven coloring may occur depending on the combination of the paper type setting and the loaded paper.
The method for checking the paper and print quality settings differs depending on your printer.
-
Printing from your computer
Check the settings using the Printer Driver.
-
Printing from your smartphone/tablet using

Check the settings on the App.
-
-
Check 2 Make sure appropriate print quality is selected.
Select a print quality suited to the paper and to what you are printing. If you notice blurs or uneven colors, increase the print quality setting and retry the printing.
-
Check 3 Increase print quality and try printing again.
Increasing the print quality using operation panel of the printer or from computer may improve the print result.
-
Check 4 Are the print head nozzles clogged?
Print the nozzle check pattern to determine whether the ink ejects properly from the print head nozzles.
-
Step 1 Print a nozzle check pattern.
After printing the nozzle check pattern, examine the pattern.
-
From the printer
If the pattern is not printed correctly, check if the ink tank for the problem color is empty.
If the ink tank is not empty, go to the next step.
-
-
Step 2 Clean the print head.
After cleaning the print head, print the nozzle check pattern and check the result.
-
From the printer
If it still does not improve, go to the next step.
-
-
Step 3 Clean the print head again.
After cleaning the print head again, print the nozzle check pattern and check the result.
If it still does not improve, go to the next step.
-
Step 4 Clean the print head deeply.
After cleaning the print head deeply, print the nozzle check pattern and check the result.
-
From the printer
If it does not improve, turn off the printer, wait for more than 24 hours without unplugging the power supply, and go to the next step.
-
-
Step 5 Clean the print head deeply again.
After cleaning the print head deeply again, print the nozzle check pattern and check the result.
If it still does not improve, go to the next step.
-
Step 6 Request a repair.
If problem is not resolved after performing print head deep cleaning twice, the print head may be damaged. Contact your nearest Canon service center to request a repair.
For details on printing the nozzle check pattern, print head cleaning, and print head deep cleaning, see Adjustments for Better Print Quality.
-
-
Check 5 Perform print head alignment.
 Note
Note-
If the problem is not resolved after performing the print head alignment, perform print head alignment manually.
-
