Custom Frame Size Screen
Specify the size of the photo(s) to print.
Switch to the Custom Frame Size screen by one of the following operations.
- Click Custom Frame Size in the Home screen
- Click Advanced... when editing Custom Frame Size in the Item edit screen
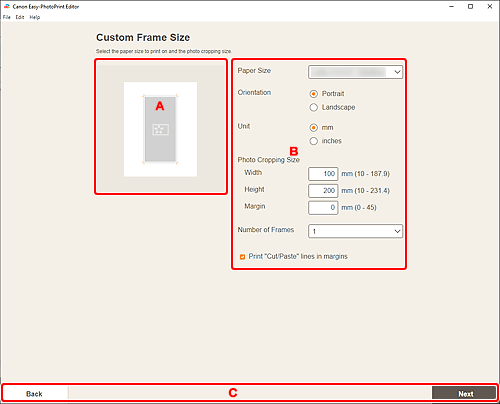
A: Preview Area
Check the print image.
B: Settings Area
Specify the paper size, photo size, and other settings.
- Paper Size
- Select the size of the paper to use.
- Orientation
- Select Portrait or Landscape.
- Unit
- Select mm or inches.
- Photo Cropping Settings
-
- Shape
- Select Rectangle or Circle.
- Size
-
- Width/Height
-
These appear when Rectangle is selected.
Specify the Width and Height of the photo(s) to print.
- Diameter
-
This appears when Circle is selected.
Specify the Diameter of the photo(s) to print.
- Margin
- Set the Margin (amount of space that remains around the printed photo after cutting it along the crop marks).
 Note
Note- If the photo(s) do not fit on the paper,
 appears. Change Size.
- Number of Frames
- Set the number of photo(s) to place on the paper.
- Print "Cut/Paste" lines in margins
- Select this checkbox to print crop marks on the paper.
![]() Note
Note
- An error message appears if the photo(s) do not fit on the paper and printing is not possible. Change Size in Photo Cropping Settings, or change Number of Frames accordingly.
C: Switch Screen Area
- Back
- Return to the previous screen.
- Next
- The view switches to the Photo Locations screen or Item edit screen.
