Print Settings Screen
Specify the print settings and start printing.
To print a photo, select it in the Photo Locations screen to switch to the Print Settings screen.
To print an item, tap Next in the Item edit screen to switch to the Print Settings screen.
 Note
Note
- The displayed settings vary depending on your printer, the language specified in Easy-PhotoPrint Editor, and your item.
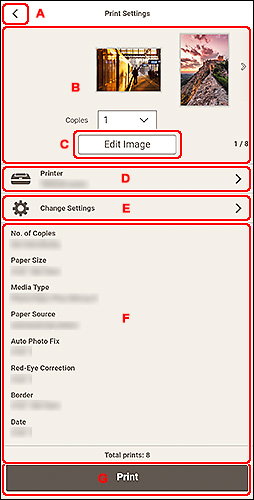
- A:
 (Back)
 - B: Print Preview Area
- C: Edit Image
- D: Printer
- E: Change Settings
- F: Print Settings Display Area
- G: Print
A:  (Back)
 (Back)
- Return to the previous screen.
B: Print Preview Area
Displays the thumbnails of photos and items.
Check the print preview or set the number of copies to print.
To display previous/next photos or pages in item:
Tap 
 (Back/Next) or flick the thumbnails left or right.
To enlarge view of photo or item:
Tap the thumbnail.
 (Copies)
-
Set the number of copies to print.
 Note
Note- When there are multiple photos, tap

 (Back/Next) or flick the thumbnails left or right to bring the target photo above
  (Copies).
 -
You can also set the number of copies to print for all the photos at once.
- When there are multiple photos, tap
C: Edit Image
 Note
Note
- When there are multiple photos, tap

 (Back/Next) or flick the thumbnails left or right to bring the photo you want to edit above
  (Copies).
Switches to the Edit Image screen and you can crop the photo or enhance it using special filters.
D: Printer
Switches to the Available Printers screen and you can add or change the printer to use.
Adding Printer:
-
Tap Add Printer.
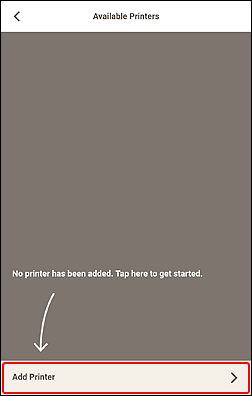
The view switches to the Add Printer screen and a list of detected printers appears.
 Note
Note- It may take a while to detect the printer to use.
- If the printer you want to use does not appear, perform setup from the top page of the Online Manual.
-
Tap printer to use.
The printer is added to the Available Printers screen.
-
Make sure checkmark is placed beside printer to use, and then tap
 (Back).
 Note
Note
- To change a printer name, press and hold the printer name you want to change, and then change it in the displayed screen.
Changing Printer to Use:
-
Select and place checkmark beside printer to use.
-
Tap
 (Back).
 Important
- If you change the printer, the settings in "E: Change Settings" may change.
- In photo printing, if you change the printer after cropping an image, the cropping settings will be canceled.
 Note
Note
- To delete an added printer, tap
 (Delete).
E: Change Settings
Switches to the Advanced Print Settings screen and you can specify the printing method and other settings.
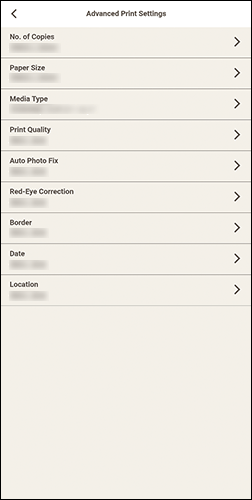
Tap a setting item to switch to the corresponding advanced setting screen.
 Important
- In photo printing, if you change Paper Size or Border after cropping an image, the cropping settings will be canceled.
In photo printing, changing Media Type or Paper Source may also cancel the cropping settings, depending on the selected media type and paper source.
- No. of Copies
-
For photo printing:
- Set individually
- Set the number of copies to print for each photo in the Print preview area.
- Set for all
-
Set the number of copies to print for all the photos at once.
Tap to display the number of copies selection screen. Tap the number of copies you want to print.
For items:
Tap the number of copies to display the number of copies selection screen. Tap the number of copies you want to print.
After completing the settings, tap
 (Back).
 - Paper Size
-
Select the size of the paper to use.
 Note
Note- To print to fit the roll paper width, select Fit to Roll Paper Width.
- Media Type
-
Select the type of the paper to use.
 Note
Note- When Auto is selected, printing is performed with the media type set on the printer.
- When Premium Fine Art Rough is selected, the paper may become stained or the print quality may deteriorate depending on your environment. Printing in a layout with wide margins is recommended.
- Paper Source
-
Select the paper source.
- Print Quality
- Select the print quality suitable for the data to be printed.
- Print Area
-
Specify which pages to print.
- All
- Print all pages.
- Pages
-
Specify a range of pages to print.
Tap Start Page or End Page to specify the page number.
After completing the settings, tap
 (Back).
- Auto Photo Fix
- Place a checkmark beside On to correct photos automatically.
- Red-Eye Correction
- Place a checkmark beside On to correct red eyes caused by a camera flash.
- Border
-
Select Borderless or Bordered.
Place a checkmark beside Borderless to print the photos or item on an entire sheet of paper without borders.
- Date
-
- Date
- Select On to print the date on a photo.
- Size
- Select the size for the date text.
- Color
-
- Text
- Select the color for the date text.
- Outline
- Select the color for the text outline.
- Location
-
- Location
- Select On to print the shooting location name on a photo.
- Size
- Select the size for the location name.
- Color
-
- Text
- Select the text color for the location name.
- Outline
- Select the color for the text outline.
- Color/Monochrome
-
Set color printing or monochrome printing.
For monochrome printing, select according to the preferred tone.
- Color
- Performs color printing.
- Monochrome (B&W)
- Performs monochrome printing in a tone that looks like an achromatic color.
- Monochrome (Warm)
- Performs monochrome printing in a warm yellowish tone.
- Monochrome (Cool)
- Performs monochrome printing in a cool bluish tone.
- Adjust Print Position
-
The view switches to the Adjust Print Position screen.
If the printed image is out of position, adjust the print position in the Adjust Print Position screen.
Business card and sticker:
Adjust the vertical and horizontal print positions separately based on the print direction in 0.01 in. or 0.1 mm increments within the range of -0.08 in. (-2.0 mm) to +0.08 in. (+2.0 mm).
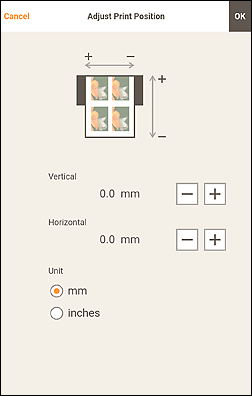
Disc label:
Adjust the vertical and horizontal print positions separately based on the print direction in 0.01 in. or 0.1 mm increments within the range of -0.04 in. (-0.9 mm) to +0.04 in. (+0.9 mm).
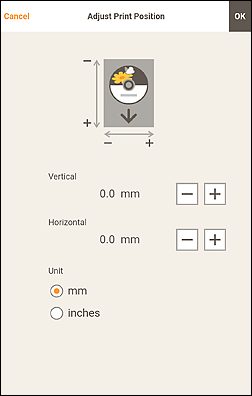
After completing the settings, tap OK.
- Save Paper (Rotate 90 Degrees)
-
Available when printing on roll paper.
Select the On checkbox to rotate the print orientation 90 degrees.
Rotating the print orientation can in some cases help conserve paper.
F: Print Settings Display Area
Check the printing method and other settings specified for the printer to use.
Tap to switch to the Advanced Print Settings screen for specifying the printing method and other settings. For details on the Advanced Print Settings screen, see E: Change Settings.
 Note
Note
- Some setting items may be hidden depending on your device. To display the hidden setting items, flick the Print Settings Display area up.
- Total prints
- Displays the total number of print copies.
G: Print
- Starts printing with the specified settings.
