Basic Settings Tab Description
The Basic Settings tab is for registering commonly used print settings.
- Settings Preview
- Preview before printing
- Page Size
- Printer Paper Size
- Media Type
- Quality
- Paper Source
- Copies
- Collate
- Orientation
- Grayscale Printing
- Borderless Printing
- Page Layout
- Zoom
- 1-sided/2-sided
- Binding Location
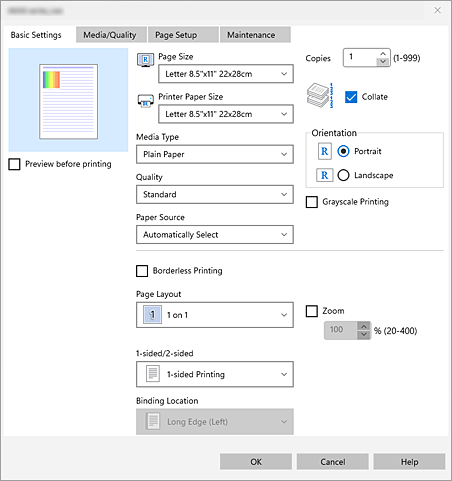
- Settings Preview
-
The paper illustration shows how the original will be laid out on a sheet of paper.
You can check an overall image of the layout. - Preview before printing
-
Shows what the print result will look like before you actually print the data.
Check this check box to display a preview before printing. - Page Size
-
Selects a page size.
Ensure that you select the same page size as you selected within the application.
If you select Custom..., the Custom Paper Size dialog box opens and allows you to specify any vertical and horizontal dimensions for the paper size. - Printer Paper Size
-
Selects the size of paper actually loaded into the printer.
Normally, it will appear as Same as Page Size, and the document is printed with no scaling.
If you select a paper size that is smaller than the Page Size, the document size will be reduced. If you select a paper size that is larger, the document size will be enlarged.
Also if you select Custom..., the Custom Paper Size dialog box opens and allows you to specify any vertical and horizontal dimensions for the paper size. - Media Type
-
Selects a type of printing paper.
Select a media type that matches the paper that is loaded in the printer. This ensures that printing is carried out properly for the specified paper. - Quality
-
Selects your desired printing quality.
Select one of the following to set the print quality level that is appropriate for the purpose.
To set the print quality level individually, click the Media/Quality tab, and for Quality, select Custom. The Set... becomes enabled. Click Set... to open the Custom dialog box, and then specify the desired settings. Important
- The available options for Quality will vary depending on the Media Type setting.
- Paper Source
-
Select the supply method for the paper source.
Important
- Depending on the media type and size, the Paper Source settings that can be selected may differ.
- Copies
- Specifies the number of copies you want to print.
- Collate
-
When printing multiple copies, the default behavior is to print all copies of page 1 first, then all copies of page 2, and so on. If you check the Collate check box, each copy will be printed in order from the first to the last page.
Important
- When the application software that you used to create the document has the same function, give priority to the Canon Print Assistant settings. However, if the print results are not acceptable, specify the function settings on the application software. When you specify the number of copies and the printing order with both the application and this Canon Print Assistant, the number of copies may be multiplied numbers of the two settings or the specified printing order may not be enabled.
- Orientation
- Selects the printing orientation.
- Grayscale Printing
- This function converts the data to monochrome data when printing your document.
- Borderless Printing
-
Performs borderless printing without any margins on the paper.
In borderless printing, originals are enlarged to extend slightly off the paper. Thus, printing can be performed without any margins (border).
To adjust the amount that the document extends beyond the paper, click the Page Setup tab, and enter the value in Amount of Extension. Note
Note- Depending on your printer model, borderless printing may not be available.
- Depending on your printer model, Amount of Extension may not be displayed.
- Page Layout
-
Selects the size of the document you want to print and the type of printing.
- 1 on 1 to 16 on 1
-
Multiple pages of document can be printed on one sheet of paper.
To change the page order, click Preferences.... In the Page Layout Printing dialog box that appears, specify Page Order.
- Zoom
- Specifies an enlargement or reduction ratio for the document you want to print.
- 1-sided/2-sided
-
Select whether to print on one side or both sides of the paper.
Note
- Depending on your printer model, 2-sided printing may not be available.
Printers that support 2-sided printing may support either or both of the following:- Manual 2-sided printing
- Automatic 2-sided printing
- Depending on your printer model, 2-sided printing may not be available.
- Binding Location
-
Selects the stapling margin position.
The printer analyzes the Orientation and Page Layout settings, and automatically selects the best stapling margin position. Check Binding Location, and select from the list to change it.
Custom Paper Size dialog box
This dialog box allows you to specify the size (width and height) of the custom paper.
- Units
- Select the unit for entering a user-defined paper size.
- Paper Size
-
Specifies the Width and the Height of the custom paper.
When you change the Units setting, the corresponding measurements will automatically update to match the selected unit.
Page Layout Printing dialog box
This dialog box allows you to select the number of document pages to be placed on one sheet of paper, the page order, and whether a page border line is to be printed around each document page.
The settings specified in this dialog box can be confirmed in the settings preview on the Canon Print Assistant.
- Page Order
- Specifies the document orientation to be printed on a sheet of paper.
- Page Border
-
Prints a page border line around each document page.
Check this check box to print the page border line.
