
Scheduled Export of Cost Data Dialog Box
Configure the scheduled export of cost information to a file in CSV format.
You can also do the settings to send exported CSV format files by email.
This will show all printers for which job costs can be checked in Accounting Manager.
Select Scheduled Export of Cost Data from Job Cost in the File menu to display this dialog box.
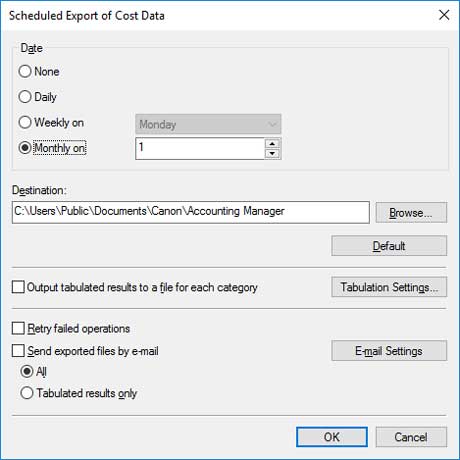
- Date
-
Specify the interval for performing the scheduled export of cost information.
-
Select from None, Daily, Weekly on, and Monthly on.
-
 Note
Note-
If None is selected, the scheduled export of cost information will not be performed.
-
To create exports at the end of each month, select Monthly on and specify 31 as the date to be performed.
-
- Destination
-
Specify the folder that the cost information is exported to.
-
Files will be exported with a name in the following format: JobCostList_YYYYMMDD-YYYYMMDD.csv. "YYYY" indicates the year, "MM" the month and "DD" the day.
-
If a file with the same name already exists, "(n)" is appended to the end of the file name, so that a file with a duplicate name is not exported.
-
- Default Button
-
Restores the default value for Destination.
- Output tabulated results to a file for each category
-
Selecting this also outputs a CSV-format file in which each item is tabulated.
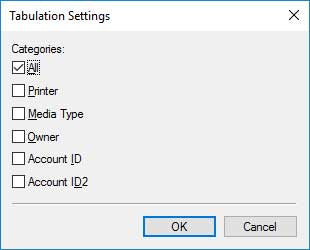
- Tabulation Settings
-
Click this to display the Tabulation Settings dialog box.
Each selected item is totaled and output as a tabulated file in CSV format.
- Retry failed operations
-
Check this check box to try creating a schedule again after the export could not be completed for some reason.
- Send exported files by email
-
By selecting this, you can send cost information files that are exported at scheduled intervals in a CSV format by email.
- All
-
Attaches a CSV-format file that is exported at scheduled intervals and a CSV-format file in which each item is totaled.
- Tabulated results only
-
Only attaches a CSV-format file in which each item is totaled.
- Email Settings
-
Displays the "Email Settings Dialog Box".
Do the settings related to the email server and the emails for sending cost information files that are exported in a CSV format.
![]() Important
Important
-
The scheduled export and email transmission of cost information requires that resident service be started.
For details on the resident service, see "Resident Service Settings Dialog Box."
-
Even if there are no jobs to be included in the exported log, a file will be exported. In this case, only the header row is exported.
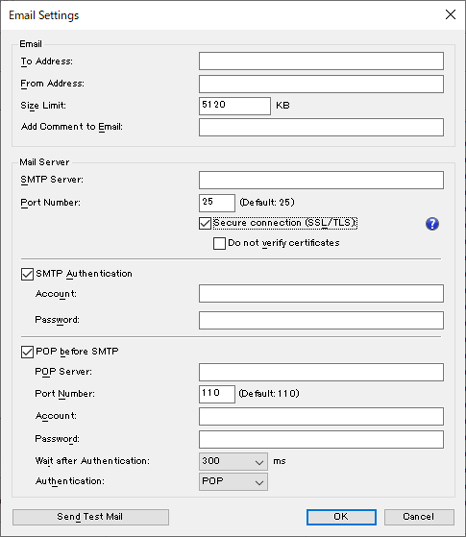
Email Settings Dialog Box
Do the settings related to the email server and the emails for sending cost information files that are exported in a CSV format.
Clicking the Email Settings button in the Scheduled Export of Cost Data dialog box opens the Email Settings dialog box.
-
- To Address
-
Input the email addresses to which to send email. You can register up to a maximum of 5 email addresses.
If you input multiple email addresses, separate them with commas ",".
- From Address
- Input the email address from which to send email. You can register 1 email address.
- Size Limit
-
Input the maximum size for attached files.
The emails are not sent if the size of the attached file is larger than the value that is input here.
Note- The default value is 5120 (KB), you can input a value in a range from 5 to 102400 (KB).
- Add Comment to Email
- Input text as the body of the email. You can input a maximum of 80 characters.
- Mail Server
-
- SMTP Server
- Input the IP address and the host name of the SMTP server.
- Port Number
- Input the port number of the SMTP server.
-
- Secure connection (SSL/TLS)
- Select this to use SSL/TLS to secure connections.
- Do not verify certificates
- Select this to not verify certificates on a secure connection.
-
You may need to install a certificate to use secure connections.
Note the following precautions when installing a certificate.
-
In the import wizard for certificates, select your local computer as the location to store the certificate.
-
In the import wizard for certificates, select Trusted Root Certificate Authorities as the certificate store.
-
If you cannot select a storage location in the import wizard for certificates, use the Microsoft Management Console (MMC) to change to a local computer.
 Important
 - SMTP Authentication
-
Select whether to use the SMTP server's authentication function. Select this to use the SMTP server's authentication function.
- Account
- Input the account that uses SMTP authentication.
- Password
- Input the password that is used for SMTP authentication.
- POP before SMTP
-
Select whether to use POP before SMTP. Select this to use POP before SMTP.
- POP Server
- Input the IP address and the host name of the POP server.
- Port Number
- Input the port number of the POP server.
- Account
- Input the account used when connecting to the POP server.
- Password
- Input the password used when connecting to the POP server.
- Wait after Authentication
- Select the time to wait before sending email after POP authentication is done.
- Authentication
- Select either POP or APOP as the authentication method for POP before SMTP.
