
Tips on Using Canon Inkjet Cloud Printing Center (at Work)
The Group management function allows you take advantage of the many useful functions that the service offers for office use.
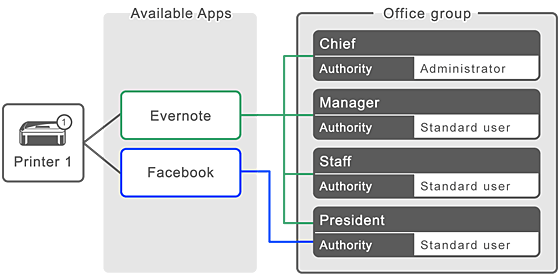
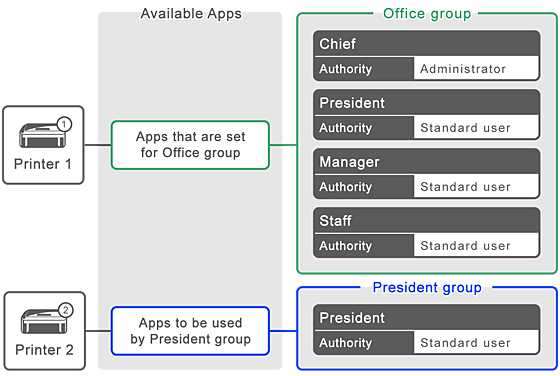
This section introduces an example in which two printers are used, the Administrator is the senior clerk, and the other members are the company president, the section manager, and the new hire.
![]() Note
Note
- If the second printer has not been registered, select "Adding the Second and Following Printer" and register the printer by following the procedure.
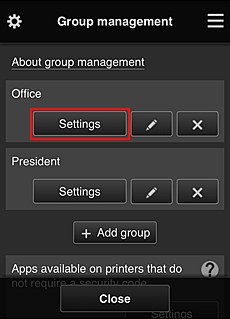
Creating a Group for All Office Members to Use
Set the basic group.
In this example, only the Evernote app will be used on 2 printers.
-
The senior clerk registers to Canon Inkjet Cloud Printing Center and becomes the Administrator
-
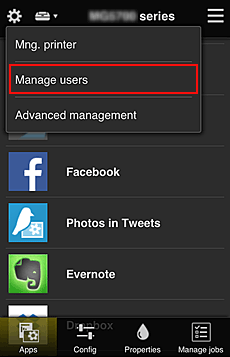
The senior clerk selects Manage users from

-
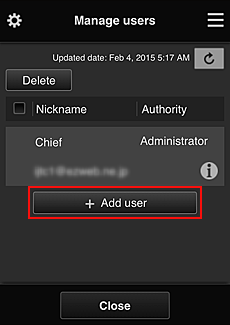
On the displayed screen, the senior clerk selects Add user and registers the company president, the section manager, and the new hire as users
-
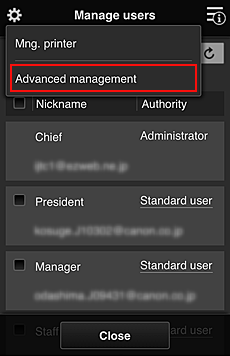
The senior clerk selects Advanced management from
-
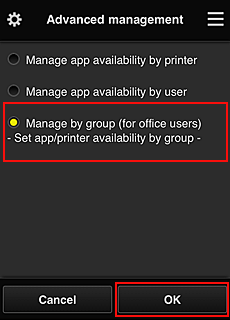
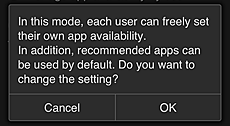
For Select how to manage, the senior clerk selects Set

-
The senior clerk sets Manage by group (for office users) and selects OK
 Note
Note- If Group management has already been set up, refer to step 10 and the subsequent steps.
-
On the screen for checking management method changes, the senior clerk checks the displayed information and selects OK.

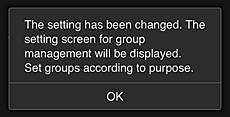
This appears only if the selected mode is Group management.
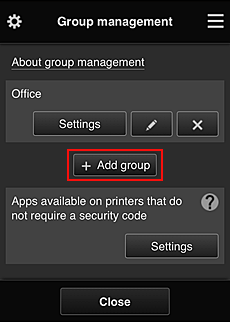
To complete the setup and display the Group management screen, select OK.Note- With the default settings, the group is named "group1".
- With the default settings, all registered users belong to the same group.
-
In the Group management screen, the senior clerk selects the
 of the group to be renamed
 -
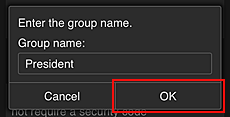
The senior clerk enters the Group name and selects OK
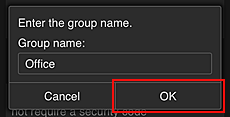
The chief clerk enters "Office" here because the clerk is setting up a group that everyone in the office will use.
 Important
-
The following restrictions apply to entering the Group name.
- The group name can have up to 20 single-byte alphanumeric characters or up to 10 double-byte characters.
- The same group name cannot be registered more than once in the same domain.
- Up to 20 groups can be registered.
- The person who created the group becomes the Administrator.
-
-
Select Settings, and in group setup screen, check that all users on the Users tab are selected
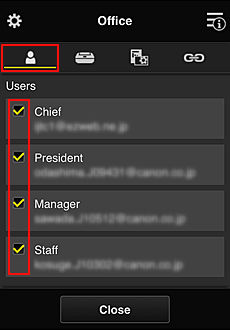
-
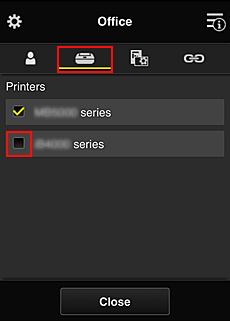
On Printers tab, check that all printers are selected

-
On Apps tab, set only Evernote app to

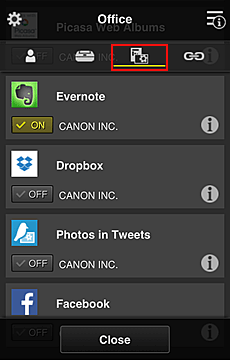
To switch between app registration/deletion, select
/  .
.
To return to the Group management screen, select Close.
This completes the setup of the group to be used by the entire office.
![]() Note
Note
- The group setup screen displays all users and printers that are registered in the domain.
- If you want to set up new apps as an individual, you can add a group.
To create a new group, use Add group, and then in the setup screen for the added group, add users and printers.
- Limiting Apps That Each User Can Use
- Limiting Apps That All Members Can Use on Printer
- Limiting Apps That Individual Users Can Use on Printer
- Limiting Printers That Individual Users Can Use
![]() Important
Important
- The available apps may differ depending on the country or the region.
Limiting Apps That Each User Can Use
Set the following:
- Entire office: Use only Evernote app
- President: Use Evernote app and Facebook app
-
From
, select Group management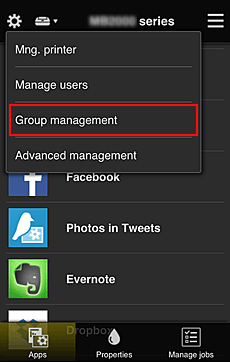 Note
Note- This appears only if Manage by group (for office users) is set in Advanced management.
-
In displayed screen, select Add group
-
The senior clerk enters the Group name and selects OK
In this field, enter "President" as the president-only group because you will be setting apps that only the president can use.
Important-
The following restrictions apply to entering the Group name.
- The group name can have up to 20 single-byte alphanumeric characters or up to 10 double-byte characters.
- The same group name cannot be registered more than once in the same domain.
- Up to 20 groups can be registered.
- The person who created the group becomes the Administrator.
-
-
Follow messages displayed on screen, and select OK
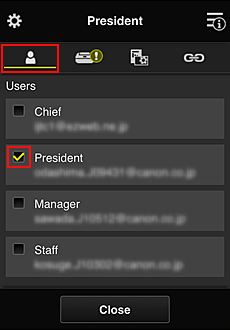
The group setup screen appears.

-
On Users tab, select only president
-
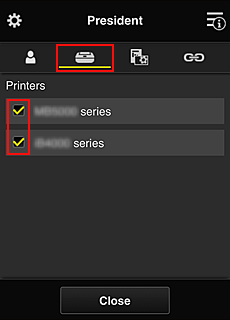
On the Printers tab, select printer to be used.
-
On the Apps tab, set the Evernote and Facebook apps to
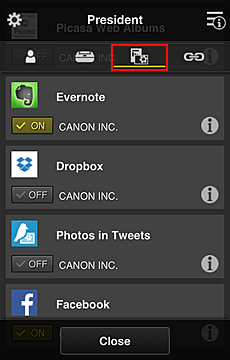
To switch between app registration/deletion, select
/ .
To return to the Group management screen, select Close.
The above procedure allows you to set apps that only the president can use.
![]() Note
Note
- The group setup screen displays all users and printers that are registered in the domain.
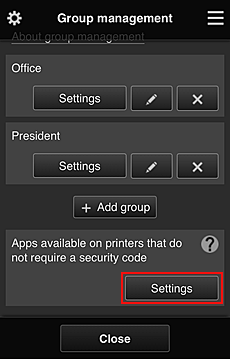
Limiting Apps That All Members Can Use on Printer
To set the apps to be used on the printer, use the following procedure provided by this service.
As an example, this section describes the procedure for allowing all users to use the Evernote app from the printer.
-
From
, select Group managementNote- This appears only if Manage by group (for office users) is set in Advanced management.
-
For Apps available on printers that do not require a security code, select Settings
-
On Apps tab, set only Evernote app to
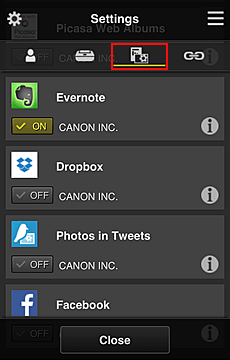
To switch between app registration/deletion, select
/ .
To return to the Group management screen, select Close.
The above procedure sets up Evernote as the only app that all users can use on the printer.
Limiting Apps That Individual Users Can Use on Printer
For each user, you can set the apps that the user can use on the printer.
As an example, this section describes the procedure for allowing only the president to also use the Facebook app from the printer.
-
From
, select Advanced management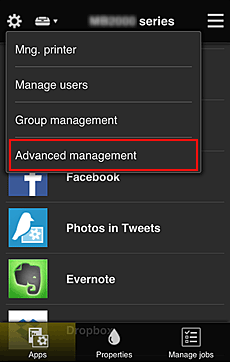
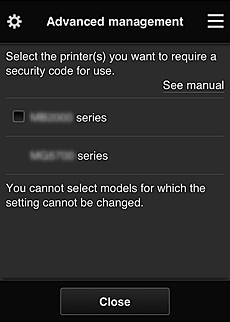
-
For Require security code, select Set.

-
Select printer for setting up Security code.
Security codes identify individual users when multiple users are using a printer.
 Note
Note- On models where the settings cannot be changed, this function cannot be selected.
Some models do not support this function. To check whether your model supports this function, see "Models that Support Security Codes".
- On models where the settings cannot be changed, this function cannot be selected.
-
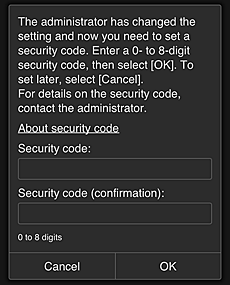
Set up Security code
If there are users who have not set up a Security code, a screen appears for checking whether to send an e-mail prompting those users to set up a Security code.
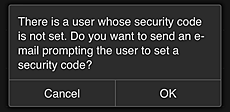
To send a notification e-mail only to users without a Security code, select OK.
To display the Security code setup screen when each user logs in and not send the notification e-mail, select Cancel.
 Important
-
The following character restriction applies to Security code entries:
- Up to 8 alphanumeric characters
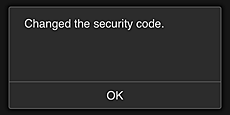
The Security code change process ends, and the change completion message appears.
In the message screen, select OK to return to the main screen. -
-
Select
 Cloud or
  from the printer's home screen
 -
In Switch user screen, select user

-
Enter Security code that you set and Log in
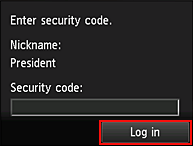 Note
Note- If you have not set a Security code, set a Security code from My account, and then Log in.
-
Select Facebook app

Only the president will be able to use the Facebook app from the printer.
Limiting Printers That Individual Users Can Use
As an example, this section describes the procedure for setting up one printer for the president and another printer for all users.
-
From
, select Group managementNote- This appears only if Manage by group (for office users) is set in Advanced management.
-
Select Settings for the group containing all users
-
On the Printers tab, clear printer that was set up for president
To return to the Group management screen, select Close.
Important- If a user is being managed in multiple groups and an app is deleted or the target printer is changed for one of those groups, the user can still use that app or printer if the one of the other groups allows it.
Only the printer that was set can be used by all users.
