
 Setting Up - Advanced Settings of Receive Mode
Make settings so that all the calls will be received as faxes automatically after the telephone connected to the printer rings for a specified period of time.
-
Press the
 FAX button on the printer.
 -
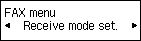
Press the
 Menu/Wireless connect button.
 -
Use the

 buttons to select Receive mode set.
 -
Press the OK button.
-
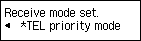
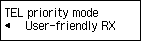
Make sure TEL priority mode is selected, and then press the OK button.
-
Make sure Yes is selected, and then press the OK button.

-
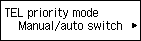
Make sure Manual/auto switch is selected, and then press the OK button.
-
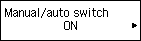
Select ON, and then press the OK button.
-
Use the Numeric buttons or
buttons to set the period of time for which to ring the telephone.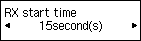
-
Press the OK button.
-
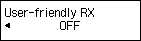
Make sure User-friendly RX is selected, and then press the OK button.
-
Select OFF, and then press the OK button.
The advanced settings of the receive mode are completed. Go to the next page.
