
- MG5500 series
Troubleshooting -WEP-
Select an applicable item.
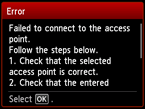
"Failed to connect to the access point." is Displayed
Make sure that the entered WEP key for the access point and selected WEP key number are correct, then set up a wireless connection again.
To change the WEP key number you want to use, change the access point settings, then set up a wireless connection again.
For details on how to change the WEP key number of the access point, refer to the manual supplied with the access point or contact its manufacturer.
When there is no problem with the WEP key and WEP key number
If the DHCP function of the access point is inactive, enable the DHCP function and configure wireless connection settings again.
When the DHCP function is active
If using an access point that automatically creates WEP keys, check the WEP key (hexadecimal) created automatically on the access point, then enter it on the printer.
For details on how to check or change the settings of the access point, refer to the manual supplied with the access point or contact its manufacturer.
When there is no problem with WEP key
If the MAC address filtering is enabled on the access point, change settings so that the MAC address of the printer will be accepted.
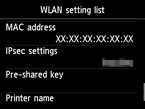
Follow the procedure below to check the MAC address of the printer.
- Press the HOME button.
- Display Setup, then press the right Function button.
- Select Device settings, then press the OK button.
-
Select LAN settings > Confirm LAN settings > WLAN setting list to check MAC address.
When the MAC address filtering is disabled on the access point, set up a wireless connection again.
If none of the above measures solve the problem
Enter the access point name directly, then set up a wireless connection again.
For details on how to check the settings of the access point, refer to the manual supplied with the access point or contact its manufacturer.
"The device may not be able to connect to the network." is Displayed
Press the OK button.
If the DHCP function of the access point is inactive, enable the DHCP function or specify the IP address (IPv4 only) of the printer and configure wireless connection settings again. In addition, make sure that the selected WEP key number and entered WEP key are correct.
When specifying the IP address of the printer
To specify the IP address of the printer, follow the procedure below.
- Display Setup in the HOME screen, then press the right Function button.
- Select Device settings, then press the OK button.
- Select LAN settings, then press the OK button.
- Select Other setup, then press the OK button.
- Select TCP/IP settings, then press the OK button.
- Select IPv4, then press the OK button.
- Select Yes, then press the OK button.
- Select IP address, then press the OK button.
- Select Manual setup, then press the OK button.
Follow the on-screen instructions to proceed with settings.
When the setup is complete, press the HOME button, then set up a wireless connection again.
When the DHCP function is active
Enter wireless connection settings of the access point directly.
When there is no problem with the WEP key number and WEP key
For details on how to check or change the settings of the access point, refer to the manual supplied with the access point or contact its manufacturer.


© Canon Inc. 2013