
Start Wired Connection
Follow the procedure below to setup a printer.
![]() Note
Note
- Notes on Wired Connection (Appears in a new window)
-
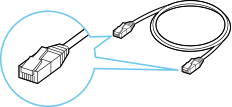
You will need an Ethernet cable (sold separately).
-
Make sure printer is turned on before starting wired connection setup.
If the power is on, touch the touch screen (A) to display the screen (A).

 Important
- If printer is performing cleaning, print head alignment, or other processes, wait for the process to finish, before starting setup.
-
Check the screen displayed on the printer.
If the following screen is displayed, tap Exit or Finish, and then proceed to the next step.
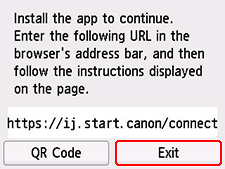
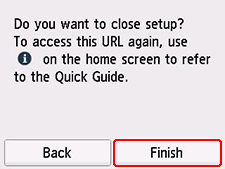
If one of the following screens is displayed, proceed to If Different Screen is Displayed:.
If a different screen is displayed, proceed to the next step.
-
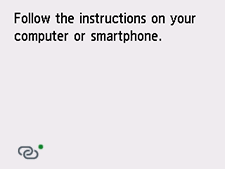
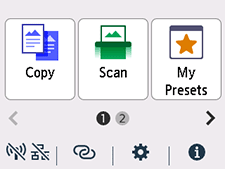
In the printer screen, check if
 (with a green dot) is displayed.
If
(with a green dot) is displayed, proceed to If (with Green Dot) is Displayed:.
If (without a green dot) is displayed or if neither (with a green dot) nor (without a green dot) is displayed, proceed to If Different Screen is Displayed:.
If (with Green Dot) is Displayed:
-
Remove the Cap (B) from the port located on the left side at the back of the printer.
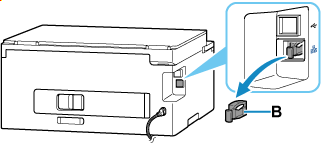
Printer without fax capability
Printer with fax capability
-
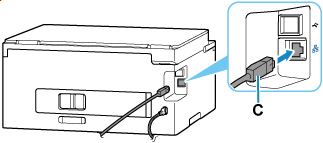
Connect the printer and a network device (router, etc.) with an Ethernet cable (C).
Do not connect to any other port.
Printer without fax capability
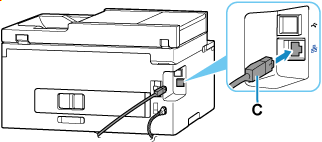
Printer with fax capability
 Note
Note- Please wait for about 20 seconds until a wired LAN connection is detected.
-
Check that
(with a green dot) displayed in the screen has changed to (without a green dot).If it does not change, perform from the step If the following screen is not displayed, select
 (Stop), and then select
  (HOME). in "If Different Screen is Displayed:."
 -
Proceed with the setup as follows according to your environment.
If performing setup without using computer, smartphone, etc.:
Download and install software.
After installing the software, start the software, and then follow the on-screen instructions to proceed with setup.
If performing setup using computer, smartphone, etc.:
After checking the following, click the close button on the Web browser to close this guide.
Windows
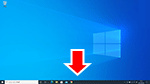
In the taskbar, click the application software you have been using for setup, and then follow the on-screen instructions to proceed with setup.
macOS
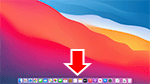
Click
 in the Dock, and then follow the on-screen instructions to proceed with setup.
Smartphone/tablet
Return to the app you have been using for setup on the smartphone, and then follow the on-screen instructions to proceed with setup.
If Different Screen is Displayed:
-
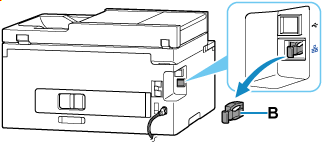
Remove the Cap (B) from the port located on the left side at the back of the printer.
Printer without fax capability
Printer with fax capability
-
Connect the printer and a network device (router, etc.) with an Ethernet cable (C).
Do not connect to any other port.
Printer without fax capability
Printer with fax capability
-
If the following screen is not displayed, select
(Stop), and then select (HOME).If the following screen is displayed, proceed to the next step.
-
Tap
 (Network).
The appearance of
(Network) varies depending on the printer's network connection status.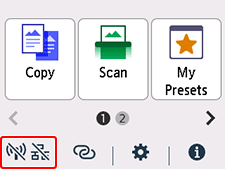 Note
Note- If the administrator mode or screen lock is enabled, the setting screen may not appear for standard users. Ask your network administrator for the setup.
-
Tap Wired LAN.
-
Tap Enable/disable Wired LAN.
-
Tap Enable.
-
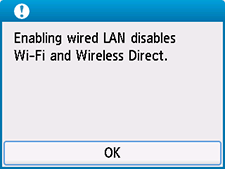
If the following screen is displayed, tap OK.
If the following screen is not displayed, proceed to the next step.
-
Select
(HOME).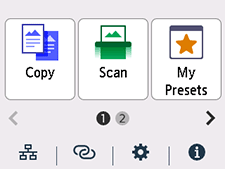
The network connection setup is now complete.
Once connection is complete,
 appears at the lower left of the screen.
 -
Proceed with the setup as follows according to your environment.
If performing setup without using computer, smartphone, etc.:
Download and install software.
After installing the software, start the software, and then follow the on-screen instructions to proceed with setup.
If performing setup using computer, smartphone, etc.:
After checking the following, click the close button on the Web browser to close this guide.
Windows
In the taskbar, click the application software you have been using for setup, and then follow the on-screen instructions to proceed with setup.
macOS
Click
in the Dock, and then follow the on-screen instructions to proceed with setup.Smartphone/tablet
Return to the app you have been using for setup on the smartphone, and then follow the on-screen instructions to proceed with setup.
