Scanning Multiple Documents at One Time from the ADF (Auto Document Feeder)
Place multiple documents on the ADF (Auto Document Feeder) and scan at one time.
 Note
Note
- To scan multiple documents at one time from the ADF, scan via Auto, Document, Custom, OCR, or ScanGear.
Refer to "Scanning Using Application Software (ScanGear)" for your model from Home of the Online Manual for how to scan using ScanGear (scanner driver).
Using Auto Scan:
The item type is detected automatically. Click Auto in the IJ Scan Utility main screen and scan.
Not Using Auto Scan:
In the Settings dialog box, set Select Source to ADF or Auto, and scan.
 Note
Note
- The screens for scanning documents are used as examples in the following descriptions.
-
Place the documents on the ADF.
-
Click Settings....
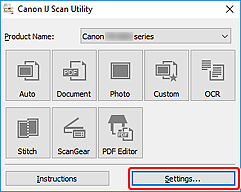
The Settings dialog box appears.
-
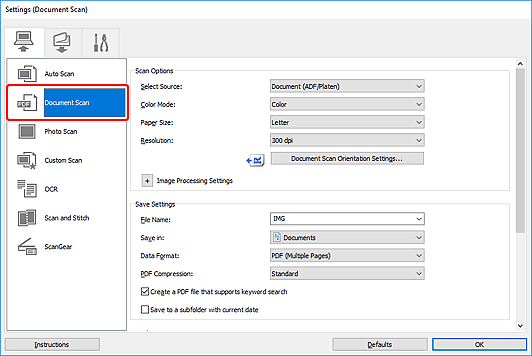
Click Document Scan.
-
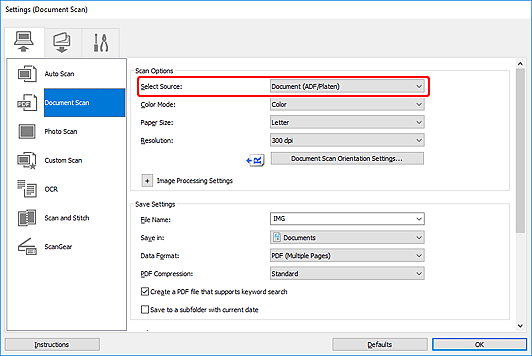
Select Select Source according to the documents to be scanned.
To scan only the front side of each document, select Document (ADF/Platen) or Document (ADF Simplex).
To scan the front side then the back side of each document, select Document (ADF Manual Duplex).
-
Set the color mode, document size, and scanning resolution as required.
Click Document Scan Orientation Settings... to specify the orientation of the documents to be scanned. In the displayed dialog box, you can specify the Orientation and Binding Side. How to place the documents when scanning the back sides depends on the Binding Side.
 Note
Note- Once settings are made in the Settings dialog box, the same settings can be used for scanning from the next time.
- In the Settings dialog box, specify image processing settings such as slant correction, set where to save the scanned images, and more, as needed.
When setting is completed, click OK.
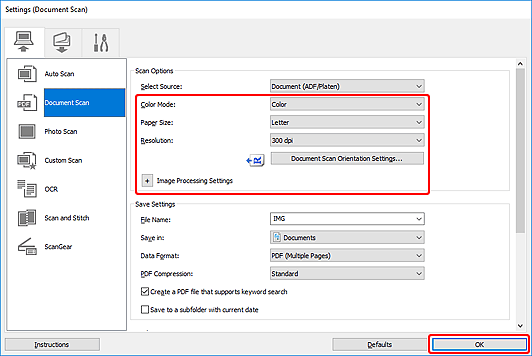
The IJ Scan Utility main screen appears.
 Note
Note-
Refer to the following pages for details on the setting items in the Settings dialog box.
-
Click Document.
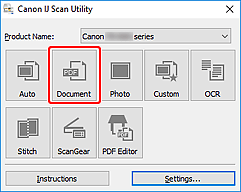
Scanning starts.
 Note
Note- To cancel the scan, click Cancel.
When Document (ADF Manual Duplex) is selected for Select Source, proceed to Step 8.
-
Follow the on-screen instructions to place the documents.
 Note
Note- The screens for scanning with Orientation set to Portrait are used as examples in the following descriptions.
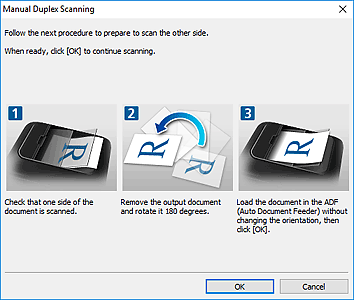
When Long edge is Selected for Binding Side in Document Scan Orientation Settings...:
Place the documents after rotating the output documents 180 degrees.
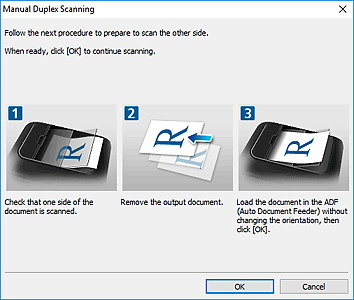
When Short edge is Selected for Binding Side in Document Scan Orientation Settings...:
Place the documents without changing the orientation of the output documents.
-
Click OK.
Scanning starts.
 Note
Note
- To cancel the scan, click Cancel.

