
You can scan an item from a WIA (Windows Image Acquisition)-compliant application.
WIA is a driver model implemented in Windows XP or later. It allows you to scan items without using an application.
The procedure varies depending on the application. The following procedures are examples only.
For details, see the application's manual.
 Important
In Windows XP, you cannot scan using the WIA driver via a network connection.
Some applications do not support continuous scanning from the ADF (Auto Document Feeder). For details, refer to the application's manual.
Complete the following settings to enable scanning over a network.
1. From the Start menu, select Computer > Network.
2. Right-click XXX_MAC address (where "XXX" is the model name) in the displayed screen, then select Install.
The following is an example of scanning using "Windows Fax and Scan."
Place the item on the platen or ADF.
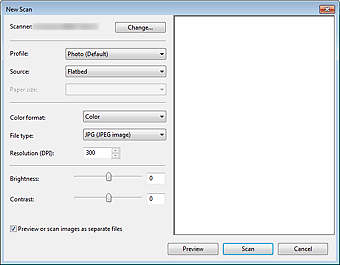
Select New on the File menu of "Windows Fax and Scan," then click Scan....
The scan setting screen appears.
 Note
NoteIf you have more than one scanner or printer, a scanner selection screen may appear. Double-click the scanner you want to use.
For USB connection: Canon XXX series (where "XXX" is the model name)
For network connection: XXX series_MAC address (where "XXX" is the model name)
Specify the settings.

Scanner
The currently set product name is displayed. To change the scanner, click Change... and select the product you want to use.
Profile
Select Photo (Default) or Documents according to the item to be scanned. To save a new Profile, select Add profile.... You can specify the details in the Add New Profile dialog box.
Source
Select a scanner type. To scan from the platen, select Flatbed. To scan from the ADF, select Feeder (Scan one side) .
Paper size
Select the paper size. Paper size can be set only when Source is Feeder (Scan one side)
Color format
Select the color mode in which to scan the item.
File type
Select a data format from JPEG, BMP, PNG, and TIFF.
Resolution (DPI)
Enter the resolution. Specify a value between 50 dpi and 600 dpi.
 Note
NoteWhen using the scanner or printer with network connection, the following resolutions can be specified.
150 dpi / 300 dpi / 600 dpi
Brightness
Move the slider to adjust the brightness. Move it to the left to darken and right to brighten the image. You can also enter a value (-100 to 100).
Contrast
Move the slider to adjust the contrast. Moving it to the left will decrease the contrast of the image, thus softening the image. Moving it to the right will increase the contrast of the image, thus sharpening the image. You can also enter a value (-100 to 100).
Preview or scan images as separate files
Select this checkbox to preview or scan multiple images as separate files.
 Important
When using the scanner or printer with network connection, you cannot specify Brightness, Contrast, and Preview or scan images as separate files.
Click Preview to preview the image.
The preview image appears on the right.
 Important
With network connection, scan without preview when scanning documents from the ADF. If you preview, place the document again and scan.
If there is document left in the ADF after previewing, press the OK button on the operation panel and remove the document.
Click Scan.
When scanning is completed, the scanned image appears in the application.
The following is an example of scanning using "Paint."
Place the item on the platen or ADF.
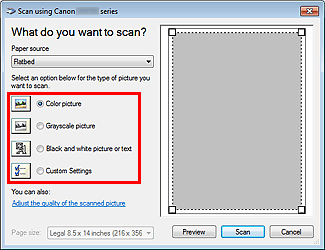
Click From scanner or camera from  . (Select the command to scan an item in the application.)
Select a type of picture according to the item to be scanned.
To scan from the platen, select Flatbed for Paper source. To scan from the ADF, select Document Feeder.

 Note
NoteWhen using the scanner or printer with network connection, the options for the type of picture may differ from those displayed with USB connection.
To scan with the values previously set in Adjust the quality of the scanned picture, select Custom Settings.
Selecting Document Feeder for Paper source enables you to select Page size.
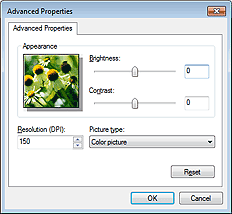
Click Adjust the quality of the scanned picture and set the preferences as required.

Brightness
Move the slider to adjust the brightness. Move it to the left to darken and right to brighten the image. You can also enter a value (-127 to 127).
Contrast
Move the slider to adjust the contrast. Moving it to the left will decrease the contrast of the image, thus softening the image. Moving it to the right will increase the contrast of the image, thus sharpening the image. You can also enter a value (-127 to 127).
Resolution (DPI)
Enter the resolution. Specify a value between 50 dpi and 600 dpi.
 Note
NoteWhen using the scanner or printer with network connection, the following resolutions can be specified.
150 dpi / 300 dpi / 600 dpi
Picture type
Select the type of scan you want for your item.
Reset
Click to restore the original settings.
 Important
When using the scanner or printer with network connection, you cannot specify Brightness and Contrast.
Click Preview to preview the image.
The preview image appears on the right. Drag  to specify the scan area.
 Important
With network connection, scan without preview when scanning documents from the ADF. If you preview, place the document again and scan.
If there is document left in the ADF after previewing, press the OK button on the operation panel and remove the document.
Click Scan.
When scanning is completed, the scanned image appears in the application.
Page top |