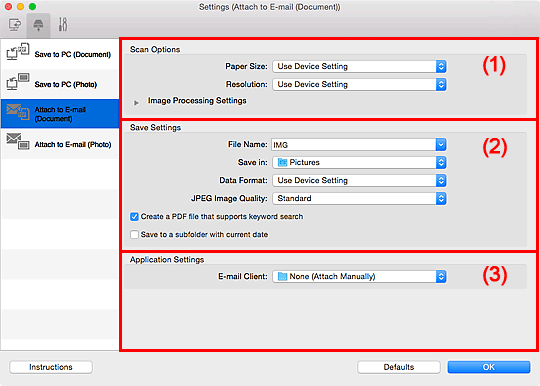
Settings (Attach to E-mail (Document)) Dialog
Click Attach to E-mail (Document) on the  (Scanning from the Operation Panel) tab to display the Settings (Attach to E-mail (Document)) dialog.
In the Settings (Attach to E-mail (Document)) dialog, you can specify how to respond when attaching images to an e-mail as documents after scanning them from the operation panel.

(1) Scan Options Area
- Paper Size
- Set from the operation panel.
- Resolution
- Set from the operation panel.
- Image Processing Settings
-
Click
 (Right Arrow) to set the following.
- Apply Auto Document Fix
-
Select this checkbox to sharpen text in a document or magazine for better readability.
 Important
- The color tone may differ from the source image due to corrections. In that case, deselect the checkbox and scan.
 Note
Note- Scanning takes longer than usual when you enable this function.
- Reduce gutter shadow (platen)
-
Reduces gutter shadows that appear between pages when scanning open booklets.
 Important
- This function is available only when scanning from the platen.
 Note
Note- When you enable this function, scanning may take longer than usual with network connection.
- Correct slanted text document
-
Detects the scanned text and corrects the angle (within -0.1 to -10 degrees or +0.1 to +10 degrees) of the document.
 Important
-
The following types of documents may not be corrected properly since the text cannot be detected correctly.
- Documents in which the text lines are inclined more than 10 degrees or the angles vary by line
- Documents containing both vertical and horizontal text
- Documents with extremely large or small fonts
- Documents with small amount of text
- Documents containing figures/images
- Hand-written text
- Documents containing both vertical and horizontal lines (tables)
 Note
Note- Scanning takes longer than usual when you enable Correct slanted text document.
-
- Detect the orientation of text document and rotate image
-
Automatically rotates the image to the correct orientation by detecting the orientation of text in the scanned document.
 Important
- Only text documents written in languages that can be selected from Document Language in the Settings (General Settings) dialog are supported.
-
The orientation may not be detected for the following types of settings or documents since the text cannot be detected correctly.
-
Resolution is outside the range of 300 dpi to 600 dpi
-
Font size is outside the range of 8 points to 48 points
-
Documents containing special fonts, effects, italics, or hand-written text
-
Documents with patterned backgrounds
-
(2) Save Settings Area
- File Name
-
Enter the file name of the image to be saved. When you save a file, the date and four digits are appended to the set file name in the "_20XX0101_0001" format.
 Note
Note- When you select the Save to a subfolder with current date checkbox, the date and four digits are appended to the set file name.
- Save in
-
Displays the folder in which to save the scanned images. To add a folder, select Add... from the pop-up menu, then click
 (Plus) in the displayed dialog and specify the destination folder.
The default save folder is the Pictures folder.
- Data Format
- Set from the operation panel.
- JPEG Image Quality
- You can specify the image quality of JPEG files.
- Create a PDF file that supports keyword search
-
Select this checkbox to convert text in images into text data and create PDF files that support keyword search.
 Note
Note- PDF files that are searchable in the language selected in Document Language on the
 (General Settings) tab of the Settings dialog are created.
- PDF files that are searchable in the language selected in Document Language on the
- Save to a subfolder with current date
-
Select this checkbox to create a current date folder in the folder specified in Save in and save scanned images in it. The folder will be created with a name such as "20XX_01_01" (Year_Month_Date).
If this checkbox is not selected, files are saved directly in the folder specified in Save in.
(3) Application Settings Area
- E-mail Client
-
Specify the e-mail client to use for attaching scanned images.
You can specify the e-mail client you want to start from the pop-up menu.
 Note
Note
- To add an e-mail client to the pop-up menu, select Add... from the pop-up menu, then click
 (Plus) in the displayed dialog and specify the e-mail client.
- Instructions
- Opens this guide.
- Defaults
- You can restore the settings in the displayed screen to the default settings.

