Installing by USB Connection
You can connect the device and computer with a USB cable and install the driver.
Prerequisites
Installation of the optional USB interface board (if required with the device you are using)
Page description language selection (plug & play) function setting of the device (if required with the device you are using)
Set [PDL Selection (Plug and Play)] at the device to match the driver you are using. For details about the setting method, refer to the manual of the device.
When starting the computer, logon as a member of Administrators.
[Desktop] screen display (when using Windows 8.1/Server 2012 R2)
Procedures
1.
Turn off the device.
2.
Double-click [Setup.exe].
3.
If you want to change the language displayed by the installer, select [Language] → click [Next].
The driver will be installed according to the selected language.
4.
Read the CANON SOFTWARE LICENSE AGREEMENT → click [Yes].
5.
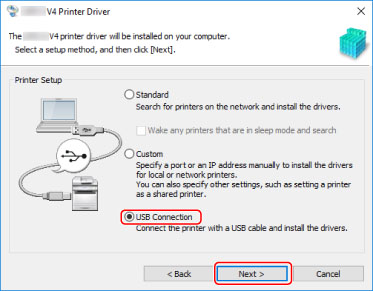
Select [USB Connection] → click [Next].

6.
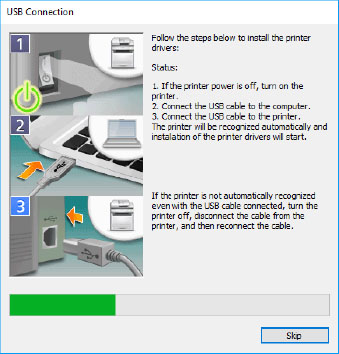
When the following screen appears, turn on the device → connect the device and computer with a USB cable.
[Skip]: If correctly connected by USB, in this screen you can finish the installation without waiting for automatic completion.

Proceed with the installation according to the instructions on the screen.
If installation fails in the above screen, click the subsequent "Open details" and perform the necessary operations.
Reinstall the driver after performing the following procedure.
(1) Turn on the device → connect the device and computer with a USB cable.
(2) Display [Device Manager].
In Windows 10/Server 2016
Right-click [ ] → click [Device Manager].
 ] → click [Device Manager].
In Windows 8.1/Server 2012 R2
Display [Control Panel] > [Hardware and Sound] > [Device Manager].
(3) Right-click the device name of the target device from [Other devices] → click [Uninstall device] or [Uninstall].
(4) Confirm the device name.
Canon + <model name being used>
7.
Click [Exit].