
Starting Layout Plug-In for Professional Print & Layout
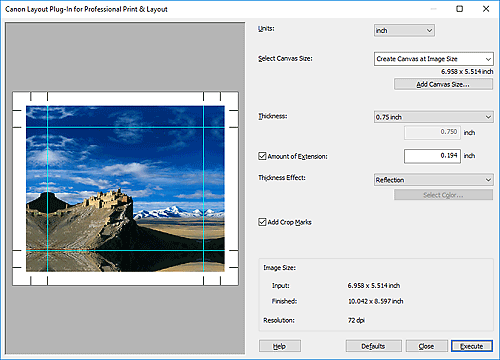
Layout Plug-In for Professional Print & Layout is a plug-in for creating a layout design when you intend to stretch a photo over a frame.
The layout is created so that even the sides of the frame can be wrapped with the image.
Start Layout Plug-In for Professional Print & Layout from Adobe Photoshop.
-
Open the image you want to print in Photoshop.
-
From the File menu of Photoshop, select Automate > Canon Layout Plug-In for Professional Print & Layout....
Layout Plug-In for Professional Print & Layout starts.
Click Execute to start Professional Print & Layout.
![]() Important
Important
- Layout Plug-In for Professional Print & Layout cannot be started when no image is displayed in Photoshop.
-
If Layout Plug-In for Professional Print & Layout is not displayed in the menu of Photoshop, follow these steps to install the Photoshop plug-in.
- Exit Photoshop.
-
Select Professional Print & Layout Plug-In Install as follows.
Windows 10:
From the Start menu, select (All apps >) Canon Utilities > Professional Print & Layout Plug-In Install.
Windows 8.1:
From the Search charm, search for "Professional Print & Layout," and then select Professional Print & Layout Plug-In Install.
Windows 7:
From the Start menu, select All Programs > Canon Utilities > Professional Print & Layout > Professional Print & Layout Plug-In Install.
-
Follow the on-screen instructions to install.
- The Photoshop plug-in may not be installed if Photoshop has never been started.
