Main Screen
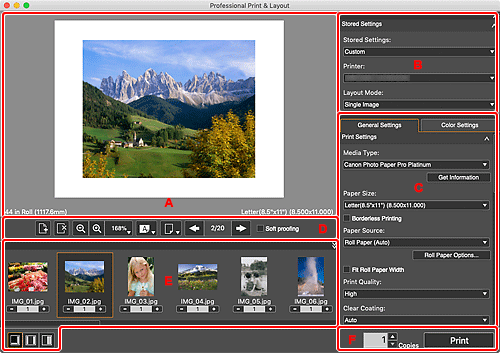
This is the screen for handling various functions of Professional Print & Layout. Operate each area to correct color tones of images, print them, and more.

- A: Preview Area
- B: Stored Settings Area
- C: Settings Area
- D: Tools Area
- E: Thumbnails Area
- F: Print Button Area
B: Stored Settings Area
Select the printer you want to use or save the settings made in the Settings area.
C: Settings Area
Make settings for printing.
The Settings area consists of two tabs. For details, see the corresponding page.
- General Settings tab
-
- Print Settings
- Layout
- Color Management
- Text Settings
- Color Settings tab
-
- Color Settings
 Note
Note
- To show or hide the corresponding category in the Settings area, click
 (Triangle).
D: Tools Area
 Note
Note
- The displayed items vary depending on the selected layout.
 (Add Page)
-
Adds a new page after the selected page.
 (Delete Page)
-
Deletes the selected page.
 (Slot Auto Nesting)
-
Automatically places images apart from each other.
 Note
Note- This is displayed only when Multiple Images (Auto Nesting) or Multiple Images is selected for Layout Mode in the Stored Settings area.
- The space between slots can be set on the Layout tab of the Other Settings dialog.

 (Zoom Out/Zoom In)
- Reduces or enlarges the display size of preview.
 (Scale)
-
Set the preview scale.
Fit to Width (for filling the entire paper width) or Fit Screen (for displaying the entire image) can also be selected.
 (Paper Orientation)
-
 (Display Paper Horizontally)
- Displays the paper in horizontal orientation.
 (Display Paper Vertically)
- Displays the paper in vertical orientation.
 (Switch Preview)
-
 (Print Preview)
- Displays a preview of how the images look with the specified paper size.
 (Roll Paper Preview)
- Displays a preview of how the images look on the entire roll paper.
 Note
Note (Switch Preview) is not displayed depending on your printer.

 (Previous Page/Next Page)
-
Switches the displayed page when there are multiple pages.
 Note
Note- If the number of copies is 0 in the Thumbnails area, that image does not appear in the Preview area.
- Soft proofing
-
Select this checkbox to display the image on the monitor in a color tone close to the print result.
 Important
- This function is unavailable depending on the selected media type.
 Note
Note- Available only when Use ICC Profile is selected for Color Mode.
 Note
Note
- When Multiple Images (Auto Nesting) is selected for Layout Mode in the Stored Settings area,
 (Add Page),
  (Delete Page),
  (Paper Orientation),
  (Switch Preview), and
 (Previous Page/Next Page) are not displayed.
E: Thumbnails Area
Displays the thumbnails of images. You can change the order of images by selecting and dragging them.

 (Number of Copies)
-
Set the number of copies for the images you want to print.
 Note
Note- Set up to 100 copies.


 (Change Layout)
- Changes the position of the Thumbnails area.
 Note
Note
- To show or hide the Thumbnails area, click
 (Triangle) at the upper right of the Thumbnails area.
 - Up to 100 images can be displayed in the Thumbnails area.
- To select multiple images, click them while pressing the command key.
- If started from the Programs folder, you can delete an image in the Thumbnails area by control-clicking it and then selecting Delete.
F: Print Button Area
- Copies
- Set the number of copies to print.
-
Displays the Print dialog for printing images.

