
Registering a Stamp
You can create and register a new stamp. You can also change and re-register some of the settings of an existing stamp. Unnecessary stamps can be deleted at any time.
The procedure for registering a new stamp is as follows:
Registering a New Stamp
Open the printer driver setup window
Select stamp
On the Layout tab, select the Stamp check box, and click Define Stamp....
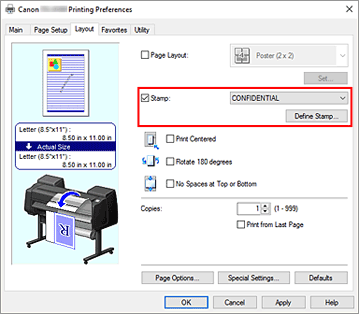
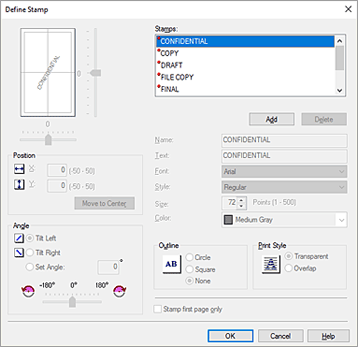
The Define Stamp dialog box opens.
Set stamp details
Click Add to add a new stamp (Untitled) to the list.
In Name, enter the name of the stamp to register, and in Text, enter the character string you want as the stamp.
Change the Font, Style, Size, and Color settings as necessary.Set the other items
Set the following items as necessary.
- Outline
- Selects a frame that encloses the stamp text string.
- Print Style
-
Select the stamp print method.
Select Transparent to print the stamp on the back of the document, and select Overlap to print it on the front. - Position
-
Specifies the stamp position on the page.
Enter numbers in X and Y to set the coordinates, or drag the horizontal and vertical slide bars to the left/right or up/down to change the settings. - Angle
-
Set the stamp placement angle.
Enter a number in Set Angle to set the angle, or drag the slide bar to the left/right to change the setting.
Set the angle by entering a number in range of -180 to 180. - Stamp first page only
- To print the stamp on the first page only, select this check box.
Complete the setup
Click OK to return to the Layout tab.
The registered title appears in the Stamp list.
Changing and Registering Some of Stamp Settings
Select stamp
On the Layout tab, select the Stamp check box, and click Define Stamp....
The Define Stamp dialog box opens.Select the stamp for which the settings are to be changed
From Stamps, select the title of the stamp you want to change the settings for.
Configure each setting while viewing the preview
Complete the setup
Click OK to return to the Layout tab.
The registered title appears in the Stamp list. Note
Note- The stamp registered as the default setting cannot be changed.
Deleting an Unnecessary Stamp
Select stamp
On the Layout tab, select the Stamp check box, and click Define Stamp....
The Define Stamp dialog box opens.Select the stamp to be deleted
Select the title that you wish to delete from the Stamps and click Delete.
Click Yes when the confirmation message appears.Complete the setup
Click OK to return to the Layout tab.
Note- The stamp registered as the default setting cannot be deleted.

