Setting Up Envelope Printing
Set the paper thickness lever to the left, and load envelope on the printer
Open the printer driver setup window
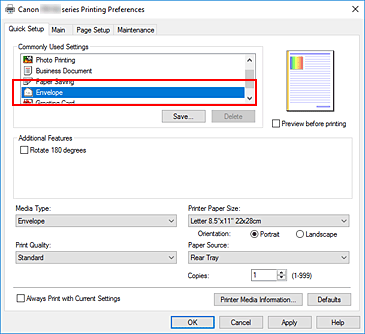
Select the media type
Select Envelope from Commonly Used Settings on the Quick Setup tab.

Select the paper size
When the Envelope Size Setting dialog box is displayed, select Envelope Com 10, Envelope DL, Yougata 4 4.13"x9.25", or Yougata 6 3.86"x7.48", and then click OK.
Set the orientation
To print the addressee horizontally, select Landscape for Orientation.

 Note
Note- If Envelope Com 10, Envelope DL, Yougata 4 4.13"x9.25", or Yougata 6 3.86"x7.48" is selected for Printer Paper Size, the printer rotates the paper 90 degrees to the left to print, regardless of the Rotate 90 degrees left when orientation is [Landscape] setting for Custom Settings in the Canon IJ Printer Assistant Tool.
Select the print quality
Select High or Standard that matches your purpose for Print Quality.
Click OK
When you perform print, the information is printed on the envelope.
 Important
- When you perform envelope printing, guide messages are displayed.
To hide the guide messages, check the Do not show this message again check box.
To show the guide again, click the View Printer Status button on the Maintenance tab, and start the Canon IJ Status Monitor.
Then click Envelope Printing from Display Guide Message of the Option menu to enable the setting.
 Note
Note
- If the paper settings in the printer driver differ from the paper information registered on the printer, an error may occur. For instructions on what to do if an error occurs, see "Paper Settings."
To check the current printer settings or to apply the printer settings to the printer driver, click Printer Media Information... from the Quick Setup tab, and specify the settings in the dialog box that appears.
For details about the paper information to be registered on the printer, see the following:

