
Printing without Margins to Match Paper Size
Procedure for printing borderless (without white margins around the edges) by enlarging/reducing documents to match paper size.
In the printer driver, open the settings screen
Select a feeding method
In Paper Source, select Roll Paper.
 Important
- The feeding methods you can choose from vary depending on paper settings.
Select paper roll width
For paper roll width, enter the same value set in the printer under Roll Width.
Select borderless printing
In the Page Setup tab, place a checkmark next to the Borderless Printing option.
After the Information dialog is displayed, under Roll Width, select the same paper width as that of the paper roll loaded in the printer and click OK.
Determine by how much you want the image to exceed the size of the paper
Adjust Amount of Extension as needed.
When clicking on Borderless Setting, the Borderless Setting dialog box will appear.
Dragging the slide bar to the right will increase overflow, while dragging it to the left will reduce it.
The second position from the right is recommended for most cases.Important- If the Amount of Extension slide bar is set to the far right position, the back of the paper may come out stained.
Select a method for printing borderless
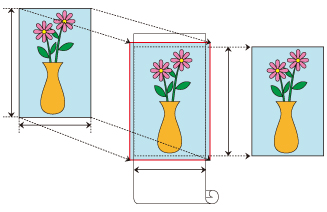
In the Borderless Printing Method tab, place a checkmark next to the Fit Paper Size option.
If the size of the document is different from the size of the paper you want to print on, select the paper size you want to print on from Printer Paper Size.Complete the setting process
Click OK.
If you print now, the document will be printed without margins to fit the paper size.
![]() Important
Important
- If you choose a paper size not compatible with borderless printing, it will be replaced with a size compatible with whole-surface borderless printing.
- If you place a checkmark next to the Borderless Printing option, the Page Layout and Print Centered options in the Layout tab will be displayed in gray out and you will not be able to configure them.
- Depending on paper size, the length/width ratio of the paper may be different from that of the image, making it impossible for the whole image to fit on the paper.
When this happens, crop the image with the application software to match paper size. - When printing borderless, printing may stop abruptly and the paper will be cut causing a slight color unevenness on the edges of the paper. If you require exceptionally high quality, in the Roll Paper Options dialog box select No from the Auto Cut... list. When you do so, the document will be printed without the left and right margins. After the printed material has exited the printer and has been cut, cut the upper and lower edges with a pair of scissors.
- When printing borderless on paper with low ink-fixing properties, depending on frequency of use, the cutter unit may come into contact with the paper surface scratching it and causing the paper to be unevenly cut.
You may be able to improve the situation by clicking Specify... on the Main tab and, in the Paper Detailed Settings dialog box, under Drying Time, set Between Pages to a higher value. - If you print borderless while Automatically switch paper sources (paper size priority) is on, in the Page Setup tab, under Borderless Printing Method, you will only be able to select Scale to fit Roll Paper Width.
- If the following paper is selected for Roll Width, margins may be formed on the left and right of the document even when borderless printing is set.
- 800mm Roll (800.0mm)
- 30 in Roll (762.0mm)
- 600mm Roll (600.0mm)
- 20 in Roll (508.0mm)
- 500mm Roll (500.0mm)
- A2/A3 Roll (420.0mm)
- 16 in Roll (406.4mm)
- A3+ Roll (329.0mm)
- 12 in Roll (304.8mm)
- 300mm Roll (300.0mm)
- A3/A4 Roll (297.0mm)
- B4 Roll (257.0mm)
- 8 in Roll (203.2mm)
![]() Note
Note
- When using applications like Microsoft Word which allow you to set margins, set margins to 0 mm.
