
Page Setup Tab Description
The Page Setup tab allows you to set borderless printing for a document and specify the scaling.
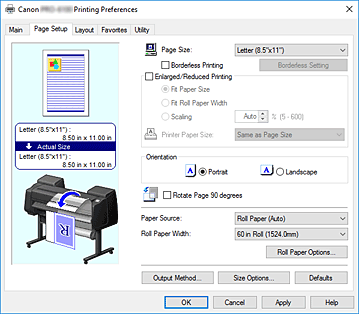
- Settings Preview
-
The paper illustration shows how the original will be laid out on a sheet of paper.
You can check an overall image of the layout.
The printer illustration shows how to load paper to match the printer driver settings.
Check whether the printer is set up correctly by looking at the illustration before you start printing. - Page Size
-
Selects a page size.
Ensure that you select the same page size as you selected within the application.
When you select Custom Size from Custom Paper Size, the Custom Size Settings dialog box appears, and you can specify any vertical and horizontal dimensions for the paper.
- Borderless Printing
-
Chooses whether you are printing on a full page without any page margins or printing with page margins.
In borderless printing, originals are enlarged to extend slightly off the paper. Thus, printing can be performed without any margins (border). Important
- When Cut Sheet is selected for Paper Source, Borderless Printing is grayed out and cannot be set.
- Borderless Setting
-
Select Borderless Printing to enable it for clicking.
Open the Borderless Setting dialog box, so that you can adjust Amount of Extension.
- Borderless Printing Method
-
This appears when you select Borderless Printing.
Set the borderless printing method.- Fit Paper Size
- Enlarge or reduce the document to match the size of the paper to be printed, and then print the document.
- Scale to fit Roll Paper Width
-
You can enlarge or reduce the document to match the roll paper width and then print the document.
When you select this check box, the Information dialog box appears, and you can select Roll Width. - Print Image with Actual Size
- Prints the document at its actual size.
- Printer Paper Size
-
When you select Fit Paper Size, you can specify the setting.
Select the size of the paper to be printed.
The list displays the paper sizes that support borderless printing.
- Enlarged/Reduced Printing
-
You can enlarge or reduce a document and then print it.
When you select Enlarged/Reduced Printing, you can then set Fit Paper Size, Fit Roll Paper Width, or Scaling.- Fit Paper Size
- Enlarge/reduce the document to match the size of the paper to be printed, and then print the document.
- Fit Roll Paper Width
-
You can enlarge/reduce the document to match the roll paper width and then print the document.
When you select this check box, the Information dialog box appears, and you can select Roll Width. - Scaling
- Enlarge or reduce the document to a specified scale before printing.
- Printer Paper Size
-
When you select Fit Paper Size, or Scaling, you can specify the setting.
Select the size of the paper to be printed.
- Orientation
-
Selects the printing orientation.
If the application used to create your document has a similar function, select the same orientation that you selected in that application.- Portrait
- Prints the document so that its top and bottom positions are unchanged relative to the paper feed direction. This is the default setting.
- Landscape
- Prints the document by rotating it 90 degrees relative to the paper feed direction.
- Rotate Page 90 degrees
-
Rotate the long edge of the document 90 degrees, match it to the width of the roll paper, and then print the document.
When you print a portrait document onto roll paper, you can save paper by rotating the document 90 degrees and print the document horizontally relative to the paper.
- Paper Source
-
Shows the source from which paper is supplied.
You may be able to switch the paper source with the printer driver.- Roll Paper (Auto)
- Depending on the paper settings on the printer driver and the paper information registered to the printer, the printer automatically determines which roll paper to use and then feeds that paper.
- Roll 1
- Paper is fed from Roll 1.
- Roll 2
- Paper is fed from Roll 2.
- Cut Sheet
- Feeds paper using the cut paper.
![]() Important
Important
- Depending on the media type and size, the Paper Source settings that can be selected may differ.
- Roll Width
-
Select the roll paper width.
Select the width that matches the width of the roll paper loaded in the printer. If you select Custom Size (XXXX), the Custom Size Settings dialog box will be displayed, and the roll width can be specified to any value. - Roll Paper Options...
-
Displays the Roll Paper Options dialog box.
You can specify auto cut, banner printing, and other settings for printing on roll paper. - Output Method...
-
Displays the Output Method dialog box.
You can select Output Method and specify save settings for saving documents to a box. - Size Options...
-
Displays the Paper Size Options dialog box.
The Paper Size Options dialog box allows you to create and register any user-defined paper.
Custom Size Settings dialog box (Paper Size)
This dialog box allows you to specify the size (width and height) of the custom paper.
- Paper Size
- Specifies the Width and the Height of the custom paper. Measurement is shown according to the units specified in Units.
- Units
- Select the unit for entering a user-defined paper size.
Borderless Setting dialog box
Adjust how much of the document extends off the paper during borderless printing, and configure the three-sided borderless setting.
- Amount of Extension
-
Adjusts how much of the document extends off the paper during borderless printing.
Moving the slider to the right increases the amount of extension and allows you to perform borderless printing with no problems.
Moving the slider to the left reduces the amount of extension and expands the range of the document to print. - Three-sided Borderless
- If you check this check box, and the width or the length of the output paper size is smaller than the roll width, a margin will be created on the right of the document, and the remaining three sides (top, bottom, and left) will be borderless when printing.
Custom Size Settings dialog box (Roll Paper Width)
Enter the roll width you want to use.
- Roll Paper Width
- Specify the Width of the roll paper. Measurement is shown according to the units specified in Units.
- Units
- Select the unit for entering a user-defined paper size.
Roll Paper Options dialog box
You can specify settings for printing on roll paper.
- Automatic Cutting
-
You can print cut guidelines for cutting the roll paper automatically or manually after printing.
- Yes
- Cut the roll paper automatically after printing.
- No
- Do not cut the roll paper automatically after printing.
- Print Cut Guideline
- Prints cut guidelines for cutting the roll paper manual after printing.
- Banner Printing
- Select this check box to print documents extending over several pages as one continuous document without any spaces between the pages.
Output Method dialog box
Set the method for exporting the print job to the printer's hard disk drive.
- Output Method
-
-
After the printing ends, the print job is not saved to the printer's hard disk drive.
- Set PIN for printing
-
Set a PIN code for print jobs to prevent issues such as retrieving the wrong documents and allowing others to peek at your documents.
- PIN
- Enter a one to seven-digit number.
- Print after reception is complete
- When you select this check box, you can prevent the print quality from dropping if the print job reception is cut off or if printing is interrupted.
- Save in Job Box
- The print job is saved to the printer's hard disk drive. If you selected Save in Job Box, select an individual box number as the save destination from the Job Box list.
- Name of data to be saved
-
- Use file name
- The file name is used as-is.
- Enter name
- You can set a new name. Enter the save name in Name.
- Job Box
- The box list appears. If you selected Save in Job Box, select an individual box number as the save destination from the list.
- Acquire Job Box Name
- When you click this, Job Box displays the box name that was obtained from the printer.
Paper Size Options dialog box
You can create and register any user-defined paper. You can then select the defined paper size from Custom Paper Size of Page Size.
- Paper Size List
- The names and sizes of the paper sizes that the printer driver can use are displayed.
- Delete
-
From Paper Size List, you can delete a user-defined paper that a user created.
 Note
Note- Paper deletion is not possible in the following case:
- When a standard paper size of the printer driver is selected
- When an oversized paper size is selected
- When a paper size with a red circle is selected
- Paper deletion is not possible in the following case:
- Custom Paper Size Name
- You can specify the name of a user-defined paper.
- Units
- You can specify the units for the height and width dimensions of the user-defined paper.
- Page Size
-
You can specify the Width and Height settings of the paper.
- Borderless Printing Size
- When you select this check box, you can select a size from the paper sizes that support Borderless Printing.
- Fix the Ratio of the Width to Height
- When you select this check box, you can change the size while keeping the Width and Height ratio.
- Width
- Specify the paper width.
- Height
- Specify the paper height.
- Register with the OS
-
Register the set user-defined paper in the OS.
By registering in the OS, any user sharing the use of the printer or PC can use the set user -defined paper. - Add
- You can register a user-defined paper that was set and overwrite the existing user-defined paper.
- Display Series
- You can narrow down the paper sizes to be displayed in Paper Size List.
- Oversize
- When you select this check box, add appropriate margins so that the document contents will not get cut off, and then print the document.
