Printing with ICC Profiles
When the image data has a specified input ICC profile, you can print by using the color space of the data effectively.
The printer driver setting procedure varies depending on the application software used to print.
Specify an ICC Profile from the Application Software and Print the Data
When you print the editing and touch-up results of Adobe Photoshop, Canon Digital Photo Professional, or any application software that allows you to specify input and printing ICC profiles, you print by effectively using the color space of the input ICC profile specified in the image data.
To use this printing method, use your application software to select color management items and specify an input ICC profile and a printing ICC profile in the image data.
Even if you print using a printing ICC profile that you created yourself or one for special Canon paper, be sure to select color management items from your application software.
For instructions, refer to the manual of the application software you are using.
Open the printer driver setup window
Select advanced settings
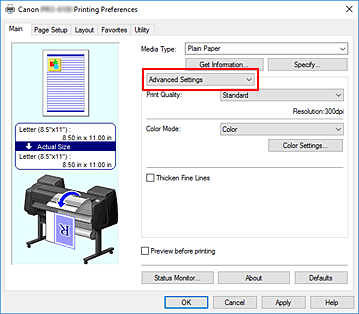
From the Main tab pull-down menu, select Advanced Settings.

Select color mode
For Color Mode, select Color, and then click Color Settings....
The Color Settings dialog box appears.Select color correction
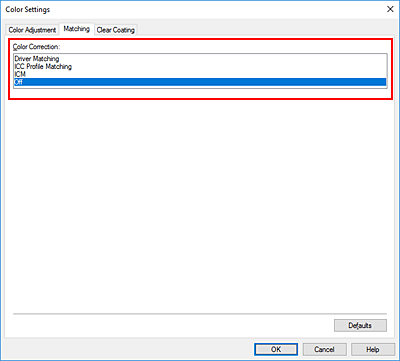
Click Matching tab, and select Off for Color Correction.

Set the other items
If necessary, click Color Adjustment tab, and adjust the color balance (Cyan, Magenta, Yellow) and adjust Brightness, and Contrast settings, and then click OK.
Complete the setup
Click OK on the Main tab.
When you execute print, the printer uses the color space of the image data.
Specify an ICC Profile with the Printer Driver, and then Print
When you print from application software that cannot identity input ICC profiles or does not allow you to specify one, the data color space is printed as sRGB.
Open the printer driver setup window
Select advanced settings
From the Main tab pull-down menu, select Advanced Settings.

Select color mode
For Color Mode, select Color, and then click Color Settings....
The Color Settings dialog box appears.Select color correction
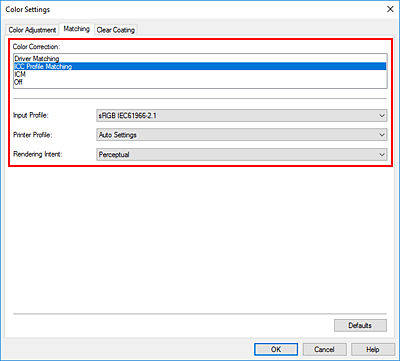
Click Matching tab, and select ICC Profile Matching for Color Correction.

Select Input Profile
Select the input profile you want to use.
 Important
- When the application software specifies an input profile, the input profile setting of the printer driver becomes invalid.
Select the printer profile
Select Printer Profile as follows:
To set the printer profile automatically:
Select Auto Settings.To set the printer profile manually:
Select a printer profile that matches the media type to be used.
Select the rendering intent
Select the coloring adjustment method in Rendering Intent.
- Perceptual
-
Reproduces colors of general photos naturally and features smooth gradation. In addition, selecting this setting allows you to adjust colors easily using an application software.
 Important
- When you select Perceptual to print images, Canon recommends that you set the monitor and the environment light as follows:
- Monitor
Color temperature: D50 (5000K)
Brightness: 100 to 120cd/m2
Gamma: 2.2 - Environment light
Fluorescent light for D50 color evaluation (color temperature 5000K, high color rendering properties)
Brightness when looking at printed materials: 500 lx ± 125 lx
- Monitor
- When you select Perceptual to print images, Canon recommends that you set the monitor and the environment light as follows:
- Saturation
- Reproduces vivid colors on data such as a poster.
- Relative Colorimetric
- When image data is converted to the color space of the printer, this method converts the image data so the color reproduction approximates the shared color regions. Select this method to print image data with colors that are close to the original colors.
- Absolute Colorimetric
- When Relative Colorimetric is selected, white spots are reproduced as white spots of the paper (background color). However, when Absolute Colorimetric is selected, how the white spots are reproduced depends on the image data.
 Important
- Depending on the media type, you may obtain the same print results even when you change the Rendering Intent setting.
Set the other items
If necessary, click Color Adjustment tab, and adjust the color balance (Cyan, Magenta, Yellow) and adjust Brightness, and Contrast settings, and then click OK.
Complete the setup
Click OK on the Main tab.
When you execute print, the printer uses the color space of the image data.


