Maintenance Tab Description
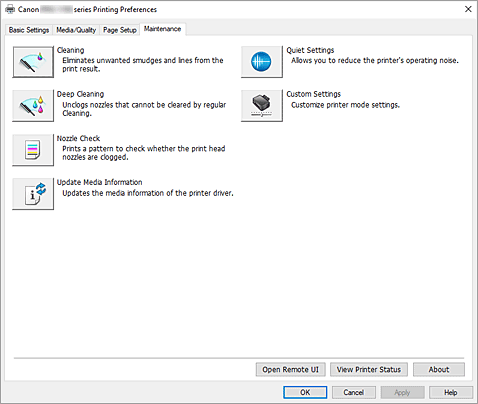
The Maintenance tab allows you to change the printer settings or check its status.
-
 Cleaning
 -
Performs print head Cleaning.
The print head Cleaning function allows you to clear up clogged print head nozzles.
Perform print head Cleaning if printing results are not satisfactory or if a specific color fails to print, even though there is enough ink. -
 Deep Cleaning
 -
Performs Deep Cleaning.
Perform Deep Cleaning when two Cleaning attempts do not resolve the print head problem. Note
Note- Deep Cleaning consumes a larger amount of ink than Cleaning.
Cleaning the print heads frequently will rapidly deplete your printer's ink supply. Perform Cleaning only when necessary.
- Ink Group
-
When you click Cleaning or Deep Cleaning, the Ink Group window is displayed.
Selects the ink group that you want to clean the print head for.
Click Initial Check Items to display the items that you need to check before you perform Cleaning or Deep Cleaning.
- Deep Cleaning consumes a larger amount of ink than Cleaning.
-
 Nozzle Check
 -
Prints a Nozzle Check pattern.
Perform this function if printing becomes faint or a specific color fails to print. Print a Nozzle Check pattern, and check whether the print head is working properly.
If the print result for a specific color is faint, or if there are any unprinted sections, click Cleaning to clean the print head.
To display a list of items that you should check before printing the Nozzle Check pattern, click Initial Check Items. -
 Update Media Information
 -
Gets the latest media information from the printer and updates the media information in the printer driver.
When the media information is updated, the media displayed for Media Type on the Media/Quality tab is updated to the latest information.
When media information on the driver cannot be successfully updated, click Initial Check Items and check the content that is displayed. -
 Quiet Settings
 -
Opens the Quiet Settings dialog box.
Quiet Settings dialog box allows you to specify a setting that reduces the operating noise of the printer. This mode comes in handy when the operating noise of the printer becomes a concern, such when printing at night. Perform this operation when you want to change the quiet mode setting.Note- If the printer is off or if communication between the printer and the computer is disabled, an error message may appear because the computer cannot collect the printer status.
If this happens, click OK to display the most recent settings specified on your computer.
- If the printer is off or if communication between the printer and the computer is disabled, an error message may appear because the computer cannot collect the printer status.
-
 Custom Settings
 -
Opens the Custom Settings dialog box.
Perform this function to change the settings of this printer.Note- If the printer is off or if communication between the printer and the computer is disabled, an error message may appear because the computer cannot collect the printer status.
If this happens, click OK to display the most recent settings specified on your computer.
- If the printer is off or if communication between the printer and the computer is disabled, an error message may appear because the computer cannot collect the printer status.
-
 Accounting
 -
Displays the Accounting dialog box.
The Accounting dialog box allows you to add IDs to print job.Note- Accounting can be set only by users with Administrator rights.
Users without Administrator rights may not be able to set Accounting information. - Accounting information can be set only from the Maintenance tab of Printer properties.
- Accounting can be set only by users with Administrator rights.
- Open Remote UI
- Menu for performing printer maintenance and changing settings.
- View Printer Status
-
Starts the Canon IJ Status Monitor.
Perform this function when you want to check the printer status and how a print job is proceeding. - About
-
Opens the About dialog box.
The version of the printer driver, plus a copyright notice, can be checked.
In addition, the language to be used can be switched.
Initial Check Items (Cleaning / Deep Cleaning)
Before running Cleaning or Deep Cleaning, check that the printer power is on, and open the cover of the printer.
Check the following items for each ink.
- Check the amount of ink remaining in the tank.
- Check that you push in the ink tank completely until you hear a clicking sound.
- If an orange tape is adhered to the ink tank, peel it off completely.
Any remaining tape will hinder ink output. - Check that the ink tanks are installed in their correct positions.
Initial Check Items (Nozzle Check)
Before running Nozzle Check, check that the printer power is on, and open the cover of the printer.
Check the following items for each ink.
- Check the amount of ink remaining in the tank.
- Check that you push in the ink tank completely until you hear a clicking sound.
- If an orange tape is adhered to the ink tank, peel it off completely.
Any remaining tape will hinder ink output. - Check that the ink tanks are installed in their correct positions.
Initial Check Items (Update Media Information)
Check that the printer is connected to the computer and that printer is turned on.
If you are unable to update media information, check the following points.
- Ensure that a user set with administrator privileges carries out the media information update.
Users other than administrators can check if a media information update is required, but cannot carry out the update itself. - Before updating media information, ensure you have added, edited, or deleted media information on the printer using the Media Configuration Tool.
![]() Important
Important
- It may take some time to update media information.
- Do not change media information on the printer while you are updating media information on the printer driver.
Quiet Settings dialog box
When you click Quiet Settings, the Quiet Settings dialog box is displayed.
Quiet Settings dialog box allows you to specify a setting that reduces the operating noise of the printer.
Select when you wish to reduce the operating noise of the printer at night, etc.
Using this function may lower the print speed.
- Do not use quiet mode
- Select this option when you wish to use the printer with volume of normal operating noise.
- Always use quiet mode
- Select this option when you wish to reduce the operating noise of the printer.
- Use quiet mode during specified hours
-
Select this option when you wish to reduce the operating noise of the printer during a specified period of time.
Set the Start time and the End time of the quiet mode you wish to be activated. If both are set to the same time, the quiet mode will not function.
![]() Important
Important
- You can set the quiet mode from the operation panel of the printer, or the Maintenance tab.
No matter how you use to set the quiet mode, the mode is applied when you perform operations from the operation panel of the printer or printing from the computer.
Custom Settings dialog box
When you click Custom Settings, the Custom Settings dialog box is displayed.
If necessary, switch between various modes of printer operation.
- Rotate 90 degrees left when orientation is [Landscape]
-
On the Page Setup tab, you can change the rotation direction of the Landscape in the Orientation.
To rotate the print data 90 degrees to the left during printing, check this check box. Important
- Do not change this setting while the print job is displayed in the print wait list. Otherwise, characters may be omitted or the layout may become corrupt.
- Do not detect mismatched paper settings when printing from a computer
-
When you print documents from your computer, the paper settings in the printer driver and the paper information registered on the printer do not match, this setting disables the message display and allows you to continue printing.
To enable detection of paper setting mismatches, uncheck this check box. - Disables paper width detection when printing from computer
-
Even if the paper width identified by the printer during printing from the computer differs from the paper width that was set in Paper Size on the Page Setup tab, this function disables the message display and allows you to continue printing.
To disable detection of the paper width during printing, check this check box.
Accounting dialog box
Click Accounting to display the Accounting dialog box.
The Accounting dialog box allows you to add IDs to print jobs. You can then use the IDs, along with the printer and cost management tool, to tabulate print history information.
- Account ID
- Enter the account ID to be set. Enter the ID by using up to 20 alphanumeric characters (0 to 9, a to z, and A to Z).
- Prohibits Account ID changes
-
Prohibits changes to account IDs that have already been set.
Check this check box to prevent other users from changing IDs.
About dialog box
When you click About, the About dialog box is displayed.
This dialog box displays the version, copyright, and module list of the printer driver. You can select the language to be used and switch the language displayed in the setup window.
- Modules
- Lists the printer driver modules.
- Language
-
Specifies the language you wish to use in the printer driver setup window.
Important
- If the font for displaying the language of your choice is not installed in your system, the characters will be garbled.
- Settings for Data Sending
-
If you click Settings for Data Sending, the Settings for Data Sending dialog box will be displayed.
If it includes data you do not agree to sending, uncheck this check box.
![]() Note
Note
- Some printer functions can be set only from the Maintenance tab of Printer properties.
