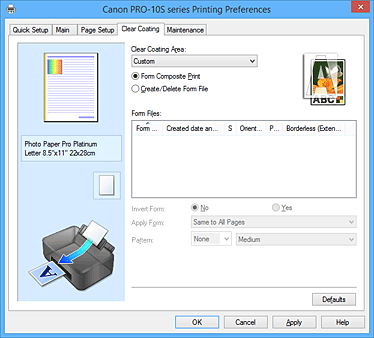
Clear Coating tab Description
The Clear Coating tab allows you to set each of the clear coating functions.
When you execute clear coating, the printer applies chroma optimizer (CO) ink onto the printing surface and allows you to adjust the glossiness.
You can also create the areas to be clear-coated and save the area information as a form. When you use a form to perform clear coating, you can realize decorative effects that cause certain characters and patterns to pop out.

- Settings Preview
-
The paper illustration shows how the original will be laid out on a sheet of paper.
You can check an overall image of the layout.
The printer illustration shows how to load paper to match the printer driver settings.
Check whether the printer is set up correctly by looking at the illustration before you start printing. - Clear Coating Area
-
Set the clear coating area.
- Auto
-
The printer automatically sets the areas to be clear-coated and whether clear coating is to be executed.
It may be possible to reduce the ink consumption of the chroma optimizer (CO) or to accelerate the print speed. - Overall
-
The printer clear-coats the entire print area.
If selecting Auto produced unsatisfactory clear coating effects, selecting Overall may improve the results. - Custom
-
Use a form to specify the clear coating areas.
Select this option also when you are creating or deleting a form.- Form Composite Print
-
Select this item to combine forms and patterns that specify clear coating areas and to print the document by adding decorative effects.
Note that you must first create a form file to execute form composite print. Important
- The decorative effects of clear coating may diminish depending on the document to be clear coated.
- Selecting Black and White Photo Print on the Quick Setup or Main tab may diminish the decorative effects of clear coating.
- Create/Delete Form File
- Select this item to create or delete a form file to be used in form composite print.
-
 Note
Note- When you execute form composite print, the printer clear-coats the white areas on the form and produces decorative effects that make characters and patterns pop out.
- To save character and pattern data created with the application software as a form file, open the printer driver, and on the Custom menu, select Create/Delete Form File. Then print the data. For details, refer to the printer manual.
- When creating a form file, use the same settings (such as Page Size and Borderless) that were used for form composite print.
-
 Important
- The selection of Overall or Custom may be disabled depending on the media type and the print quality.
- Setup Icon
- Displays how a document will be clear coated. You can therefore check a rough image of the clear coating.
- Form Files
-
This function displays a list of the saved form files.
- Form Name
- Displays the form name.
- Created date and time
- Displays the form file creation date and time.
- Size
- Displays the paper size of the form.
- Orientation
- Displays the print orientation of the form.
- Pages
- Display the number of pages in the form.
- Borderless (Extension)
- Displays the borderless print setting of the form. When the borderless print setting is enabled, the extension amount is also displayed.
-
 Note
Note- You can rearrange the displayed form files by clicking the list heading.
- It may take a while for the list of created form files to appear.
- Invert Form
-
Selecting Form Composite Print allows you to reverse the clear coating areas specified in the form.
- No
- The printer prints the data without reversing the clear coating areas.
- Yes
- The printer reverses the clear coating areas and prints the data.
- Apply Form
-
Select the method for applying the form to the document pages, when Form Composite Print is selected.
- Same to All Pages
- The first page of the selected form is applied to all pages of the document.
- Individual Page
-
If the page count of the form file is 2 or more, the printer matches the document and form pages in sequence from the first page during printing.
If the document page count is larger than the form page count, the printer applies the Overall function of Clear Coating Area to the remaining pages.
When multiple copies are printed, the number of copies that was set for the document must also be set for the applicable form during form file creation.
- Pattern
-
Select the pattern type and size, when Form Composite Print is selected.
The pattern is applied to areas that are not clear coated. - Delete
-
Deletes the form file that you selected in Form Files.
If the print queue contains a form composite print job, do not delete the form specified by that job. - Form Name
-
Enter the name of the form to be creates. Up to 64 characters can be entered.
 Note
Note- Spaces, tabs, and returns cannot be entered at the beginning or end of a form name.

