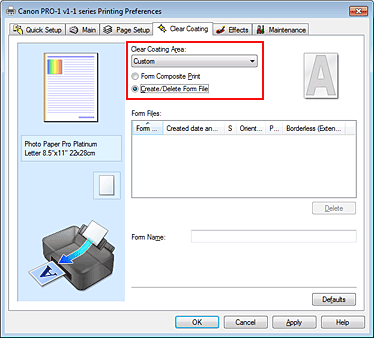

You can create clear coating areas by using the application software of your choice, and save those areas as a form. An unnecessary form file can be deleted.
This section describes the procedure for creating a form file.
Creating data for use as a form file
Using the application software of your choice, create data that contains the characters and patterns to be used as the form file.
The white areas of the created data become the clear coating areas.
Clear coating is not applied to the non-white areas.
Open the printer driver setup window from the application software
Selecting Create/Delete Form File
On the Clear Coating tab, find Clear Coating Area and select Custom. Then select Create/Delete Form File.

Setting the form name
In Form Name, enter the name of the form to be created.
 Note
Note
Spaces, tabs, and returns cannot be entered at the beginning or end of a form name.
You cannot set a form name that is the same as the name of an existing form file.
You cannot change the name of the created form.
Complete the setup
Click OK on the Clear Coating tab.
Click OK when the confirmation message appears.
When you execute printing, the data that you created using the application software is saved as a form file.
 Important
To create a form file, you must connect this printer to your computer and turn on the printer.
When Create/Delete Form File is selected, printing is not actually performed from the printer even if printing is executed.
When Create/Delete Form File is selected, a print preview is not displayed even when Preview before printing is selected on the Main tab.
Create/Delete Form File and Form Composite Print can be executed only from the setup window of the printer driver. Some applications do not support these functions.
 Note
Note
It may take a while for the list of created form files to appear.
When creating a form file, use the same settings (such as Page Size and Borderless) that were used for form composite print.
You can register up to 30 form files.
Selecting Create/Delete Form File
On the Clear Coating tab, find Clear Coating Area and select Custom. Then select Create/Delete Form File.
Select the form file to be deleted
From Form Files, select the form file to be deleted.
Delete the form file
Click Delete.
When the confirmation message appears, click OK.
The selected form file is deleted from the Form Files.
 Important
To delete a form file, you must connect this printer to your computer and turn on the printer.
Page top
|