Registering a Frequently Used Printing Profile
You can register the frequently used printing profile to Profiles on the Basic Settings tab. Unnecessary printing profiles can be deleted at any time.
Registering a Printing Profile
Open the printer driver setup window
Set the necessary items
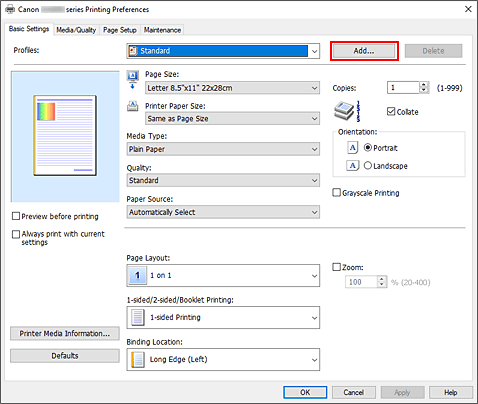
From Profiles on the Basic Settings tab, select the printing profile to be used and if necessary, change each of the settings.
You can also register necessary items on the Media/Quality and Page Setup tabs.Click Add...

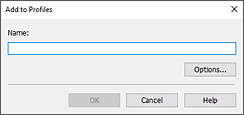
The Add to Profiles dialog box opens.

Save the settings
Enter a name for the print settings to register in the Name field. If necessary, click Options..., set the items, and then click OK.
In the Add to Profiles dialog box, click OK to save the print settings and return to the Basic Settings tab.
The name and icon are displayed in Profiles.
 Important
- To save the page size, orientation, and number of copies that was set in each sheet, click Options..., and check each item.
 Note
Note
- When you re-install the printer driver or upgrade the printer driver version, the print settings that are already registered will be deleted from Profiles.
Registered print settings cannot be saved and preserved. If a profile is deleted, register the print settings again.
Deleting Unnecessary Printing Profile
Select the printing profile to be deleted
Select the printing profile you want to delete from the Profiles list on the Basic Settings tab.
Delete the printing profile
Click Delete. When the confirmation message appears, click OK.
The selected printing profile is deleted from the Profiles list.
 Note
Note
- Printing profiles that are registered in the initial settings cannot be deleted.

