Printing by Automatically Switching Upper-level and Lower-level Roll Papers
You can print by automatically switching Roll 1 and Roll 2 depending on the media type or your purpose.
The procedure for printing by switching the roll papers is as follows:
Load roll papers in upper and lower levels of printer
Open the printer driver setup window
Select the media type
The type of paper set in the printer is displayed.

 Note
Note- If Automatically switch paper sources (paper size priority) is grayed out, refer to "Reflect Roll Unit Settings in the Printer Driver" and set Roll Unit in the Device Information dialog box to Yes.
Select the paper size
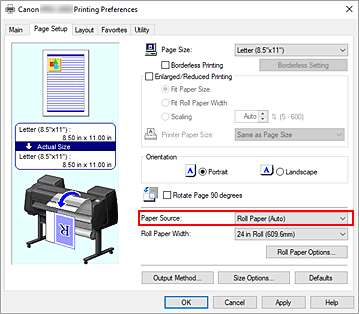
From the Page Size list on the Page Setup tab, select the same size as that of the document that was created with the application software.
For Paper Source, select Roll Paper (Auto)

Select roll paper width
For Roll Paper Width, select the width of the roll paper loaded in the printer.
Selecting the printing method for the roll paper
When performing enlarged/reduced printing in accordance with the roll width, place a checkmark next to Enlarged/Reduced Printing and select the Fit Roll Paper Width.
Set the other items
To rotate the document 90 degrees and print it, select the Rotate Page 90 degrees check box.
The current settings are displayed in the settings preview on the left side of the Page Setup tab. Note
Note- If you rotate a portrait document 90 degrees and print it at that horizontally, you may be able to save paper depending on the paper size.
 Important
- When you select the Rotate Page 90 degrees check box and print the document, the document will be rotated 90 degrees only if the vertical length of the document fits in the width set in Roll Paper Width.
Therefore to use this function, correctly set Roll Paper Width to the width of one of the roll papers loaded in the printer.Document
Roll Width:
ISO A1/A2 Roll (594.0 mm)


- If the roll papers loaded in the upper and lower levels are different media types, the document is printed on the roll paper that matches the media type specified in the print job.
If the document is being rotated 90 degrees for printing and the roll papers loaded in the upper and lower levels have different widths and different media types, set the correct combination of width and media type so that they match one of the roll papers loaded in the printer.
Complete the setup
Click OK.
When you print, the paper source is switched automatically to roll paper.
 Important
- On the operation panel, if Printer settings -> Paper-related settings -> Roll paper auto switching is set to Do not identify size, the document may be printed on the unintended roll paper. Canon recommends that you set this setting to Identify size before you print.
- 2-level roll switching is not possible when the paper rolls being fed on the platen are not compatible with automatic cut-off. For checking which types of paper are compatible with automatic cut-off, look up the paper you want to use on the "Paper Information List."
- If Auto (Use Printer Settings) is selected for Media Type in the Main sheet, you cannot switch between upper and lower rolls corresponding to the media type specified by the print job. If different types of roll paper are set for the upper and lower rolls, specify the media type, such as plain paper or enameled paper, in Media Type.
 Note
Note
- For details about how to switch the source levels depending on the print job, see "How to Switch Paper Rolls."
Printing by Saving Paper
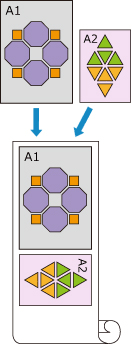
Depending on the paper size that was specified in the print job, the printer automatically identifies the roll paper that will produce the smaller margins.
Whether or not the page is rotated 90 degrees, the printer prints using conditions that produce the smallest paper margins from among the Roll1 and Roll2 combinations.
|
Document |
|

|

|
|
Roll 1: ISO A1/A2 |
Roll 2: ISO A3/A4 |
Display the Devices and Printers window
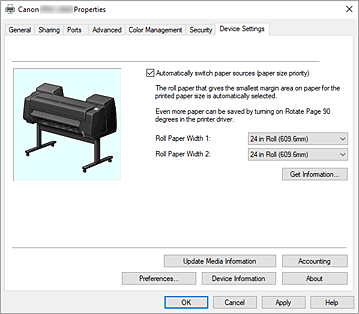
Select the Control Panel -> Hardware and Sound (Hardware) -> Devices and Printers.
The Devices and Printers window is displayed.Display setup window
Right-click the "Your model name" icon, and select Printer properties.
The printer's Properties window appears.Set automatic paper source switching
On the Device Settings tab, select the Automatically switch paper sources (paper size priority) check box.

Click Get Information...
When the confirmation message appears, click Yes.
Your computer gets the paper size information from the printer and displays the width of the roll paper that is actually loaded in the printer. Important
- When you replace the roll paper loaded in the printer, always click Get Information... to obtain the roll paper width information. If the roll paper width is not set correctly, you may not be able to print the document as intended.
Open the printer driver setup window
Select the media type
The type of paper set in the printer is displayed.
Select the paper size
From the Page Size list on the Page Setup tab, select the same size as that of the document that was created with the application software.
For Paper Source, select Roll Paper (Auto)
Select roll paper width
For Roll Paper Width, select the width of the roll paper loaded in the printer.
Set the other items
To rotate the document 90 degrees and print it, select the Rotate Page 90 degrees check box.
Complete the setup
Click OK.
When you print, the paper source is switched automatically to roll paper.
 Important
- This method switches the upper and lower levels depending on the paper size specified in the print job. Always load the same media type for the roll papers in the upper and lower levels of the printer.
If different types of paper are loaded, an error could occur and you may not be able to print the document as intended. - If roll papers of the same width and type are loaded in the upper and lower levels and you want to automatically switch the roll papers, clear the Automatically switch paper sources (paper size priority) check box.
 Note
Note
- If Roll 1 and Roll 2 produce the same margins, Roll 1 is used for printing.
