Setting Accounting Information
By setting accounting information, you add IDs to print jobs, and use the printer and cost management tool to tabulate print history information for any ID.
The procedure for setting accounting information is described below.
Setting Accounting Information
Open the printer driver setup window
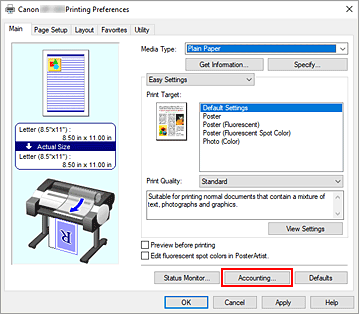
Click Accounting... on the Main tab

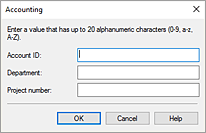
The Accounting dialog box opens.

If necessary, complete the following settings:
- Account ID/Department/Project number
- Enter the account ID, department, and project number that you want to set. Enter the ID by using up to 20 alphanumeric characters (0 to 9, a to z, and A to Z).
Fix Accounting
Display the Devices and Printers window
Select the Control Panel -> Hardware and Sound (Hardware) -> Devices and Printers.
The Devices and Printers window is displayed.Display setup window
Right-click the "Your model name" icon, and select Printer properties.
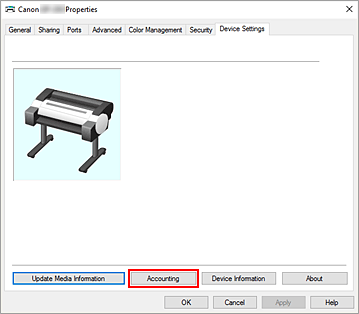
The printer's properties window appears.Click Accounting on the Device Settings tab

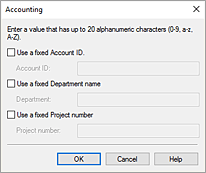
The Accounting dialog box opens.

If necessary, complete the following settings:
- Use a fixed Account ID./Use a fixed Department name./Use a fixed Project number.
-
Prohibits changes to account ID, department, and project number that have already been set.
Check this check box to prevent other users from changing IDs.- Account ID/Department/Project number
-
Enter the account ID, department, and project number that you want to set. Enter the ID by using up to 20 alphanumeric characters (0 to 9, a to z, and A to Z).
If you've added checkmarks to Use a fixed Account ID., Use a fixed Department name., or Use a fixed Project number., you'll be able to configure each setting.
After completing the setting, click OK to return to the Device Settings tab.
Apply the settings
Click OK or Apply.
The settings are enabled hereafter.
 Important
- If you fix the Accounting value in the Device Settings tab, the setting items in the Accounting dialog box in the Main tab will be grayed out and disabled.

