Adjusting Color Balance Using Sample Patterns (Printer Driver)
You can look at the print results of pattern print and adjust the color balance.
When you change the color balance or intensity/contrast of a document, the pattern print function prints the adjustment results in a list, together with the adjustment values.
Open the printer driver setup window
Select the manual color adjustment
On the Main tab, select Manual for Color/Intensity, and click Set....
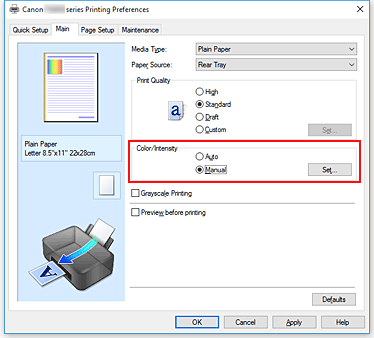
The Manual Color Adjustment dialog box opens.
Selecting pattern print
On the Color Adjustment tab, select the Print a pattern for color adjustment check box, and click Pattern Print preferences....
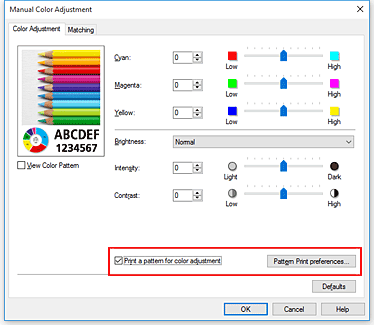
Setting pattern print
When the Pattern Print dialog box opens, set the following items, and then click OK.
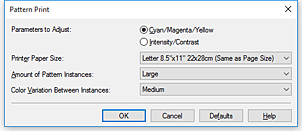
- Parameters to Adjust
-
Select Cyan/Magenta/Yellow.
 Important
- When the Grayscale Printing check box on the Main tab is checked, Cyan/Magenta/Yellow appear grayed out and are unavailable.
- Printer Paper Size
-
Select the paper size to be used for pattern printing.
 Note
Note- Depending on the paper size selected on the Page Setup tab, there may be sizes that cannot be selected.
- Amount of Pattern Instances
-
Select Largest, Large, or Small to set the number of patterns to be printed.
 Note
Note- Largest and Large cannot be selected when certain paper sizes or output paper sizes are selected.
- Color Variation Between Instances
-
Set the amount of color change between neighboring patterns.
 Note
Note- Large is about double the size of Medium, and Small is about half the size of Medium.
Checking the print results of pattern print
On the Color Adjustment tab, select OK to close the Manual Color Adjustment dialog box.
On the Main tab, select OK, and then execute printing. The printer then prints a pattern in which the color balance that you set is the center value.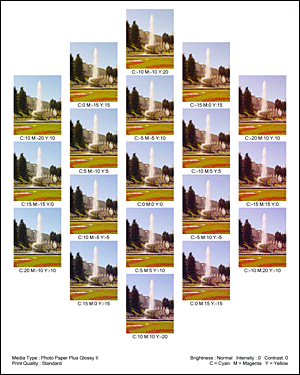
 Important
- Normally, patterns are printed with the color balance settings as the center values. However, when Black Only is selected for Print With on the Print Options dialog box, the color balance settings are not applied to pattern printing.
Adjusting the color balance
Look at the print results and select the image that you like best. Then enter the color balance numbers indicated at the bottom of that image into the Cyan, Magenta, and Yellow fields on the Color Adjustment tab.
Clear the Print a pattern for color adjustment check box, and click OK.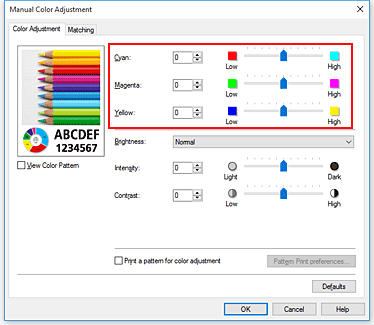
 Note
Note- You can also set color balance on the Quick Setup tab by choosing Photo Printing under Commonly Used Settings, and then choosing Color/Intensity Manual Adjustment under Additional Features.
Complete the setup
Click OK on the Main tab.
Then when you execute printing, the document is printed with the color balance that was adjusted by the pattern print function.
 Important
- When Print a pattern for color adjustment is selected on the Color Adjustment tab, the following items are grayed out and cannot be set:
- Preview before printing on the Main tab
- Stapling Side and Specify Margin... on the Page Setup tab (When Duplex Printing (Manual) is set, only Stapling Side can be set.)
- You can print a pattern only if the Page Layout setting on the Page Setup tab is Normal-size or Borderless.
- When the Grayscale Printing check box on the Main tab is checked, Cyan, Magenta, and Yellow appear grayed out and are unavailable.
- Depending on your application software, this function may not be available.

