
Adjusting Print Head Position
Any error in the print head installation position can cause color and line shifts. Adjusting the print head position improves print results.
Print head position can be adjusted either automatically or manually.
This section describes the procedure for adjusting the head position manually.
 Print Head Alignment
On Maintenance tab, click Custom Settings
The Custom Settings dialog box appears.
Set to manual adjustment
Select Align heads manually.
Apply settings
Click OK. When the confirmation message appears, click OK.
On Maintenance tab, click Print Head Alignment
The Start Print Head Alignment dialog box appears.
Load paper in printer
In the rear tray, load 3 sheets of plain A4-sized or Letter-sized paper.
Run head position adjustment
Check that the printer power is on, and then click Align Print Head. Perform the necessary operations by following the message instructions.
 Important
- While the printer is printing, do not open the printer cover.
Check printed patterns
In each entry field, enter the number of the pattern with the least prominent streaks or stripes from among the printed patterns.
You can also enter numbers into the entry fields automatically by clicking relevant pattern in the preview.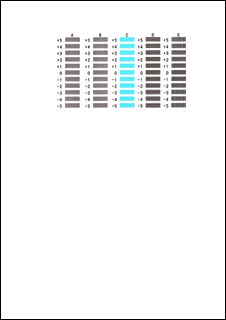
After completing the entries, click OK.
 Note
Note- If the patterns are not uniform, select the pattern with the least prominent vertical streaks.
(A) Less prominent vertical streaks
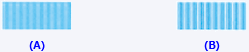
(B) More prominent vertical streaks - If the patterns are not uniform, select the pattern with the least prominent horizontal stripes.
(A) Less prominent horizontal stripes

(B) More prominent horizontal stripes
- If the patterns are not uniform, select the pattern with the least prominent vertical streaks.
Check message content, and click OK
The print head adjustment patterns on the second sheet are printed.
Important- While the printer is printing, do not open the printer cover.
Check printed patterns
In each entry field, enter the number of the pattern with the least prominent streaks from among the printed patterns.
You can also enter numbers into the entry fields automatically by clicking relevant pattern in the preview.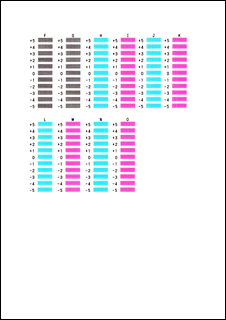
After completing the entries, click OK.
Note- If the patterns are not uniform, select the pattern with the least prominent vertical streaks.
(A) Less prominent vertical streaks
(B) More prominent vertical streaks
- If the patterns are not uniform, select the pattern with the least prominent vertical streaks.
Check message content, and click OK
The print head adjustment patterns on the third sheet are printed.
Important- While the printer is printing, do not open the printer cover.
Check printed patterns
In each entry field, enter the number of the pattern with the least prominent horizontal stripes from among the printed patterns.
You can also enter numbers into the entry fields automatically by clicking relevant pattern in the preview.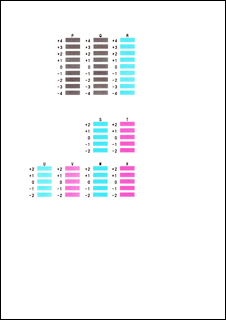
After completing the entries, click OK.
Note- If the patterns are not uniform, select the pattern with the least prominent horizontal stripes.
(A) Less prominent horizontal stripes

(B) More prominent horizontal stripes
- If the patterns are not uniform, select the pattern with the least prominent horizontal stripes.
![]() Note
Note
- In the Start Print Head Alignment dialog box, click Print Alignment Value to print the current settings so that you can check the settings.
